
Horizons & Verticals
We’re starting our weekly topics with something fundamental, but it can have a dramatic impact on the look of your photograph. We will explore how the angle from which we hold our phone or camera affects the lines and edges in the image.
The Power of Horizontal Lines
A horizontal line in a photograph implies stability and tranquillity. It can convey the feeling of eternity or a frozen moment, which is the essence of photography. It transmits a static atmosphere to the viewer. Level horizontal lines provide a feeling of balance, while even slightly tilted horizons can create a sense of unease. A static look to your shots can be desirable or limiting, depending on your creative vision. To create more dynamic compositions, photographers often incorporate other elements that intersect with the horizon, introducing tension and visual interest.
Horizontal lines also serve practical compositional purposes by acting as dividers, breaking an image into separate portions. In landscape photography, the horizon line separates land or sea from sky, creating distinct zones within the photograph.
We’ll get the obvious one out of the way: Horizons.
The horizon is the most fundamental horizontal line in photography. It provides viewers a natural reference point, anchoring the composition and establishing a sense of place. When working with horizons, photographers must decide where to position this line within the frame. Placing it centrally creates symmetry and balance, while positioning it lower emphasises the sky and higher emphasises the foreground.
Most of the time, you want the horizon to be level. A slightly wonky horizon tends to draw the eye and creates a sense of unease, especially for a viewer who likes photography. It will immediately distract from your actual photograph. It’s a bit like the visual equivalent of nails on a blackboard.
Luckily, your phone and most digital cameras have a grid you can turn on to help with composition. On the iPhone, it’s in Settings > Camera > Grid. This displays a 3x3 ‘noughts & crosses’ grid, perfect for checking your image's horizon and other lines.
However, sometimes, you might want to tilt the horizon in a photo deliberately, for dramatic effect—and this is perfectly okay; we won’t judge! The key is to make it evident that this is an intentional feature… go big or go home, basically.


Vertical Lines: Creating Height and Drama
While horizontal lines suggest stability, vertical lines draw the eye upward through the frame, often creating a sense of scale and grandeur. By emphasising perspective, they can make objects appear taller than they actually are. Vertical lines are particularly effective at conveying strength and power, serving as a visual metaphor for growth and aspiration. In urban environments, vertical lines dominate in the form of skyscrapers, lampposts, and architectural elements. In natural settings, they appear as trees, waterfalls, and cliff faces. These elements can create striking patterns within images and establish visual rhythm through repetition.
The way your phone is tilted up or down will dramatically affect how vertical lines appear in your photograph:
If you tilt your phone so it looks up at your subject, vertical lines will appear to converge towards the top of the frame. A good example is looking up at trees or buildings. This can emphasise looming, tall subjects or make a person’s pose seem more heroic or important. On the other hand, if you’re shooting architecture or an indoor subject, it can be nearly as distracting as the wonky horizon.
If your phone is tilted to look down at your subject, the opposite occurs, and lines appear to spread out towards the top of the frame. This can be used to emphasise certain parts of the image for dramatic effect, or make a subject seem small, dwarfed by its surroundings. But, it can look awkward when taking pictures of children or pets (it's best to be at their eye level) and it will mess with the vertical lines of indoor photographs.
Practical Applications for Smartphone Photography
Today's smartphone cameras offer powerful tools for exploring linear composition. Here are some practical considerations for incorporating horizontal and vertical lines into your mobile photography:
Utilising the Grid Overlay
So, how do you straighten things up? Hold the phone so that it is perfectly upright, parallel to the walls, trees, people or whatever it is you are shooting.
Most smartphone cameras include a grid overlay option that divides the screen into thirds both horizontally and vertically. Enabling this feature helps ensure that horizons are level and vertical elements are correctly aligned. It also helps in placing key elements at intersection points to create balanced compositions. On the iPhone, it’s in Settings > Camera > Grid.
The grid will help you check that your verticals are vertical, and many phones and cameras have an electronic level that you can switch on to indicate how your phone is tilted. Settings > Camera > Level on the iPhone.
For very tricky shots, or where getting your lines right is critically important, using a tripod or a tabletop stand to keep your camera steady is a good idea.
Exploring Perspective
Experiment with different shooting angles to emphasise horizontal or vertical lines. Photographing buildings from below, for instance, accentuates vertical lines and creates a sense of height and grandeur. Conversely, photographing from an elevated position can emphasise horizontal planes and create a more expansive feel.
Correcting and Enhancing Linear Elements
Editing apps, such as Snapseed, offer tools specifically designed for adjusting linear elements. When photographing architecture, use straightening tools to correct slightly crooked horizons and perspective correction features to address converging vertical lines. However, consider whether these corrections serve your creative intent—sometimes, embracing natural perspective distortion can create more dynamic images.
Finding Lines in Unexpected Places
While obvious sources of lines exist in architecture and landscapes, train yourself to notice more subtle linear elements: shadows cast across pavements, the pattern of light through blinds, or the arrangement of objects on a table. These elements can create compelling compositional structures even in seemingly ordinary scenes.
Famous Photographers and Iconic Images
Hiroshi Sugimoto has created one of the most recognisable bodies of work centred on the horizon line. His "Seascapes" series, begun in the 1980s, features minimalist black-and-white photographs in which the horizon bisects the frame, separating water from sky. Through their stark simplicity, these meditative images explore the relationship between time, space, and perception.
Sugimoto writes of his seascapes: "Every time I view the sea, I feel a calming sense of security, as if visiting my ancestral home; I embark on a voyage of seeing". His work demonstrates how the horizontal line can transcend a mere compositional device to become a philosophical exploration of liminality and diasporic identity.
Ansel Adams, the renowned landscape photographer, masterfully employed horizontal lines to capture the grandeur of the American West. His black-and-white landscapes often feature strong horizontal elements that create a sense of expansiveness and depth. Adams' work with the Zone System allowed for unprecedented control over tonal range, enabling him to emphasise the subtle gradations along horizontal planes in his compositions.
Edward Weston initially believed that "straight" photography could not successfully deal with landscape, writing in 1922 that "nature unadulterated and unimproved by man—is simply chaos." However, by the mid-1930s, his approach evolved, and his landscapes began to include horizons that "described deep space in a naturalistic way, without sacrificing the formal rigour that he had achieved earlier."
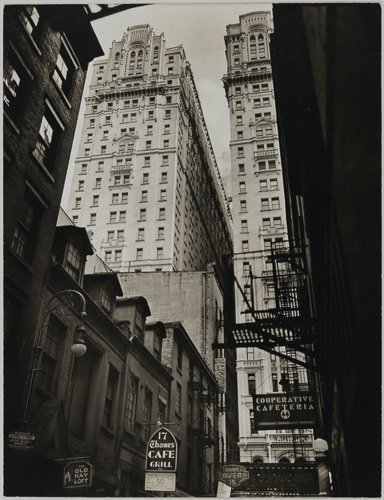
Berenice Abbott created one of the most significant photographic records of New York City's architectural transformation during the early 20th century. After returning from Europe in 1929, she was struck by the city's unprecedented building boom, where hundreds of 19th-century buildings had been razed to make way for dozens of skyscrapers. Her project "Changing New York" documented this vertical expansion of the city's skyline, capturing the dramatic juxtaposition of old and new structures.
Bernd and Hilla Becher systematically photographed industrial structures across Europe and North America for forty years, including water towers, coal bunkers, and factories. Their black-and-white images, often presented in grid formations, emphasise the vertical nature of industrial architecture. The Bechers referred to these structures as "anonymous sculptures," highlighting their sculptural qualities through rigorous photographic documentation. Their work was so effective at illustrating the three-dimensional properties of architecture that they received an award at the Venice Biennale for sculpture rather than photography.
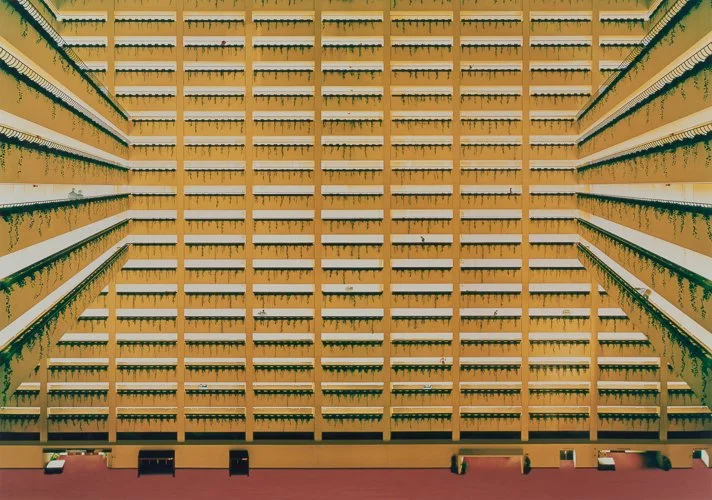
Andreas Gursky, a student of the Bechers, has become known for his large-scale photographs that often feature strong compositional lines. His contemporary work frequently depicts architectural subjects and landscapes with pronounced vertical and horizontal elements. Through their scale and formal precision, Gursky's monumental images explore issues of globalisation and capitalism.


Resources
Here’s a helpful video from Mike Browne, which nicely illustrates how to control your vertical lines in camera: “Converging verticals is when something you know is upright appears to bend together and get thinner in your picture. It can look really cool as an effect, but what if you don't want it? You can buy a specialist lens called a shift lens, which allows you to adjust it to straighten converging verticals. Alternatively, you can straighten them with software, but the straighter you can get them in-camera when taking the photo, the easier it is to tweak them later. Convergence is caused by the camera's sensor not being parallel to the subject being photographed. It often isn't possible to get completely parallel, and that's why software is so brilliant. As you look up or down onto something, the distance between it and your camera sensor varies from top to bottom, causing converging verticals.”
And another by Matthew Anderson, which is a bit more didactic (the target audience is professional architectural photographers) but has some useful material at the beginning: “This video is for the beginners! If you're new to the genre of architecture + design or real estate photography, then this video is for you. We go over multiple ways to make sure your final images are level and the verticals are straight. My name is Matthew and I'm an architecture & interiors photographer based in Kansas City.”
This week’s assignments…
Your brief for this week’s daily photos is to explore how holding the phone affects horizontal and vertical lines. Play around with your phone, and watch how lines shift as you move it. The object of this exercise is to get our eyes tuned in to the lines in our photographs and how they move. Once you notice it, you won’t unsee it!
Let’s see photographs that use this to good effect. A dramatic tilted horizon—maybe to help emphasise action or a moving subject. Use diverging verticals to introduce a bit of drama to woodland or city scenes or to make something look tiny. Take an indoor photo with perfectly aligned walls and doorframes—bonus points for pulling this off; it can be tricky!