
How to Shoot Silhouettes
There is something mildly counterintuitive about silhouette photography. The entire enterprise consists of deliberately making your subject as dark as possible — removing colour, texture, and facial expression, stripping the thing you pointed your camera at down to a flat black shape — and then calling it a success. Against every instinct that photography training tends to instil, you are actively working against the subject being visible. And yet the results, when they work, have an immediate graphic clarity that fully detailed photographs rarely achieve. The outline carries everything.
Technically, a silhouette is straightforward enough: your subject is significantly underexposed relative to the background, to the point where it renders as near-black or pure black. The background — sky, window light, a lamp, a reflective puddle — is exposed correctly or close to it, which means the subject, receiving far less light, goes dark by comparison. It is not a trick exactly; it is a deliberate exploitation of the way a camera's metering system works, or rather a deliberate overriding of it when it tries to be helpful. The camera wants to expose for your subject. You want to expose for everything except your subject. This is a manageable disagreement.
What makes silhouettes particularly accessible — and this is genuinely good news — is that smartphones are, in certain ways, well suited to the technique. The fixed aperture you cannot change, the aggressive face-detection metering that normally fights you, the automatic HDR that compresses everything: these are the features that frustrate smartphone photographers in many situations. For silhouettes, once you know how to override the automatic exposure, the simplicity of the smartphone camera is not a limitation but a convenience. You do not need to think about aperture or depth of field. You need to think about light, outline, and timing. Those are exactly the right things to think about.
What Makes a Good Subject?
The first thing to understand about silhouette subjects is that the outline has to do all the work. In an ordinarily exposed photograph, you have colour, texture, shadow, tonal variation, and sharpness gradients all helping the viewer understand what they are looking at. In a silhouette, you have a black shape. That shape needs to be immediately recognisable and, ideally, interesting on its own terms. This is a higher bar than it sounds.
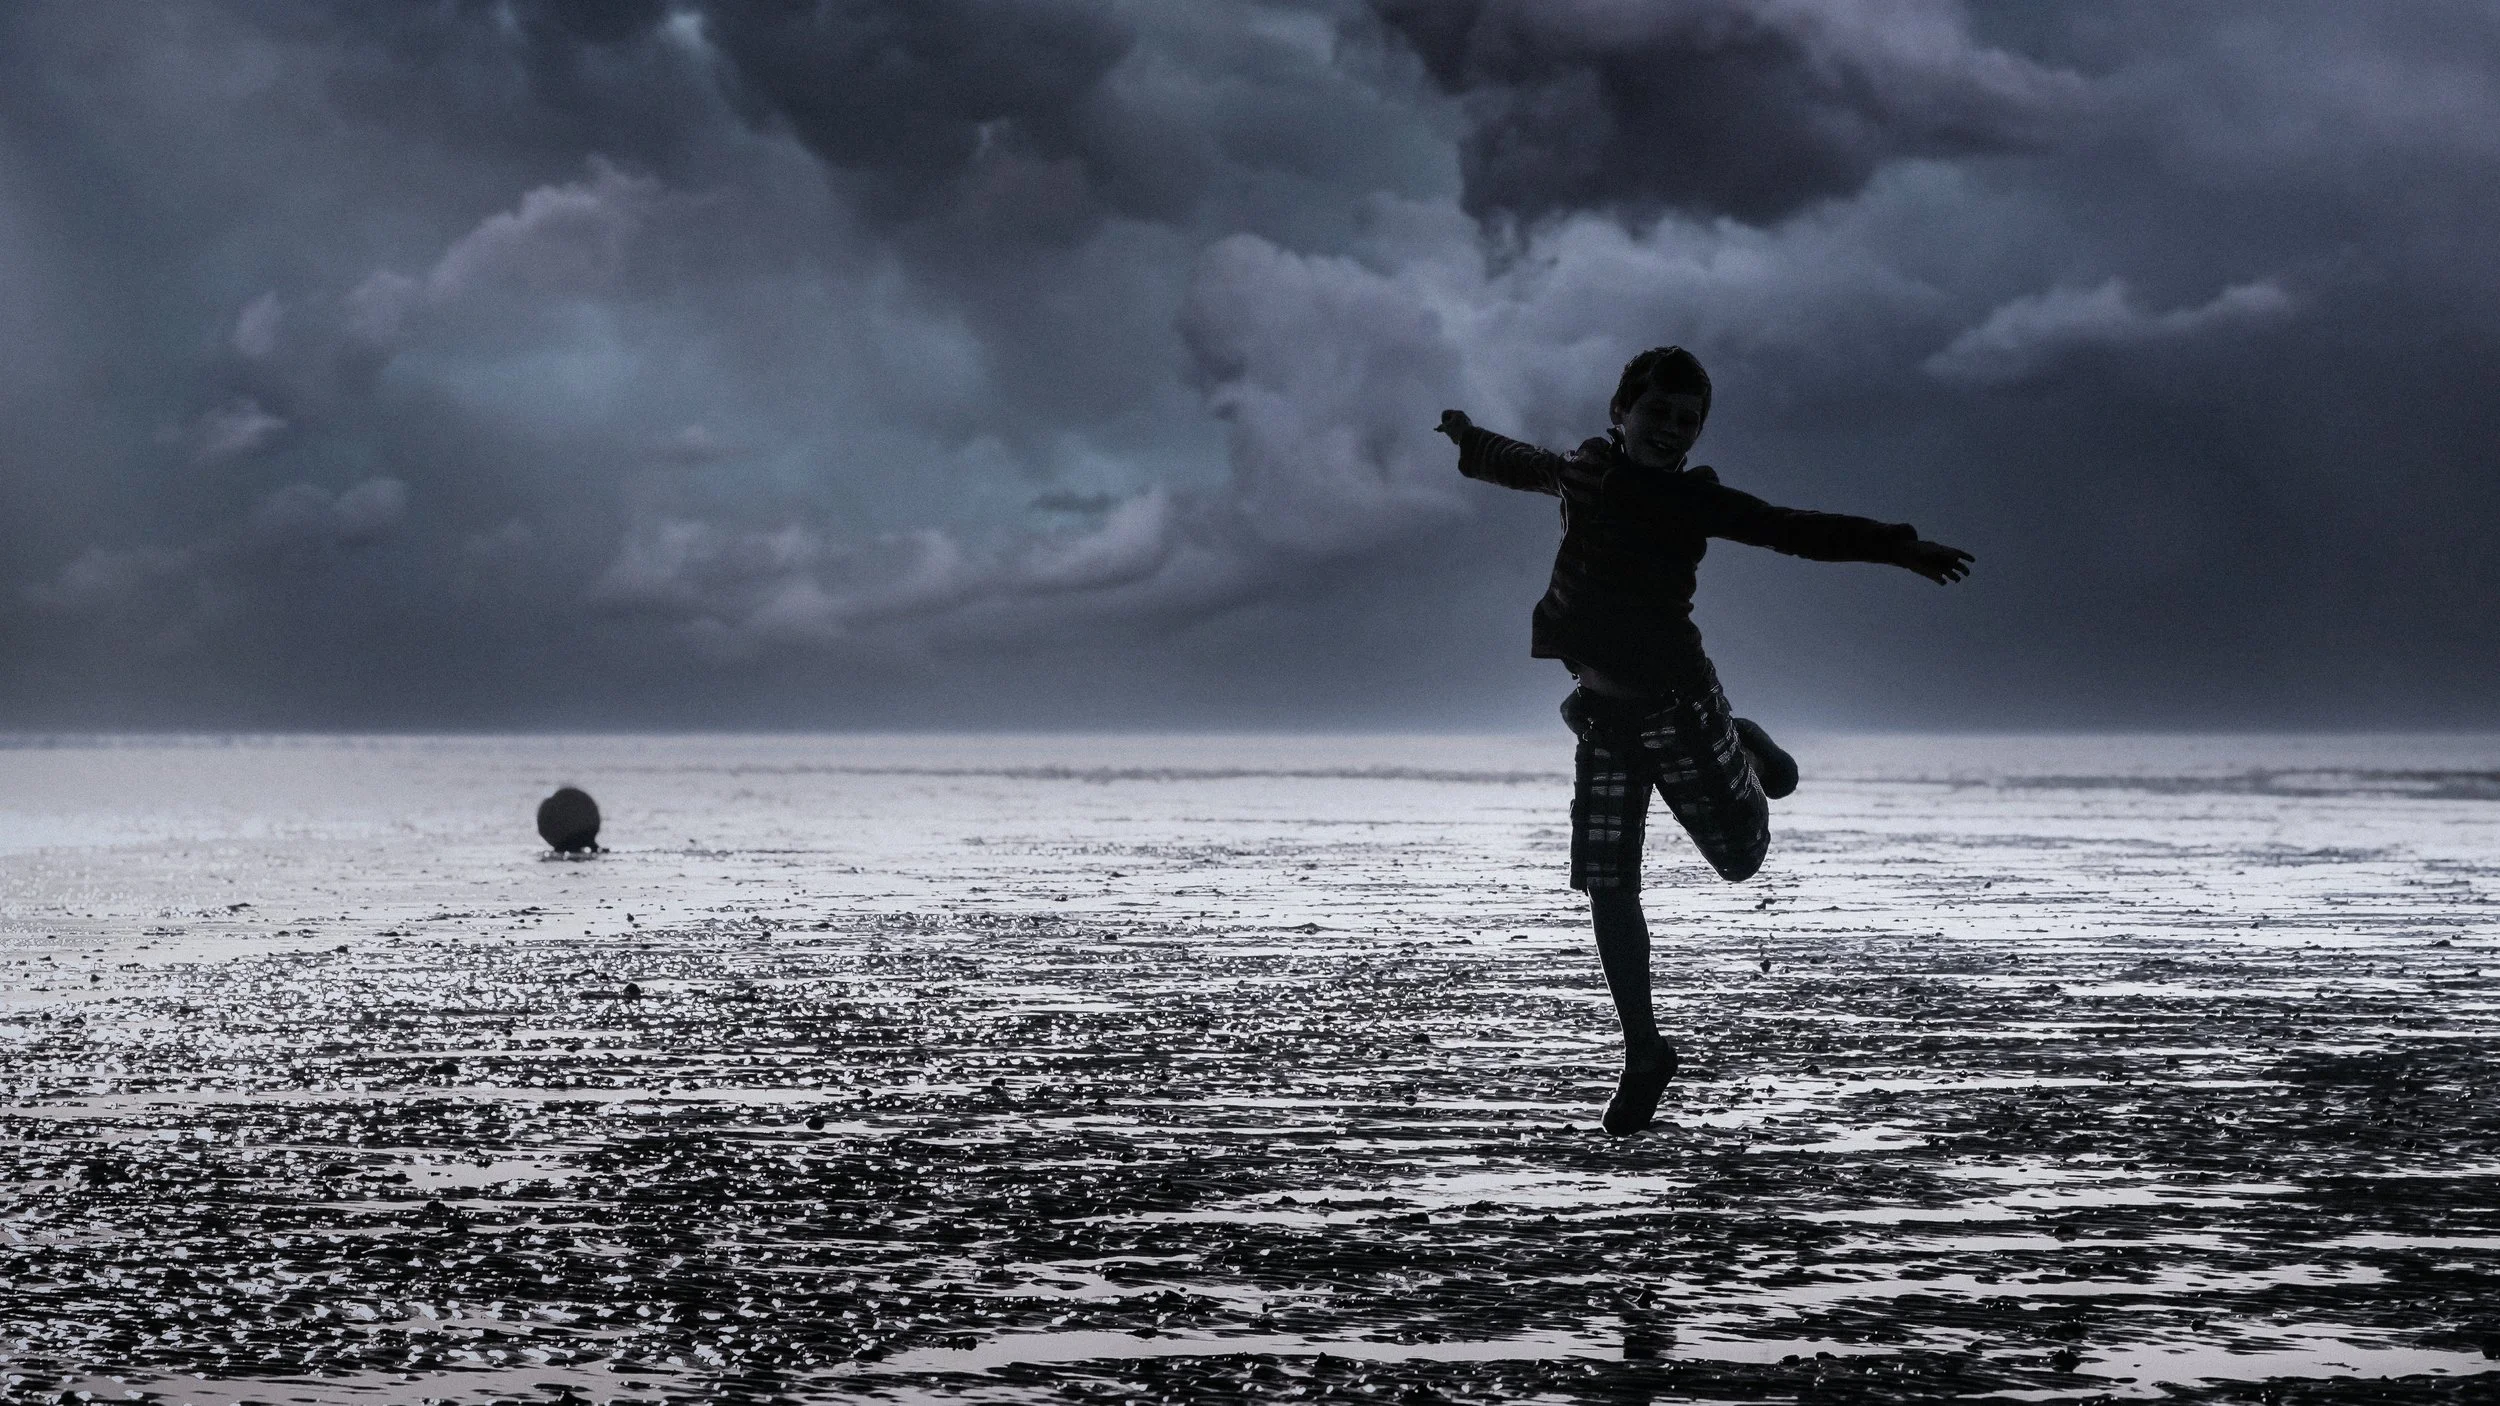
The outline carries the entire communicative load. Without internal detail, a face becomes a profile; a body becomes a pose; a tree becomes a pattern of branches. If the outline is ambiguous — if the shape alone does not clearly read as what it is — the image does not work. A frontal photograph of a person with their arms at their sides produces a silhouette that looks like a dark rectangle. A profile with one arm raised tells you something. A figure mid-jump, arms out, is unmistakable. The same person, completely different image.
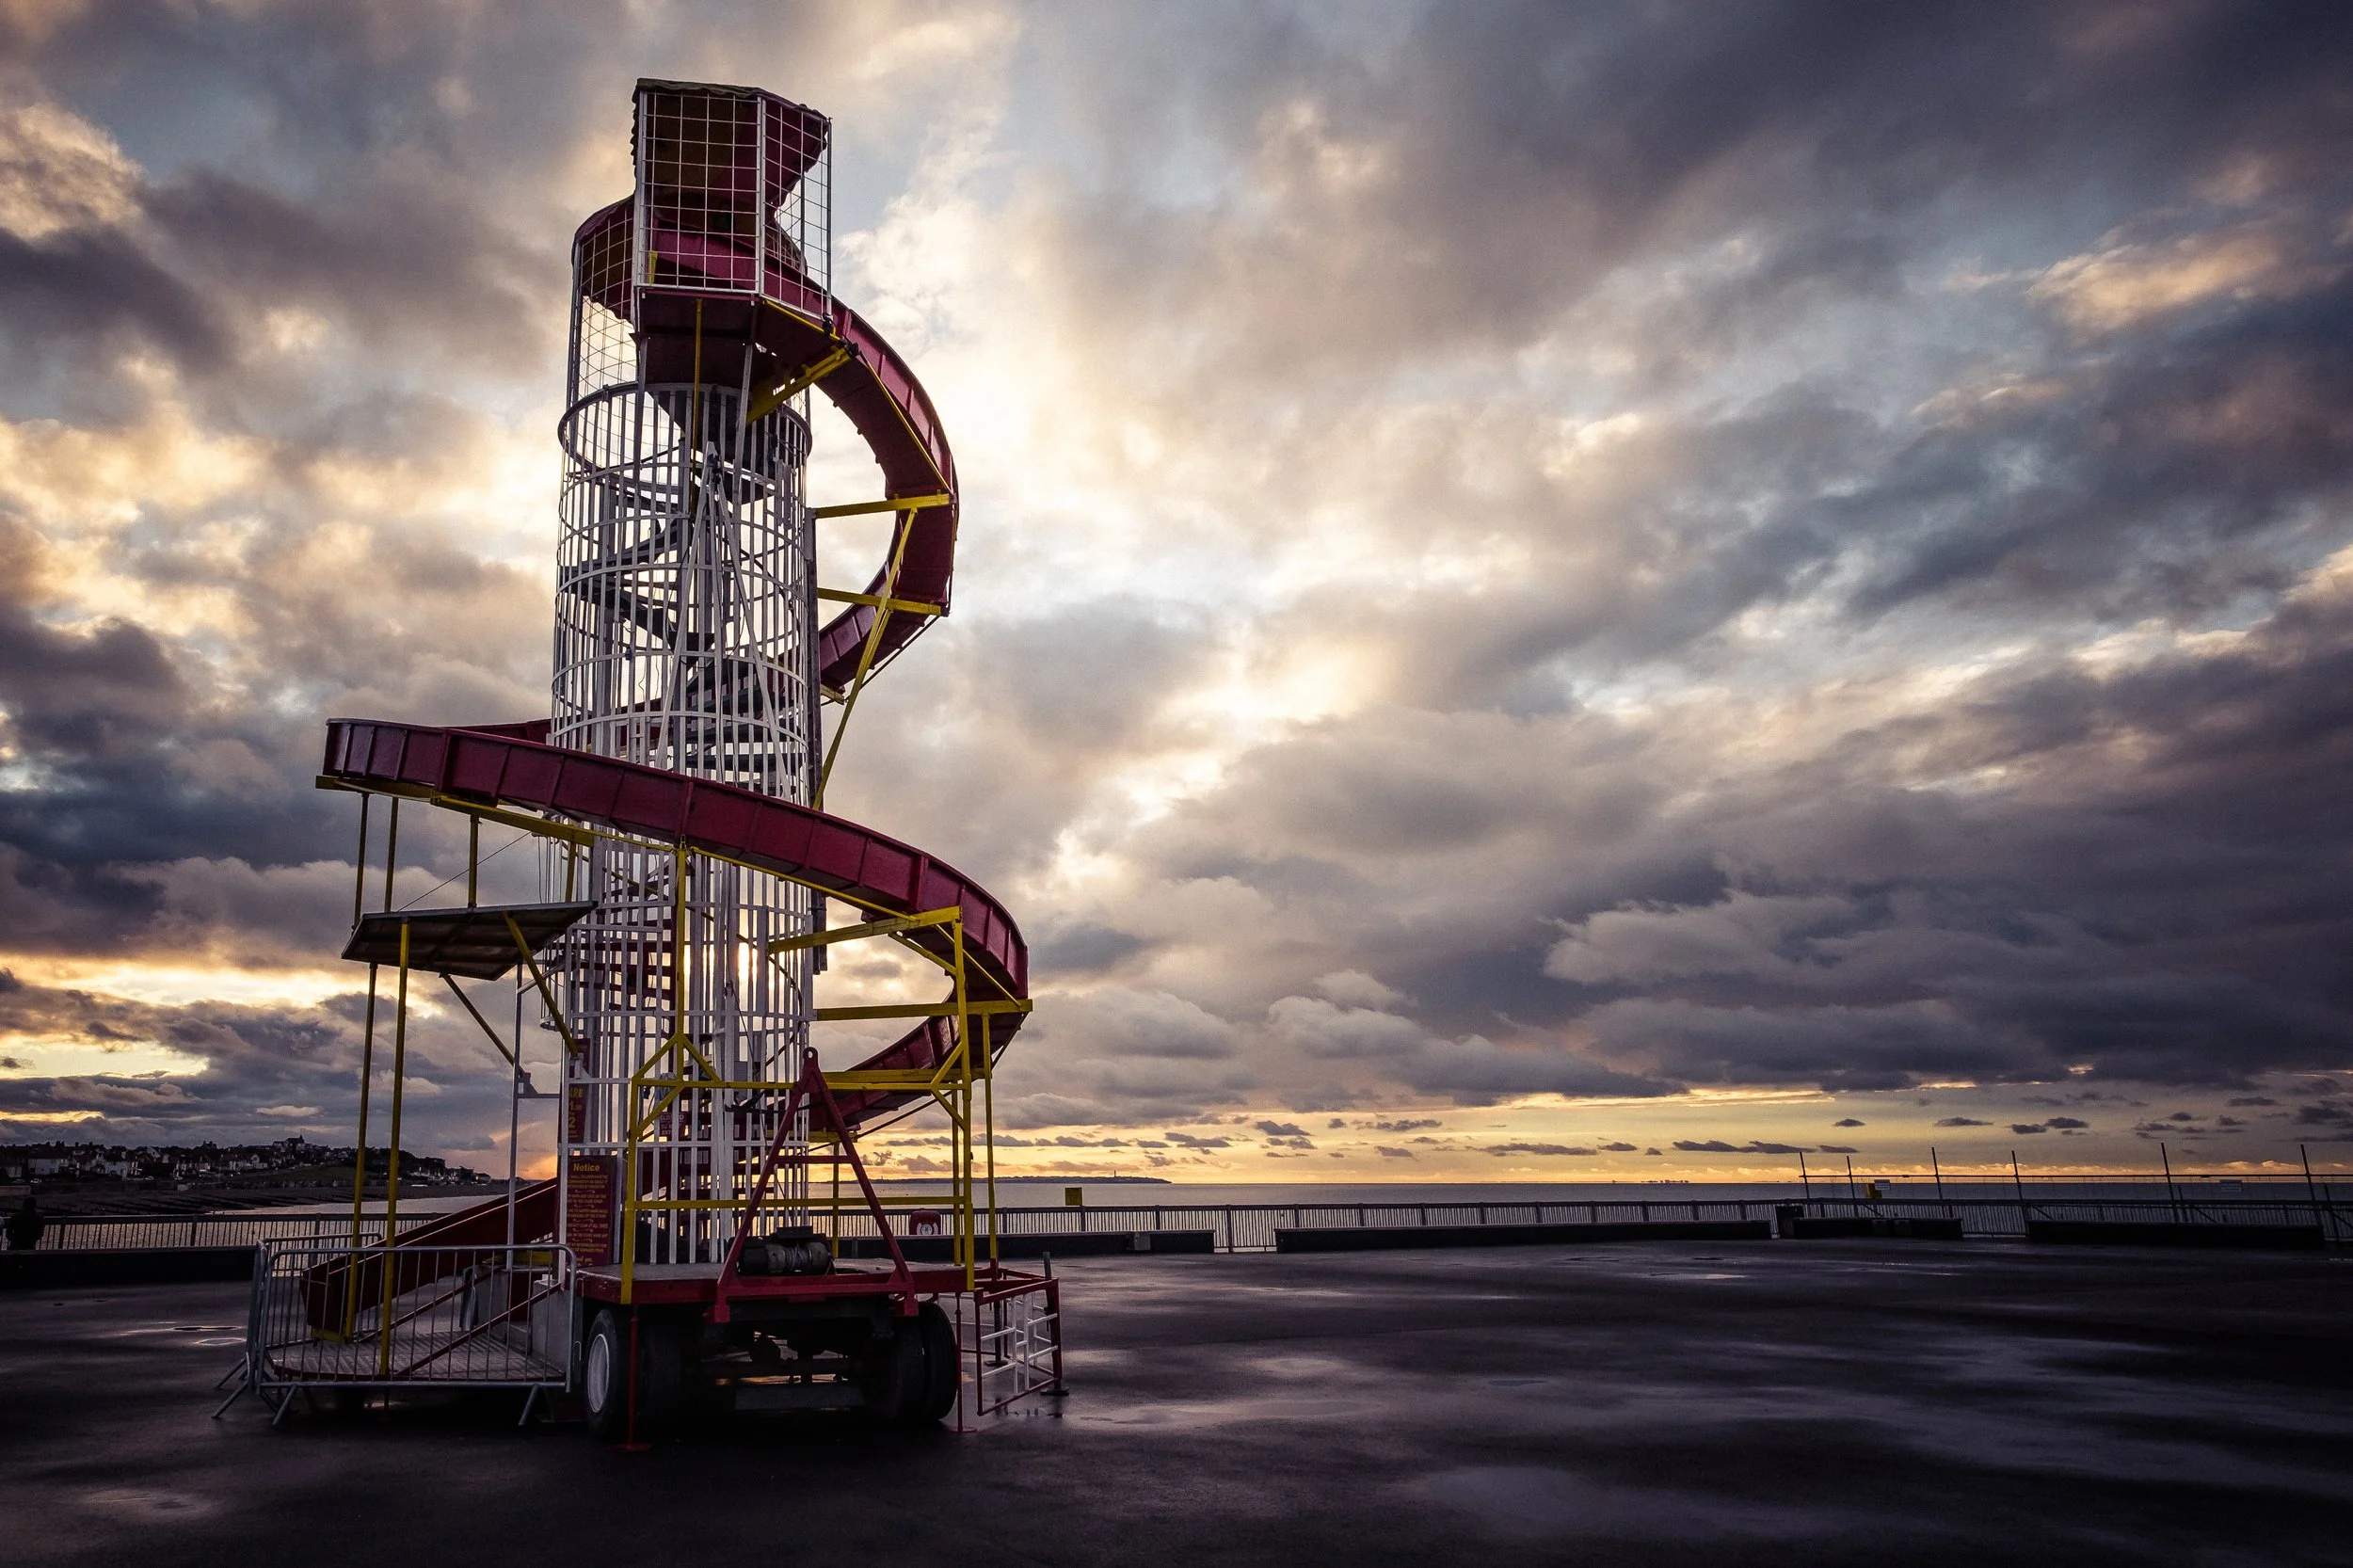
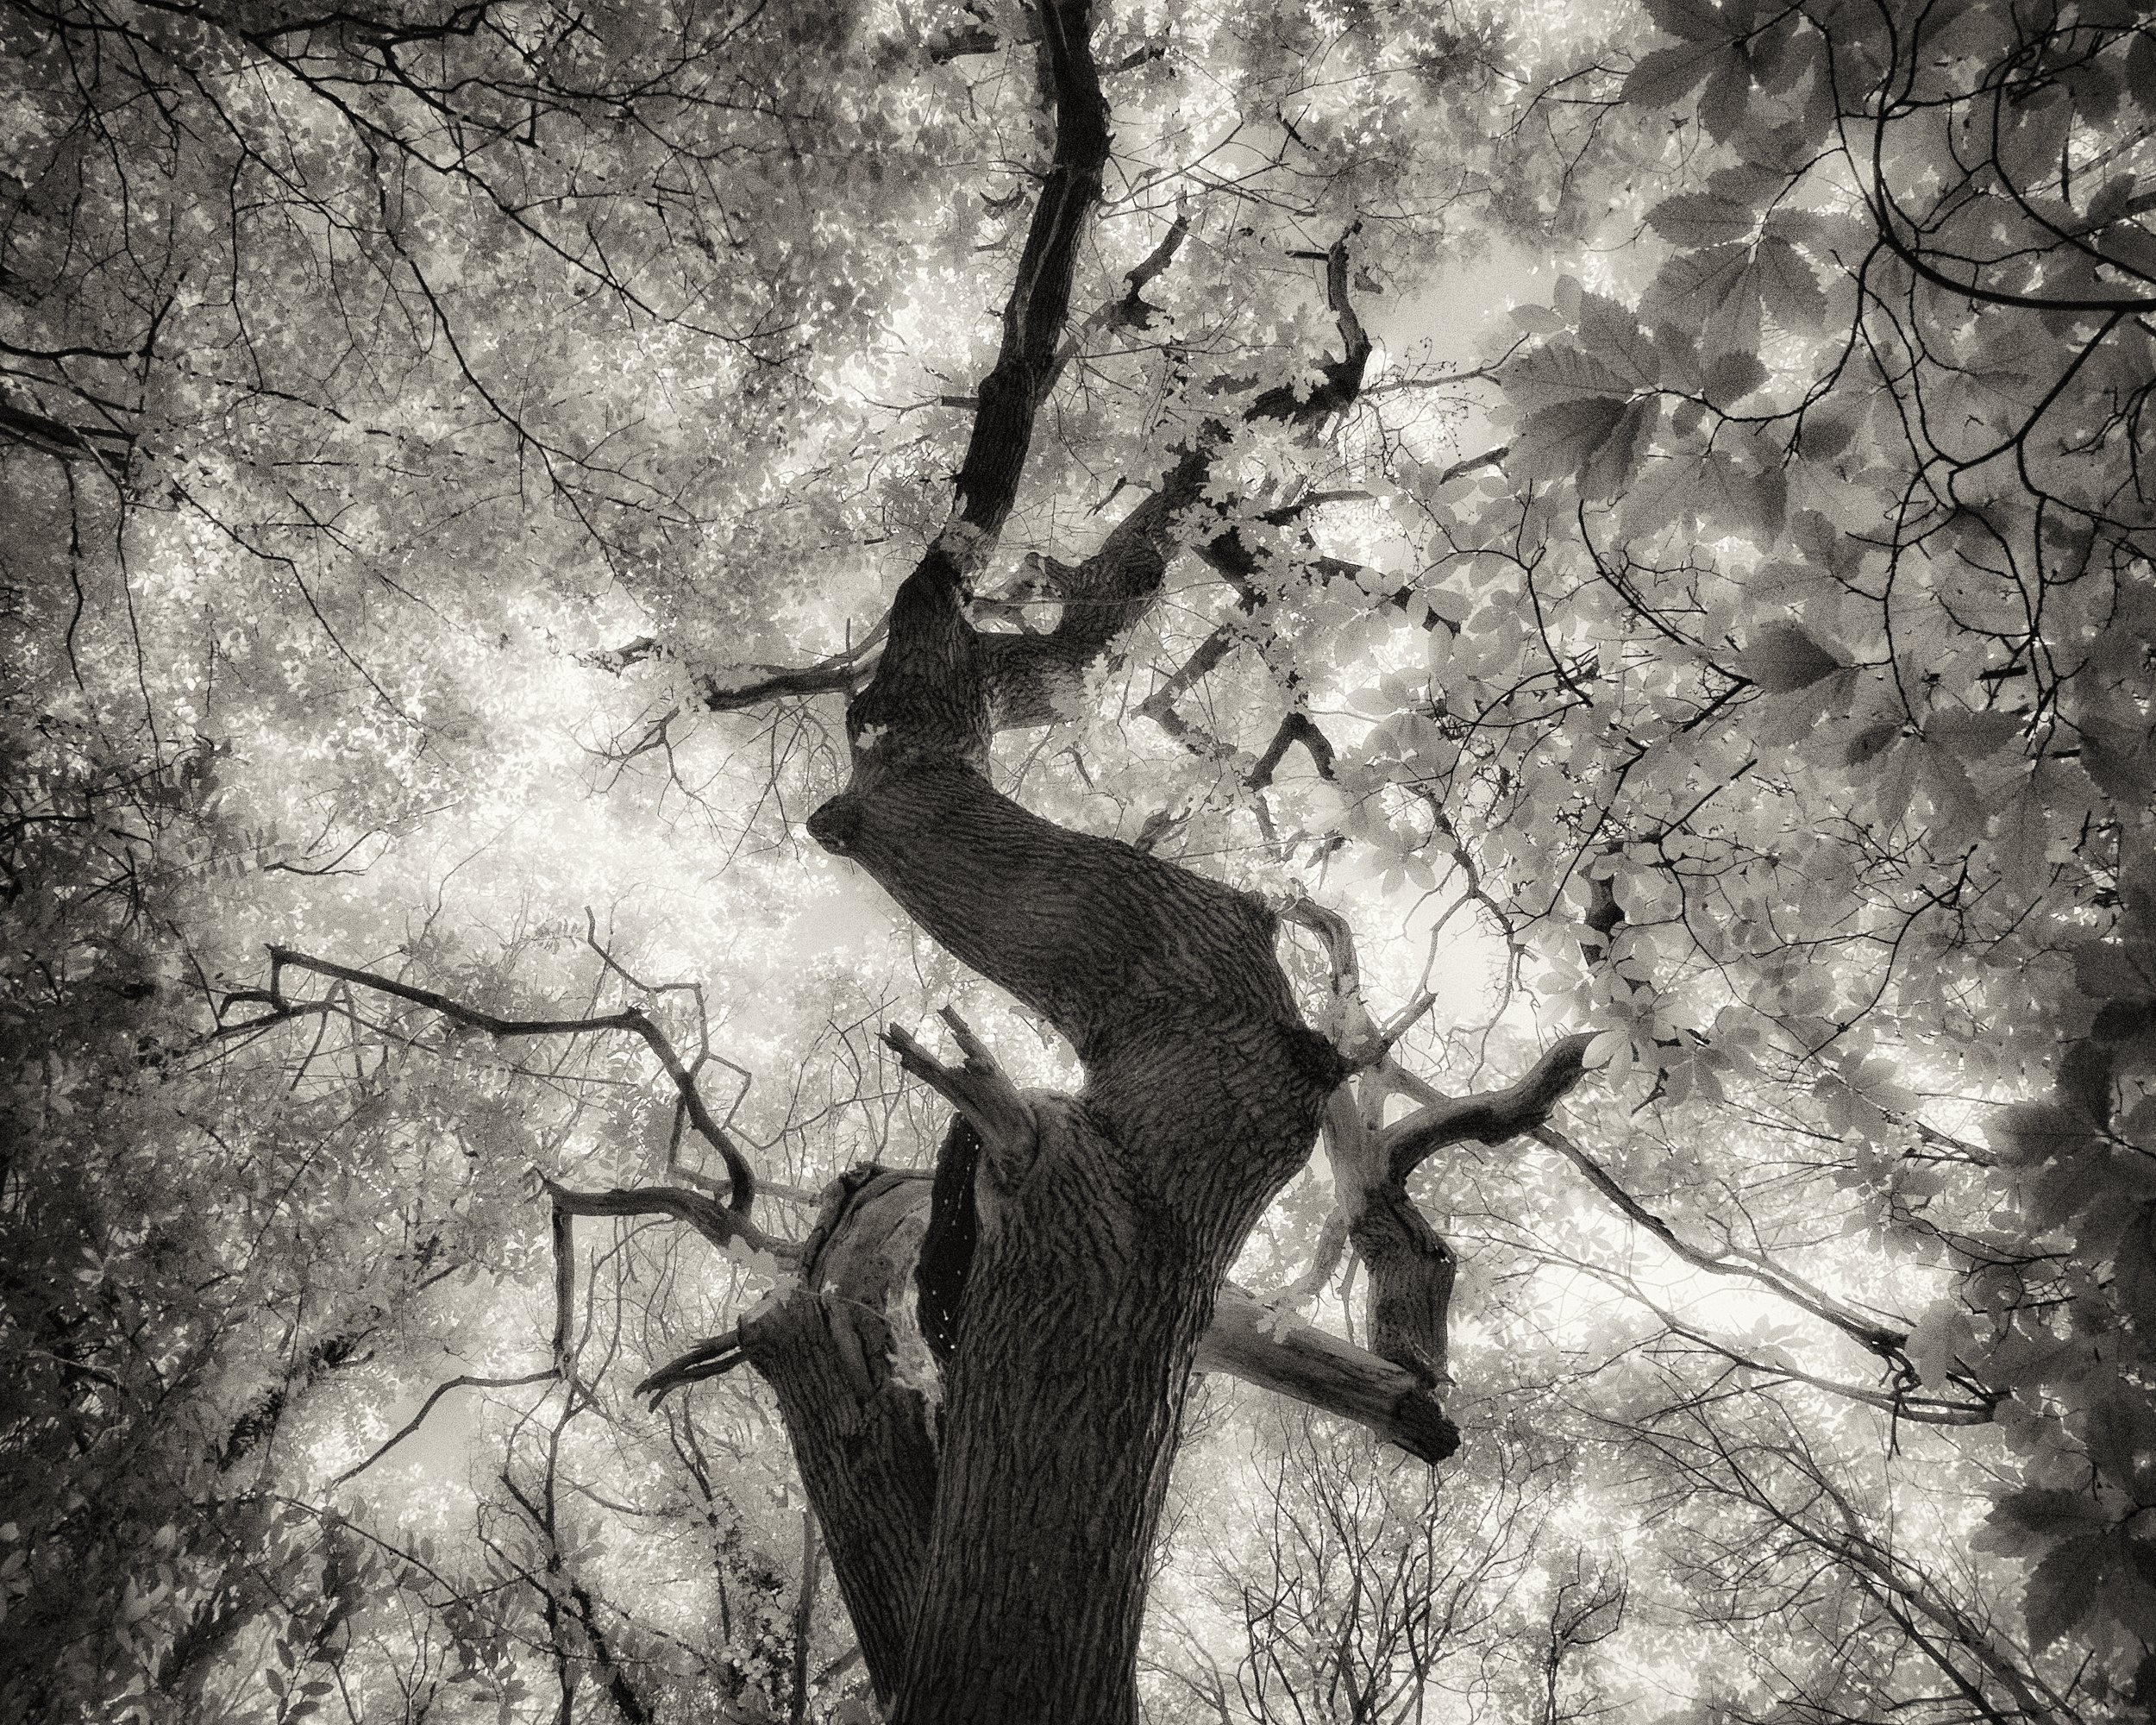
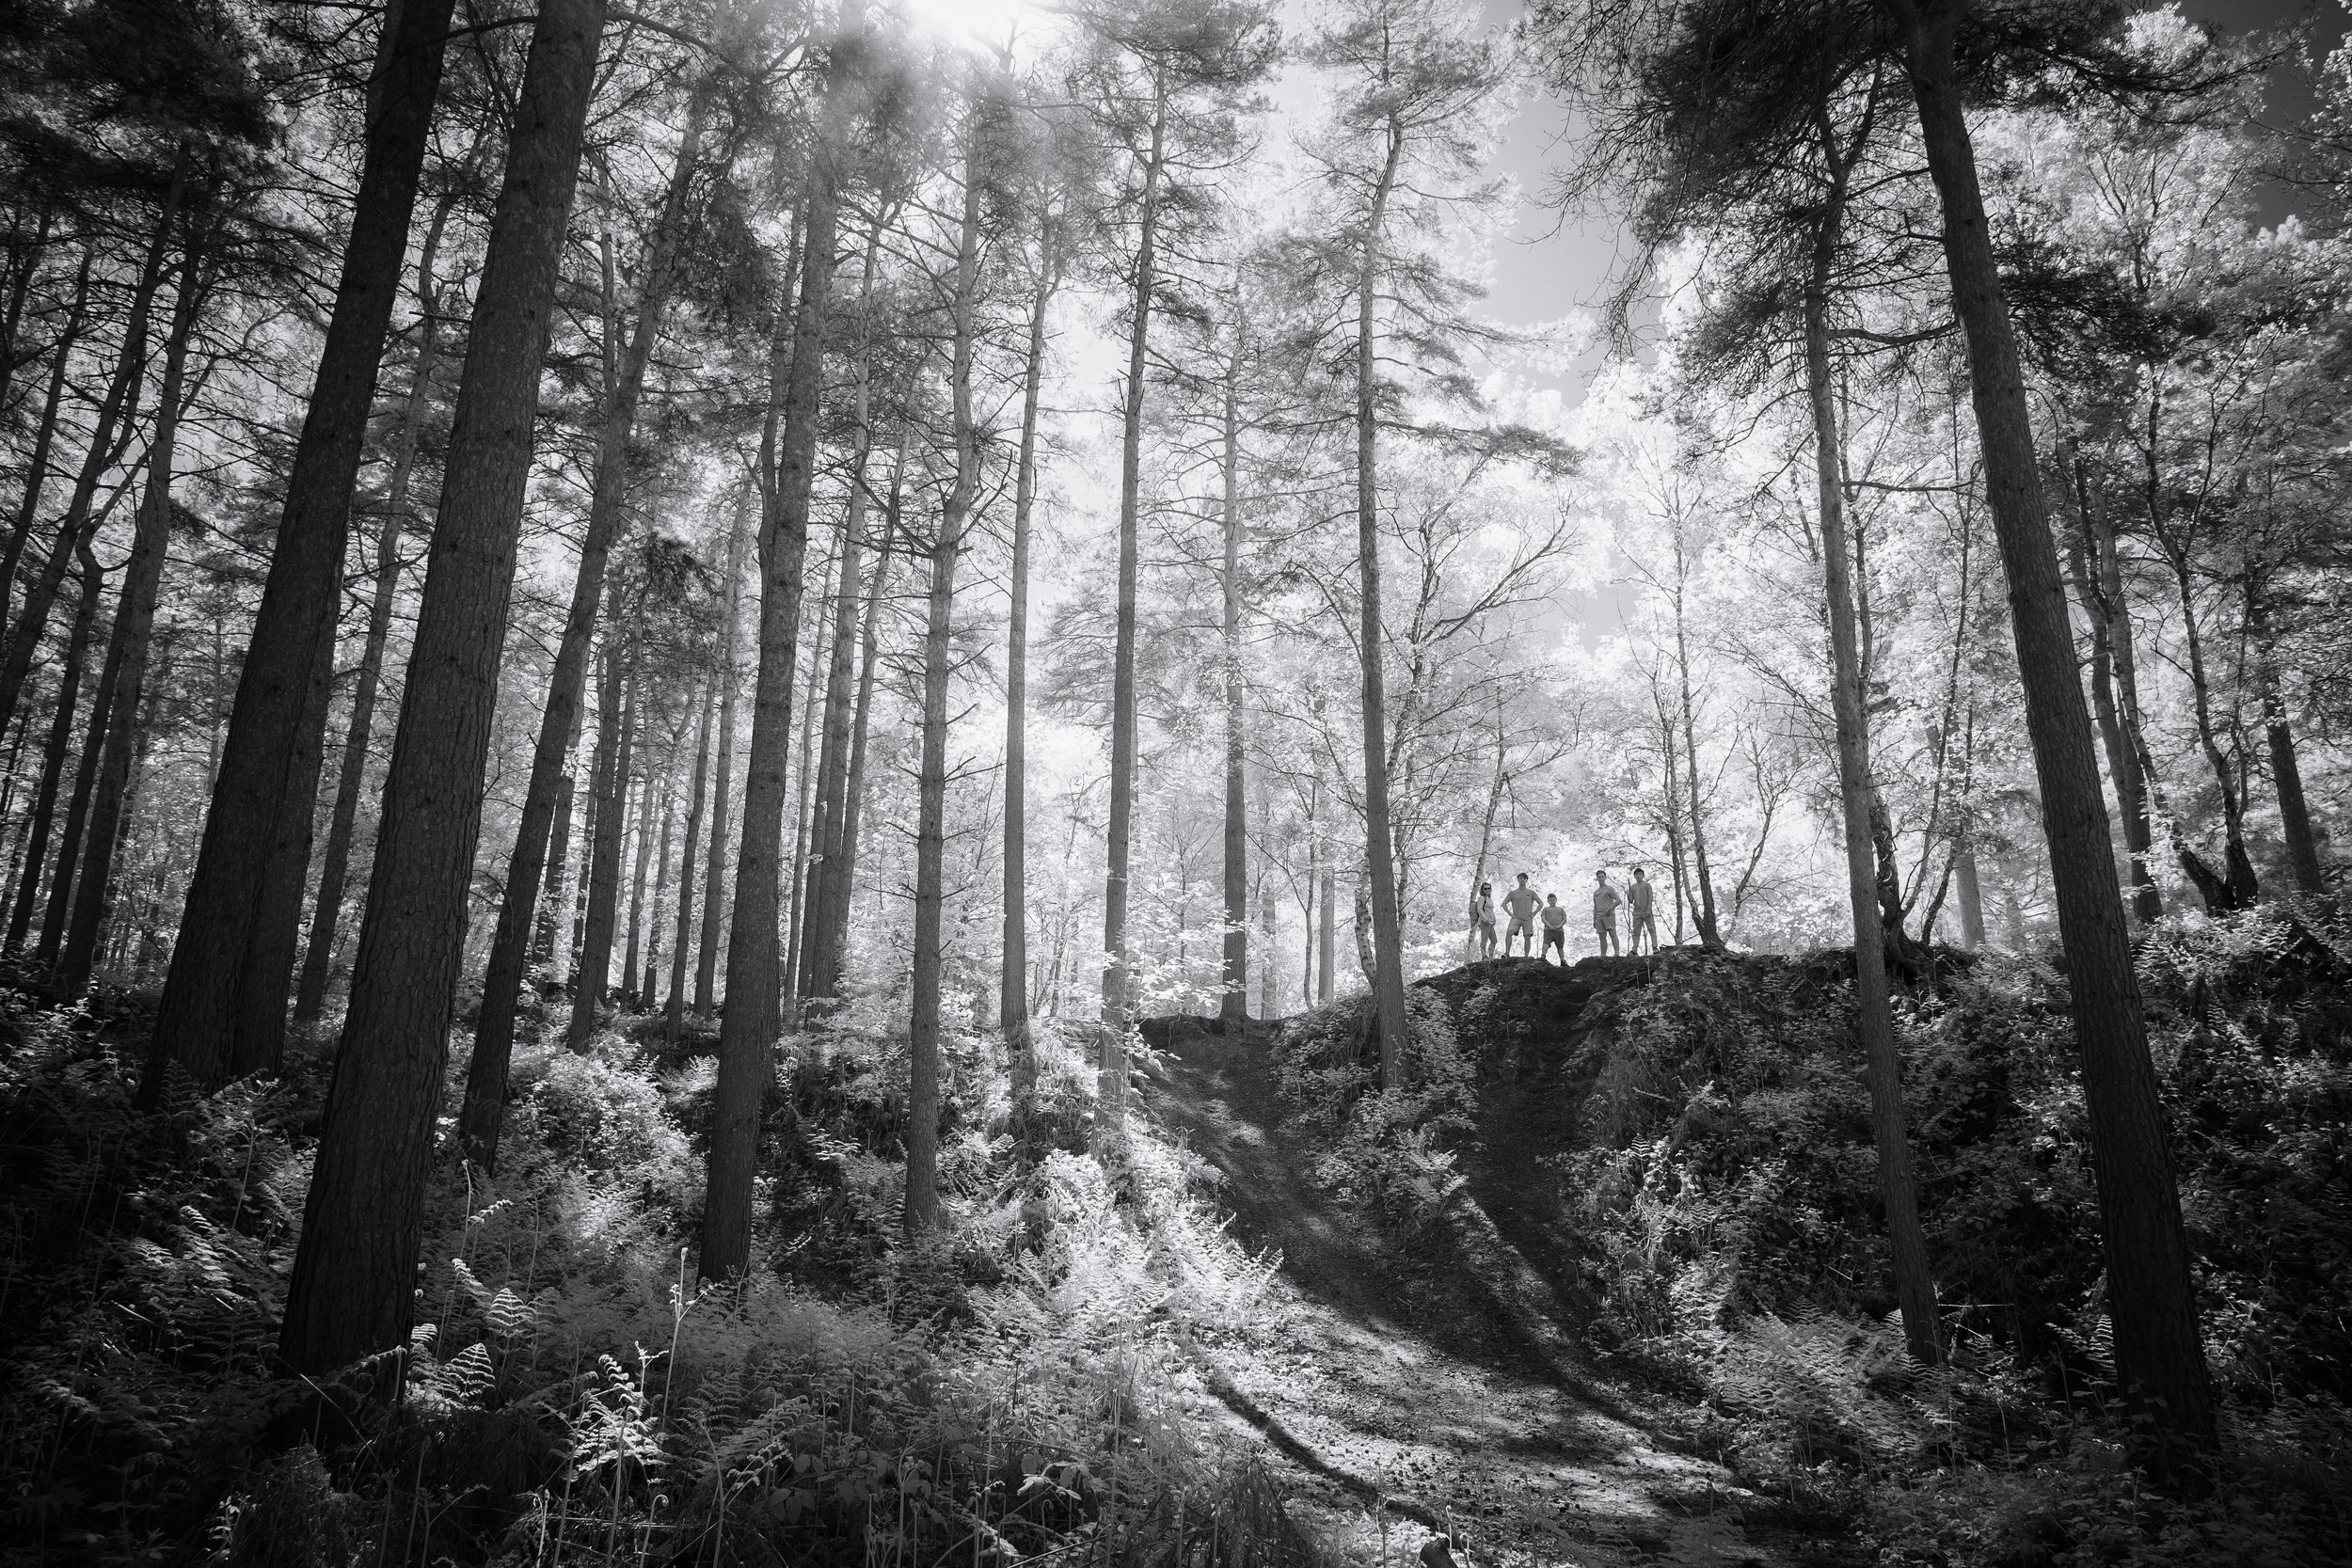
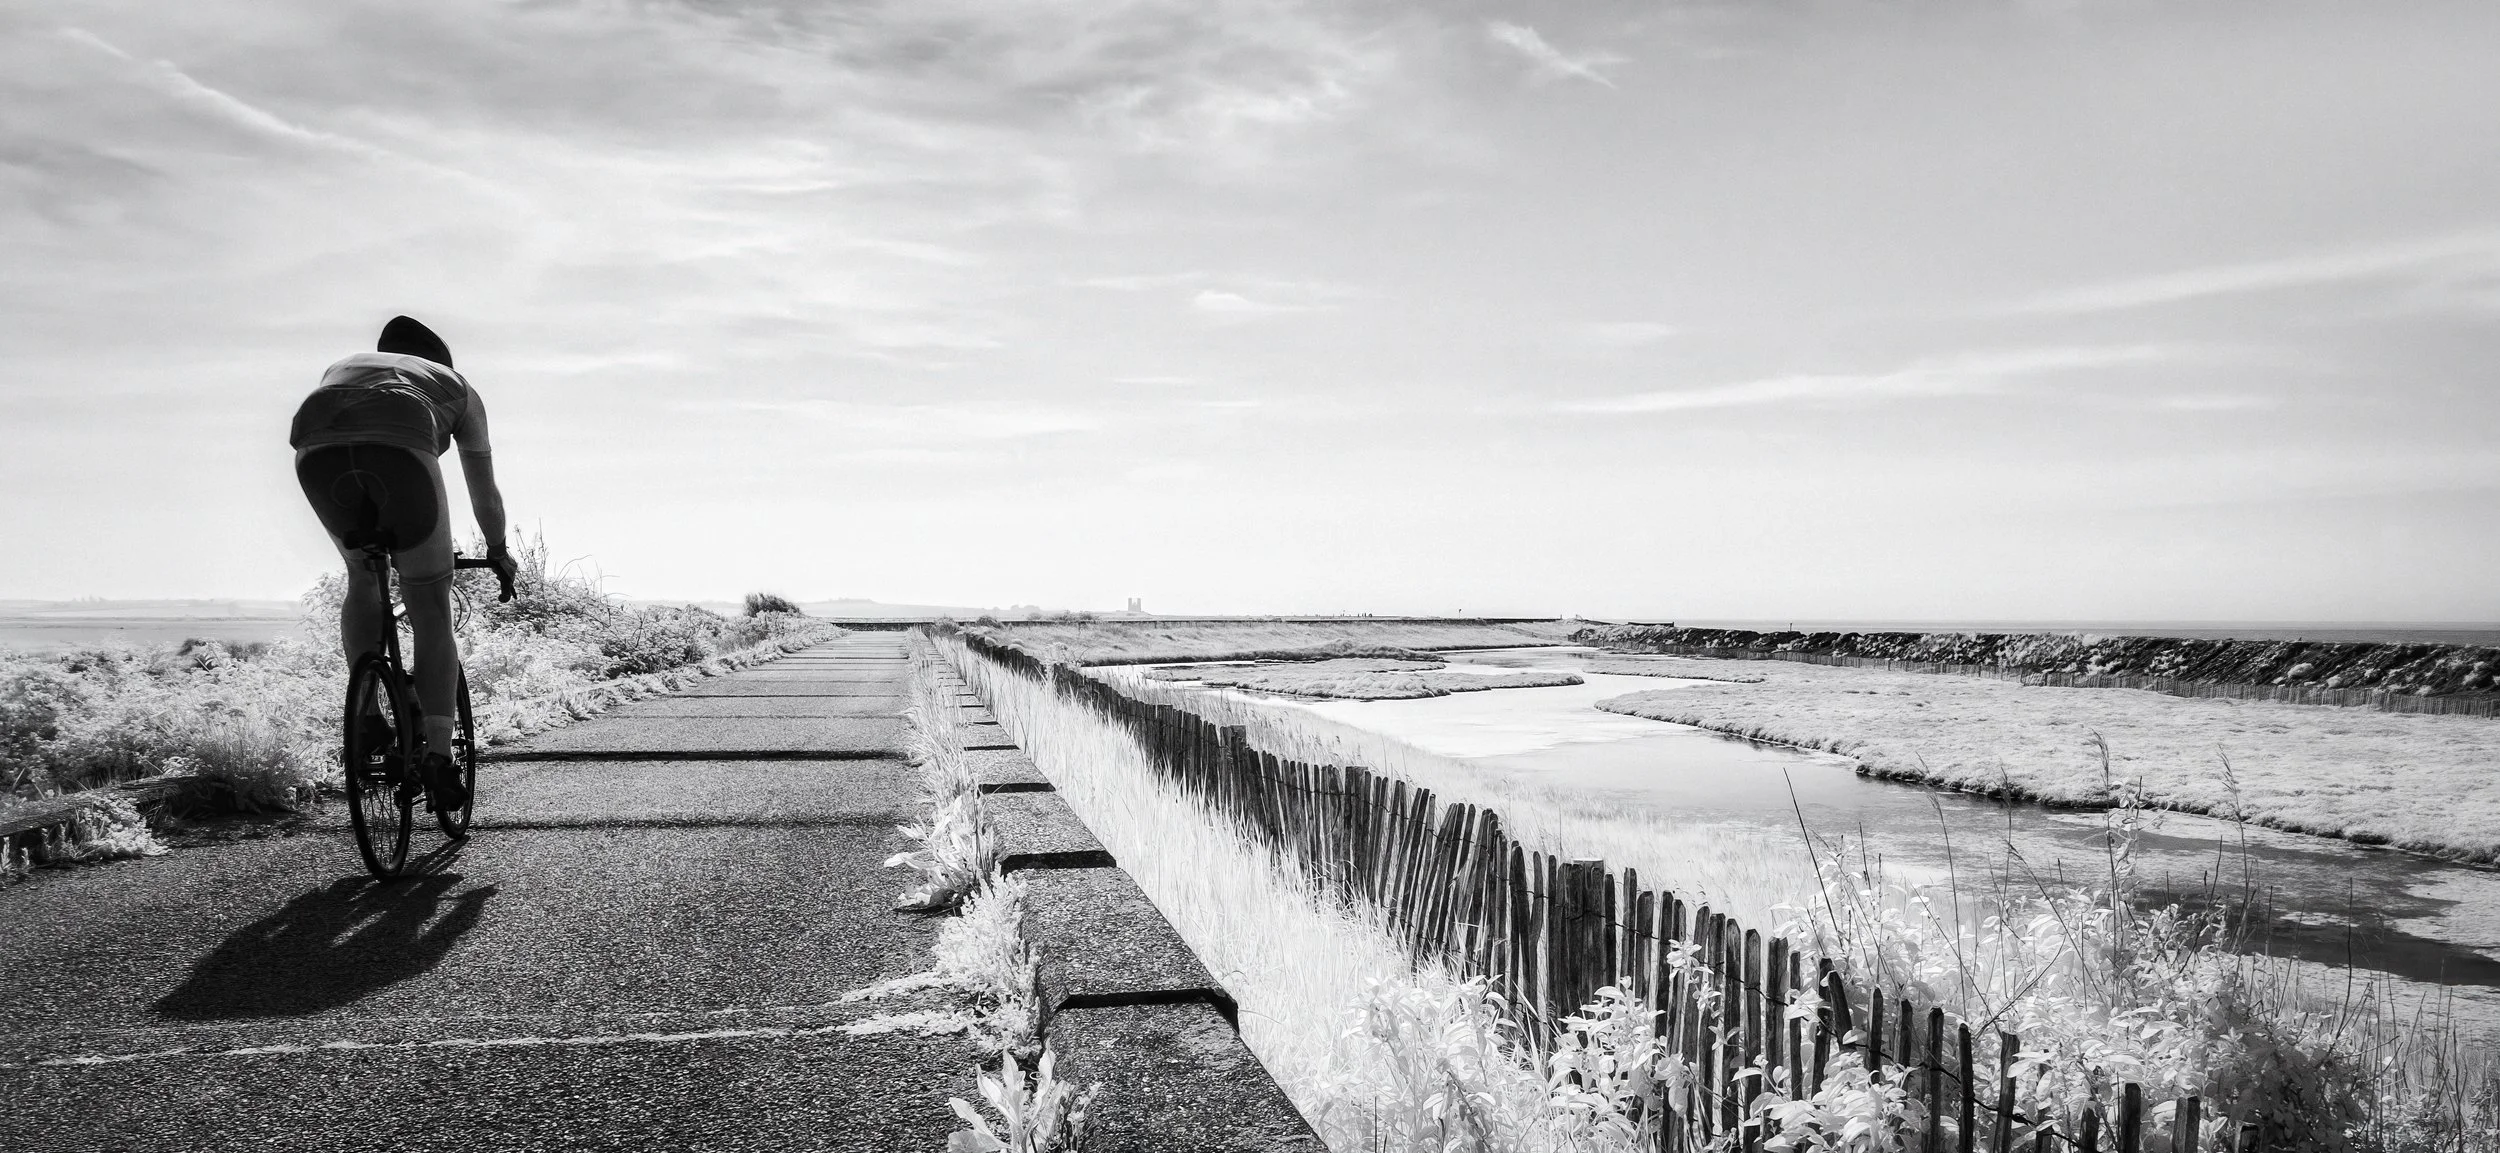
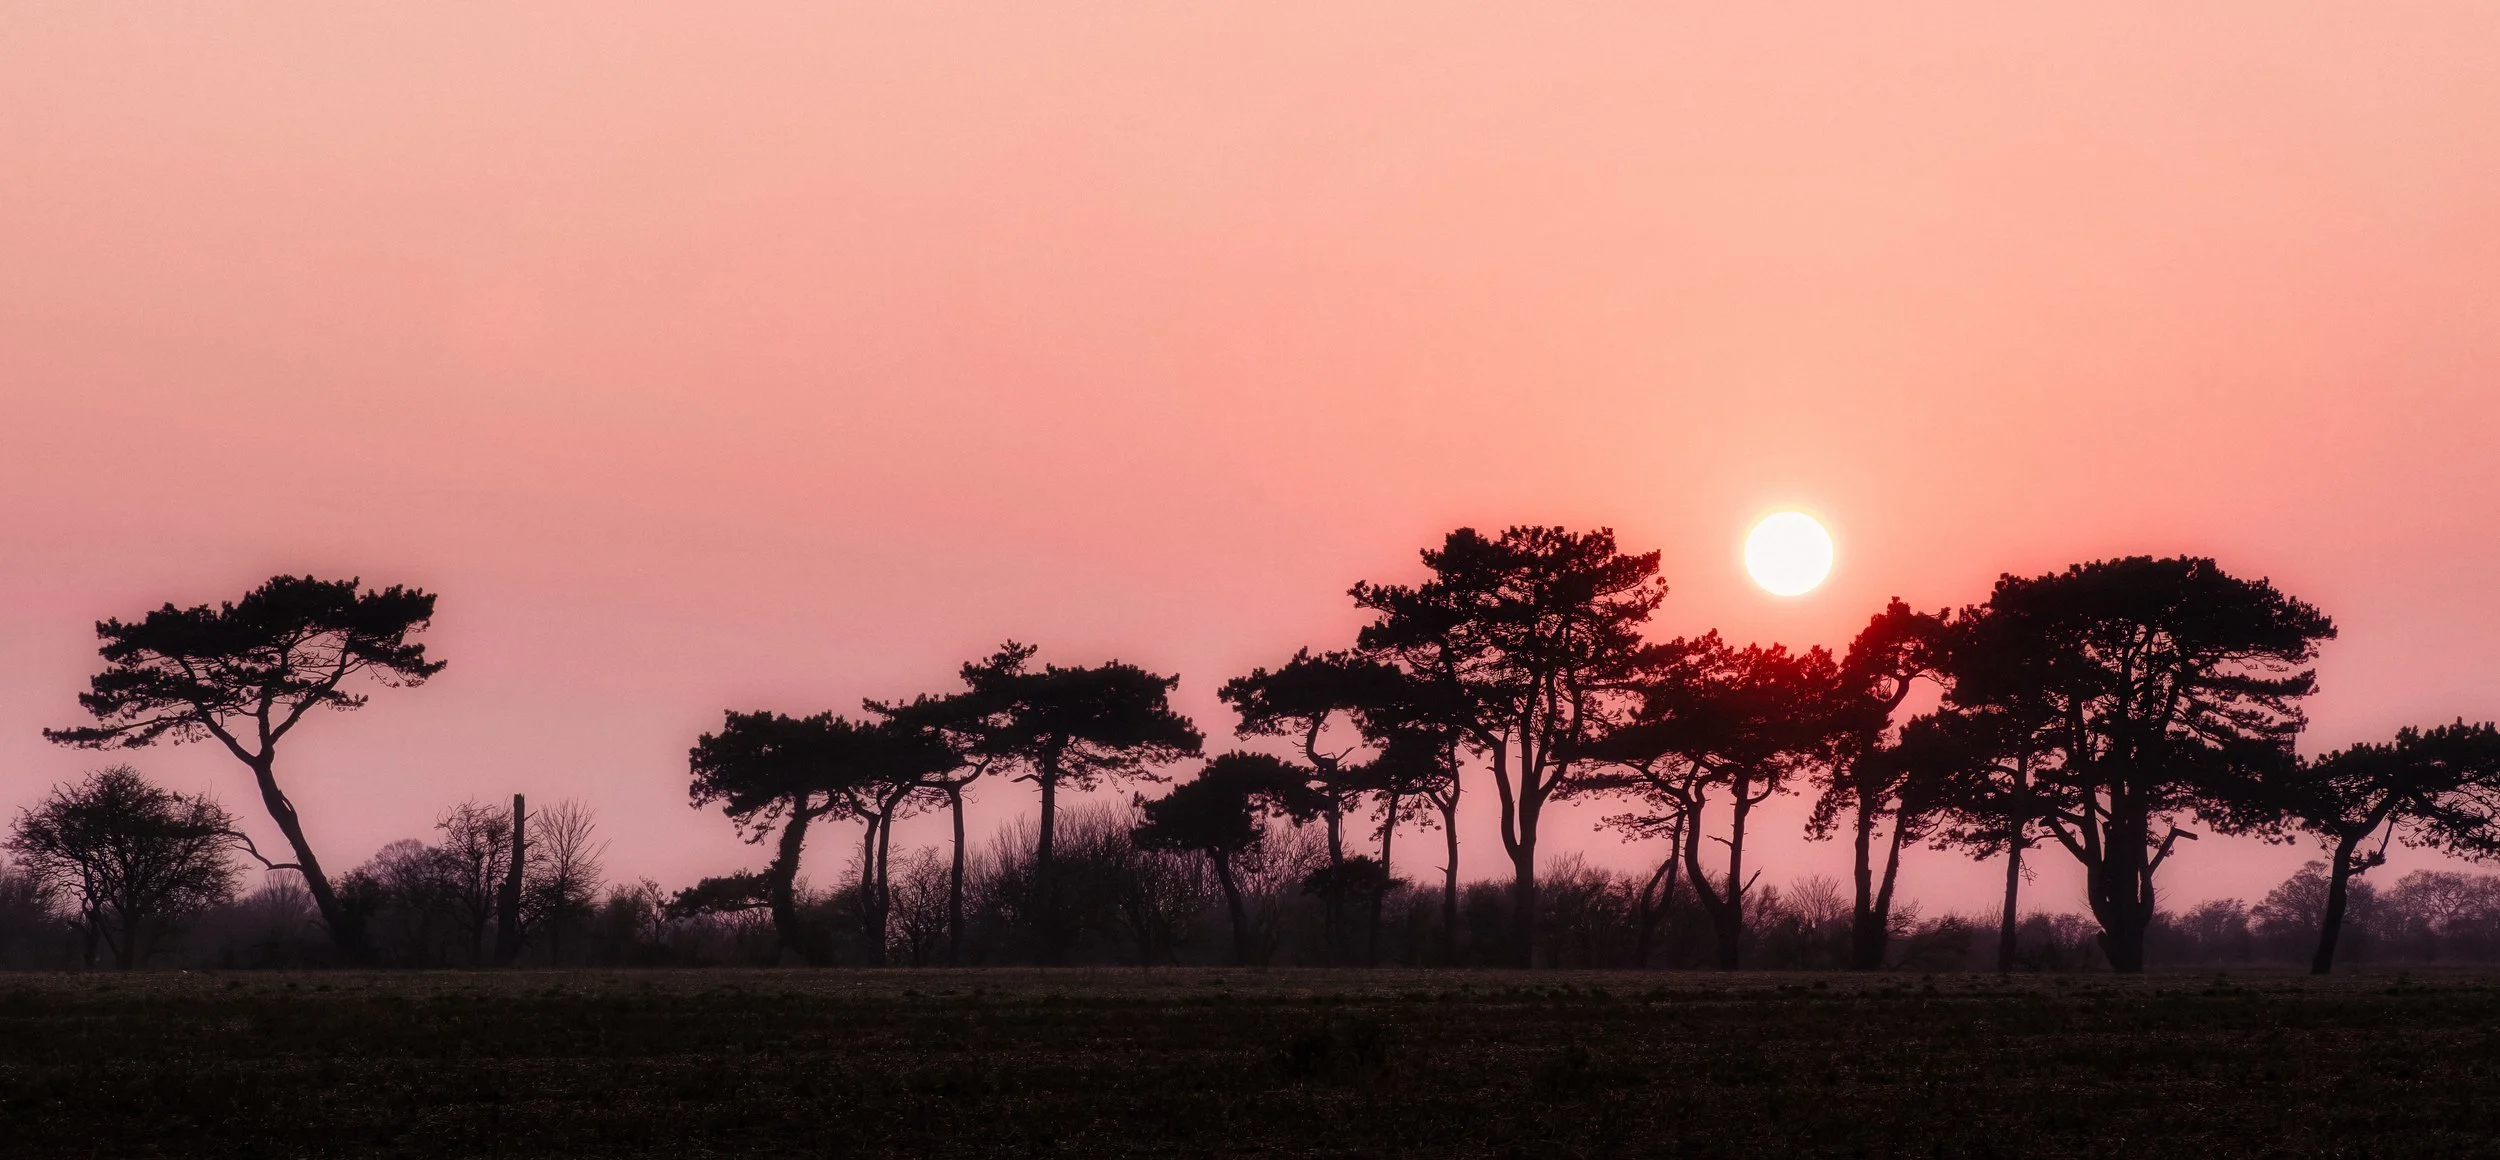
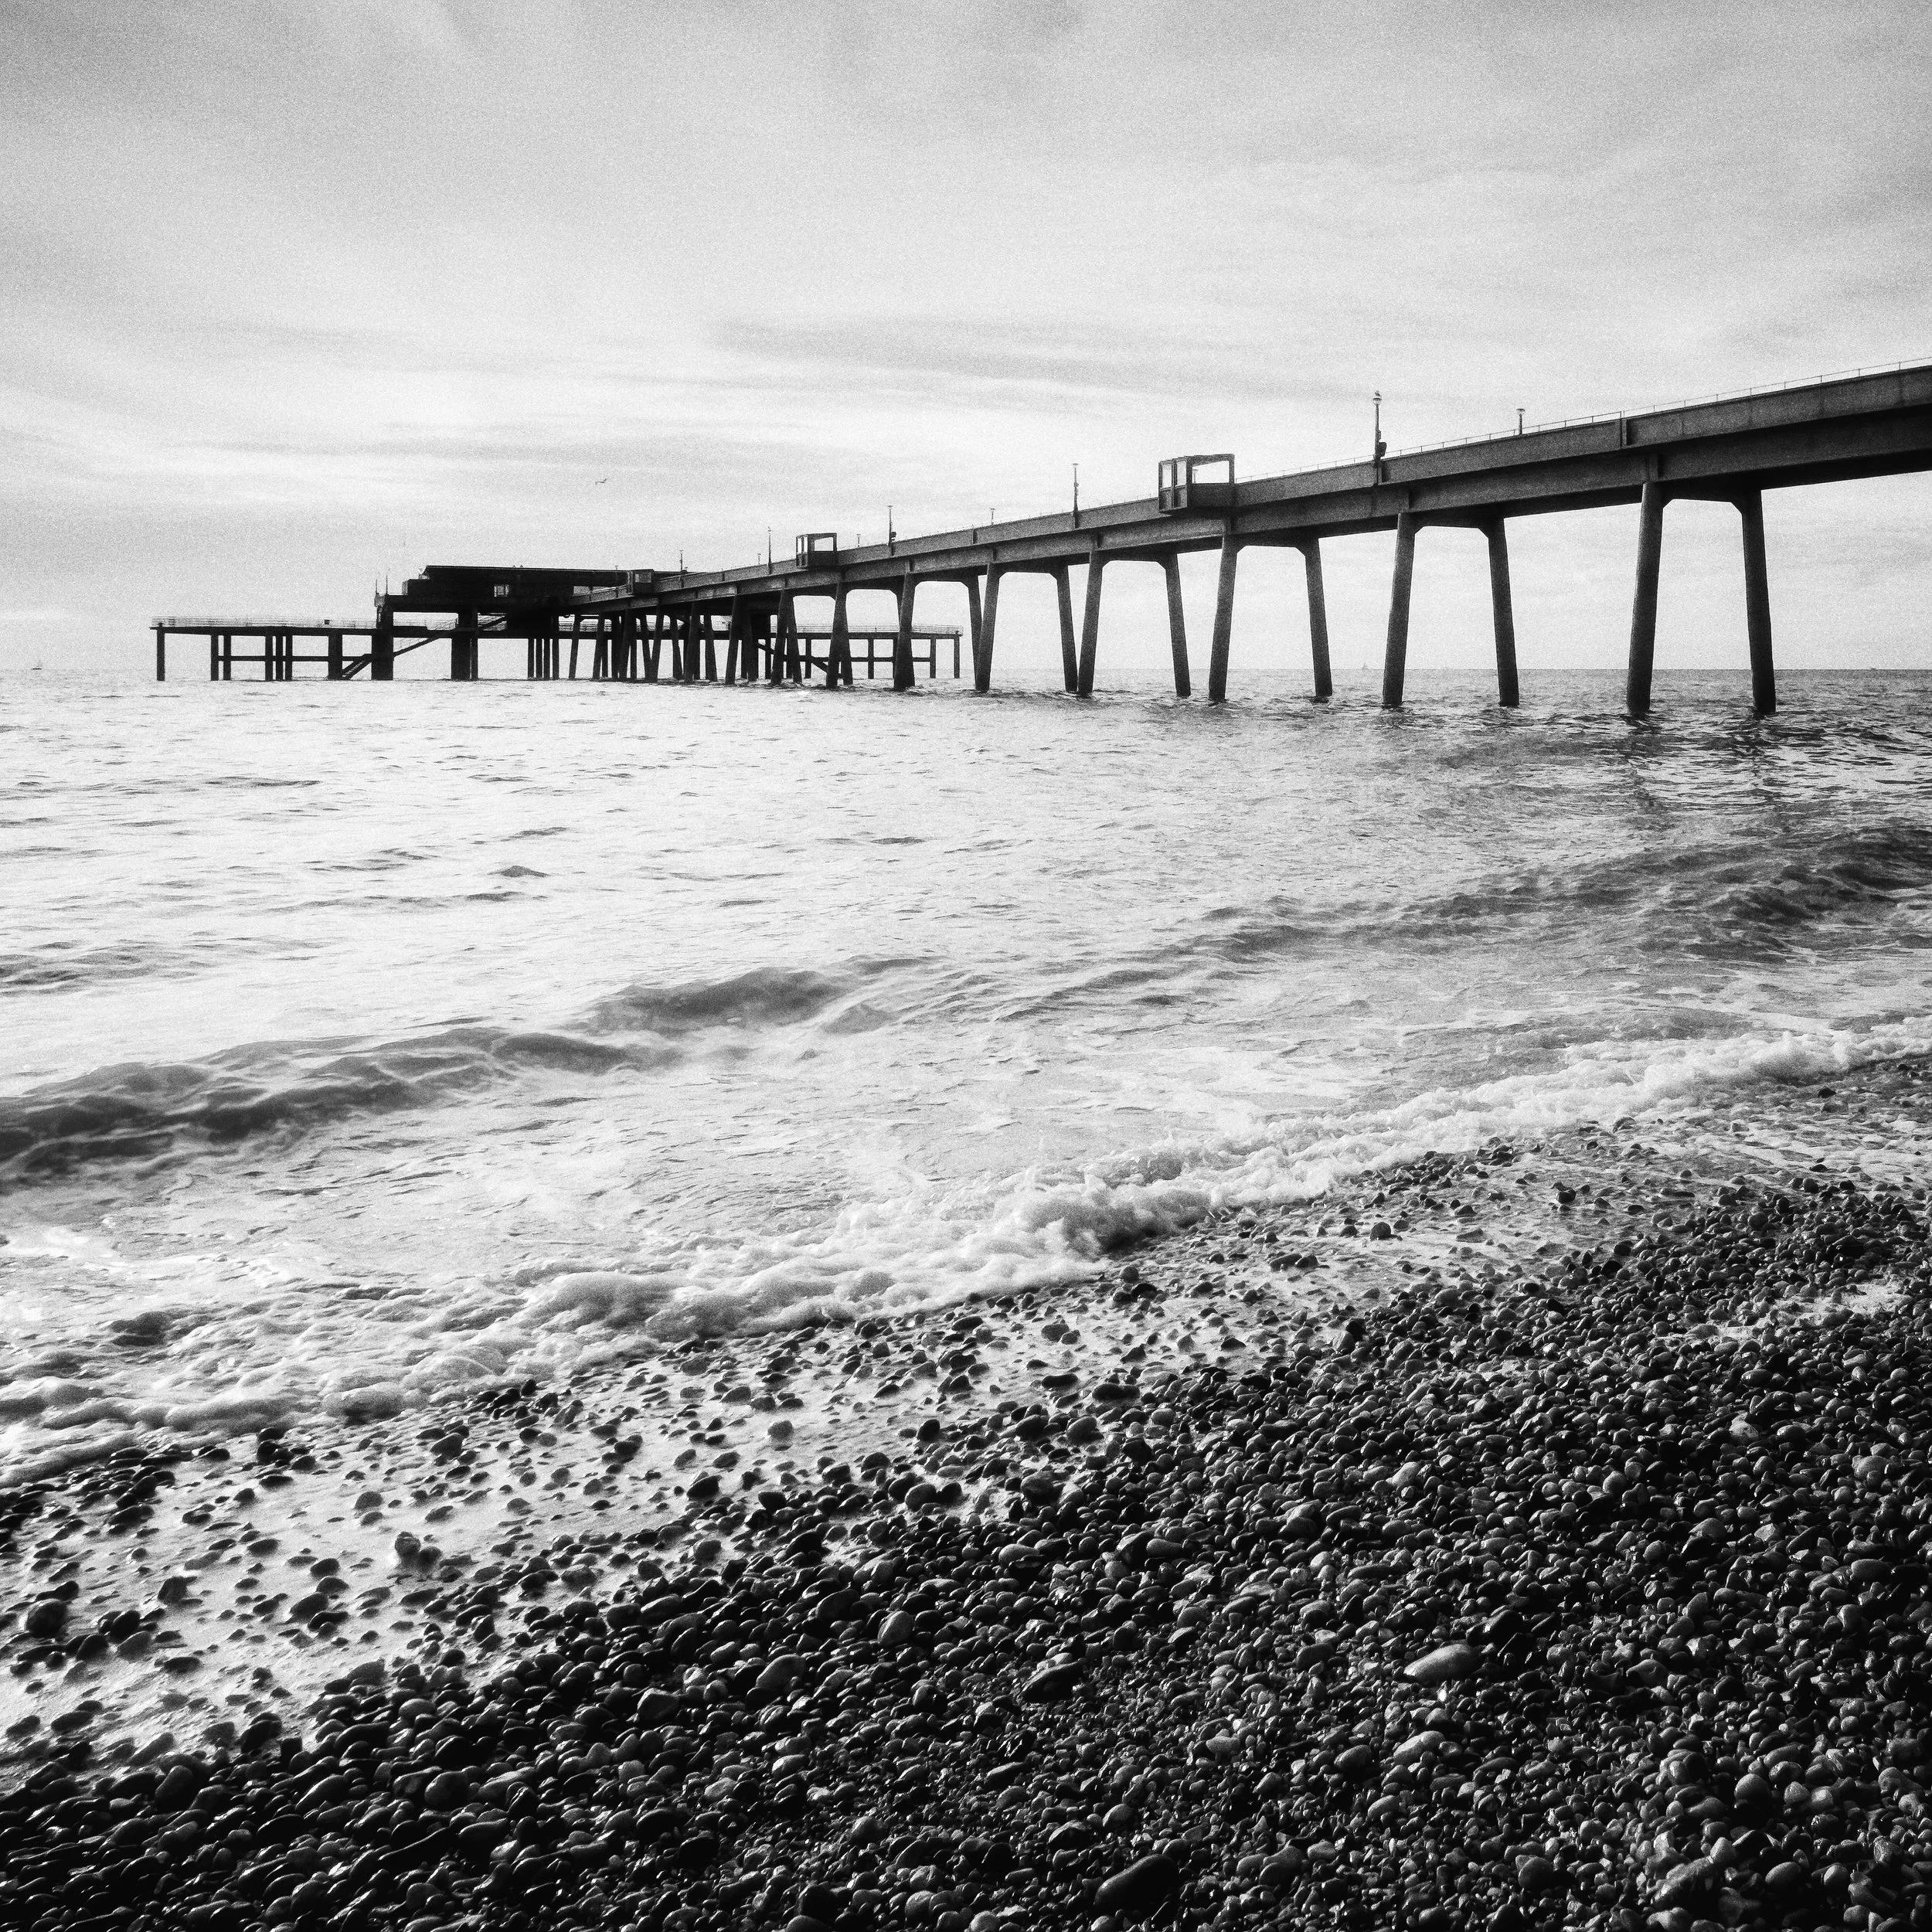
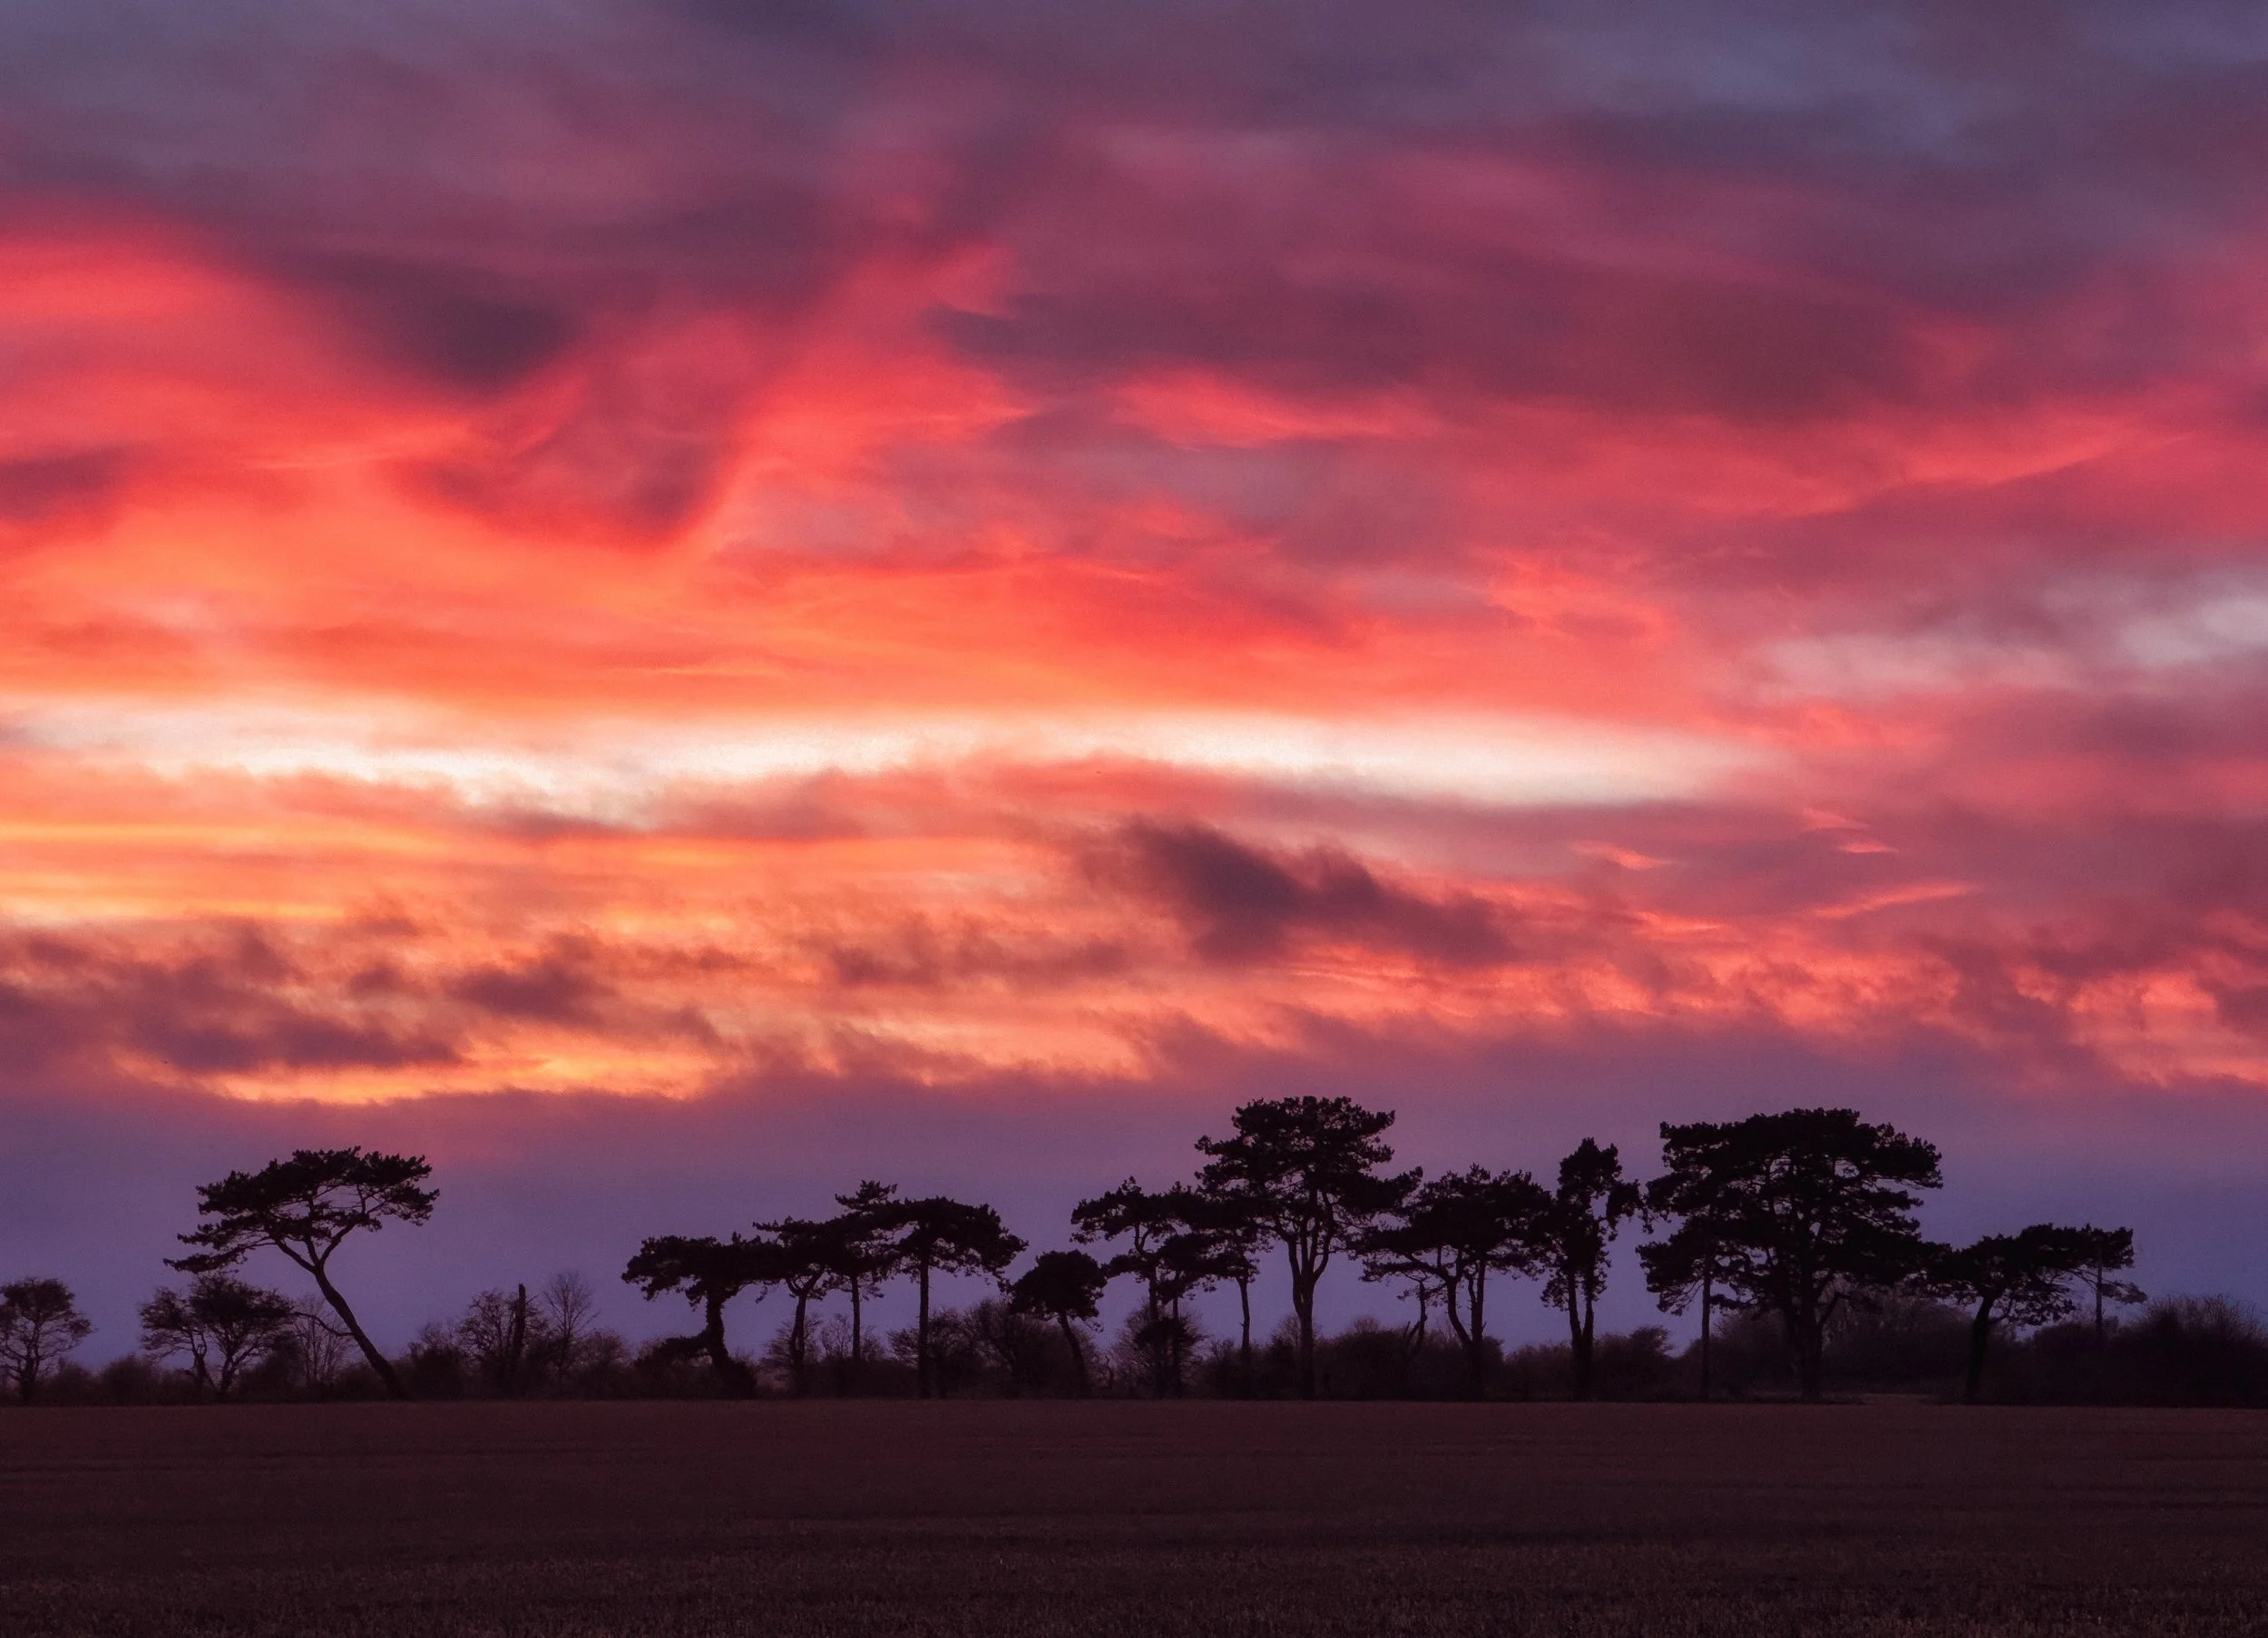
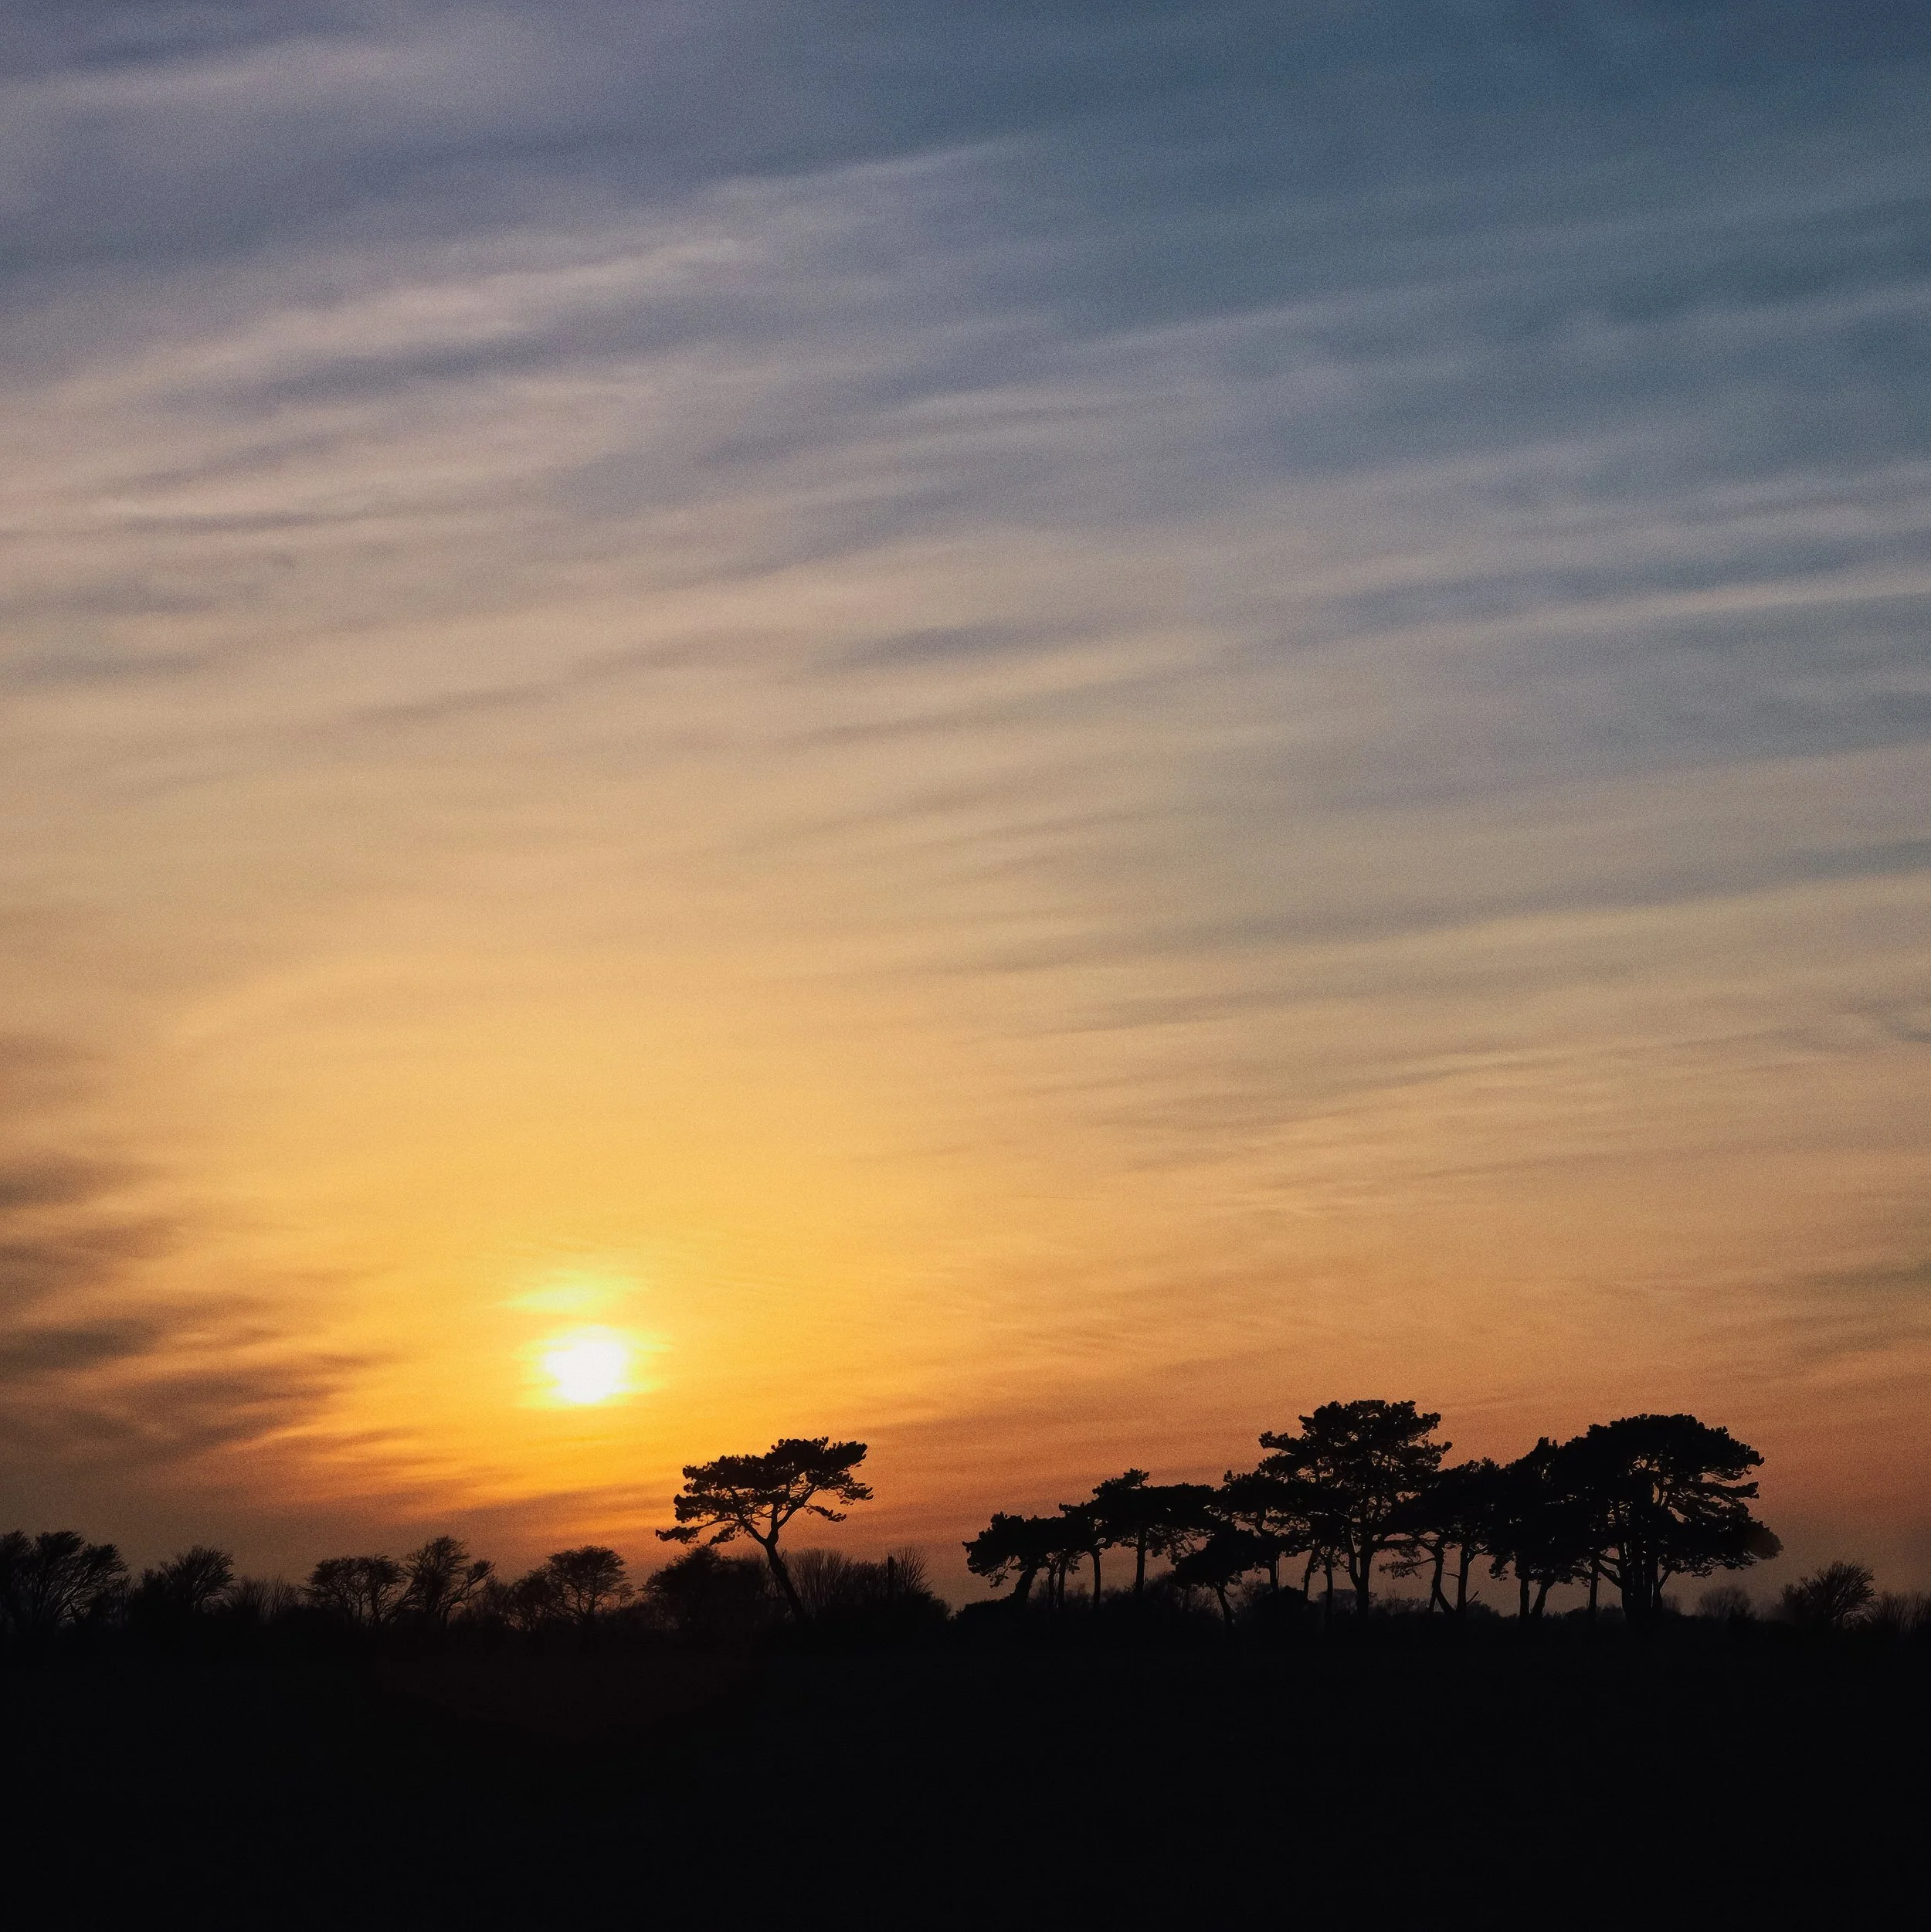
Subjects that work well tend to have strong, distinctive outlines: people in motion or in expressive poses; animals (particularly birds in flight, which reduce to immediately legible wing-shapes); trees and bare branches against a sky; architectural elements — bridges, cranes, rooflines, fire escapes — where the geometry is strong; bicycles (one of the most elegant silhouette subjects, with their spoke patterns and distinctive frame shapes); vehicles; and everyday objects with clear geometric forms. The silhouette of a bicycle leaning against a wall is recognisable to anyone. The silhouette of a handbag is not, unless the bag has a very specific and famous shape.
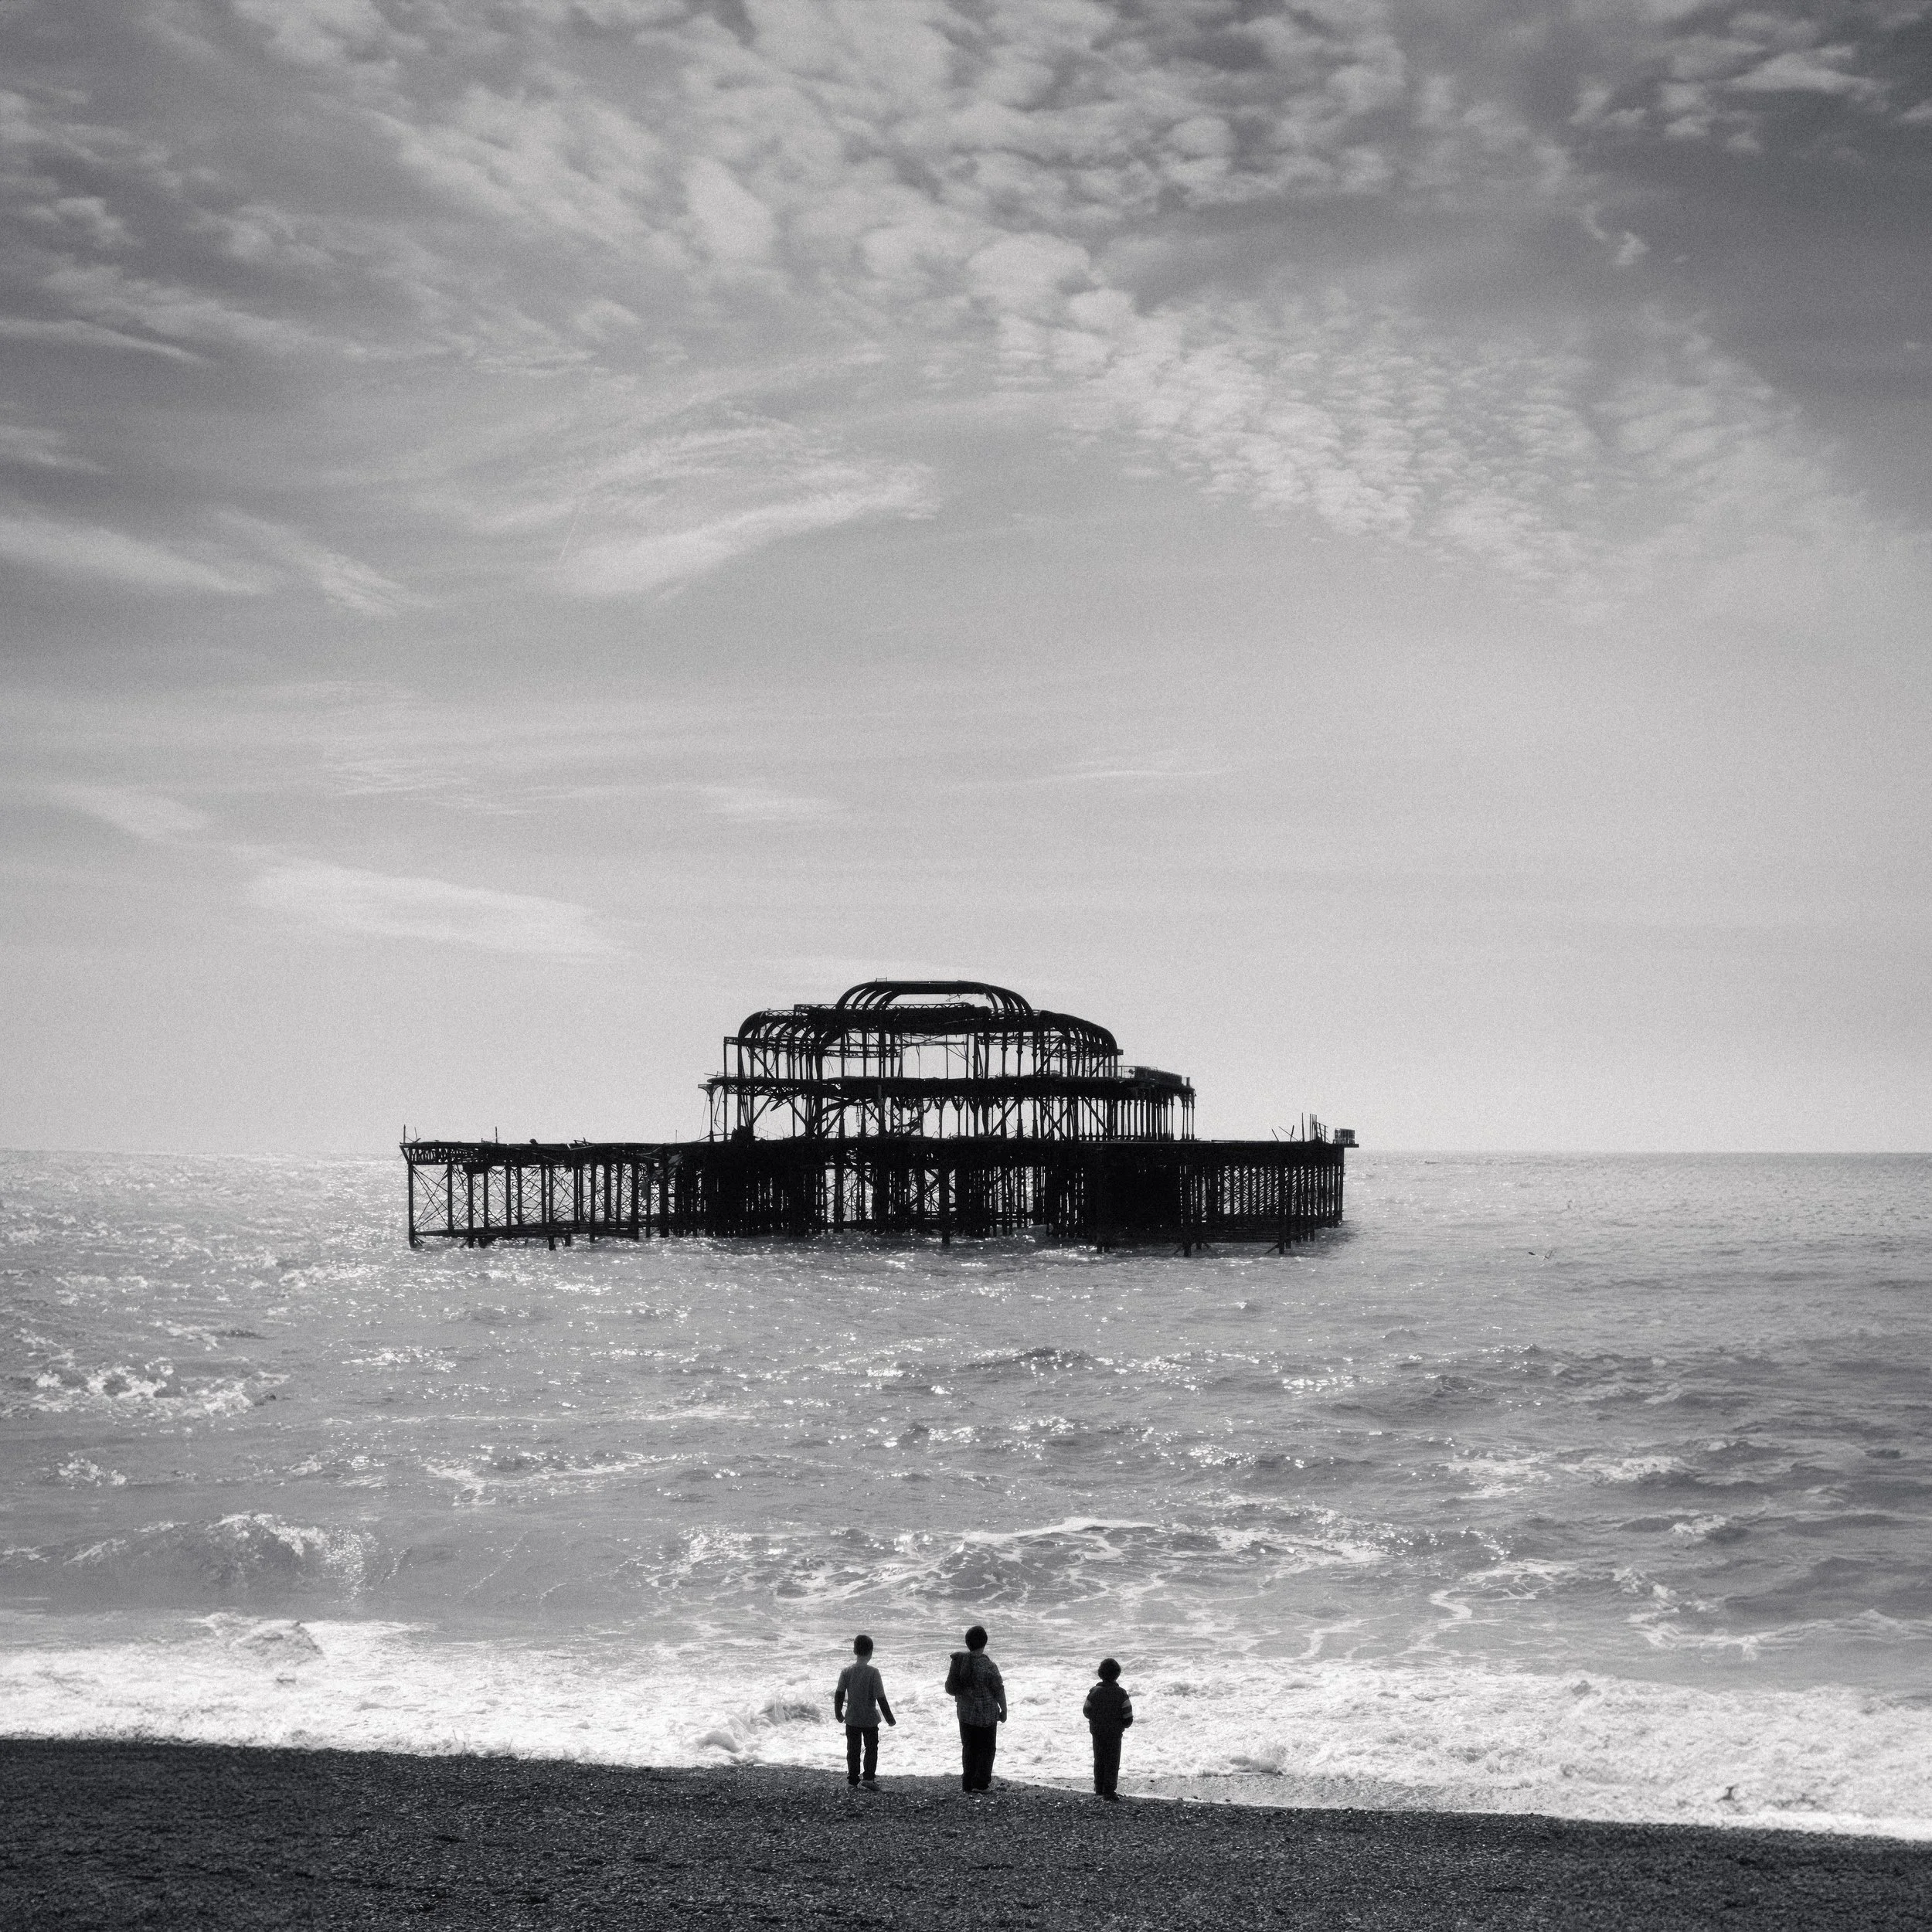
Subjects that work less well are those with complex, irregular, or ambiguous outlines. Soft-edged subjects — clouds, foliage in full leaf, water splashing — tend to produce silhouettes that are not clearly defined. They are better used as backgrounds than subjects. Groups of people present a particular challenge: where individual figures overlap, their outlines merge into a single mass, and the eye cannot resolve the individual shapes. A carefully spaced pair of figures can work; four people standing close together usually produces something that reads as a dark blot. This is not insurmountable, but it requires conscious spacing of your subjects within the frame.
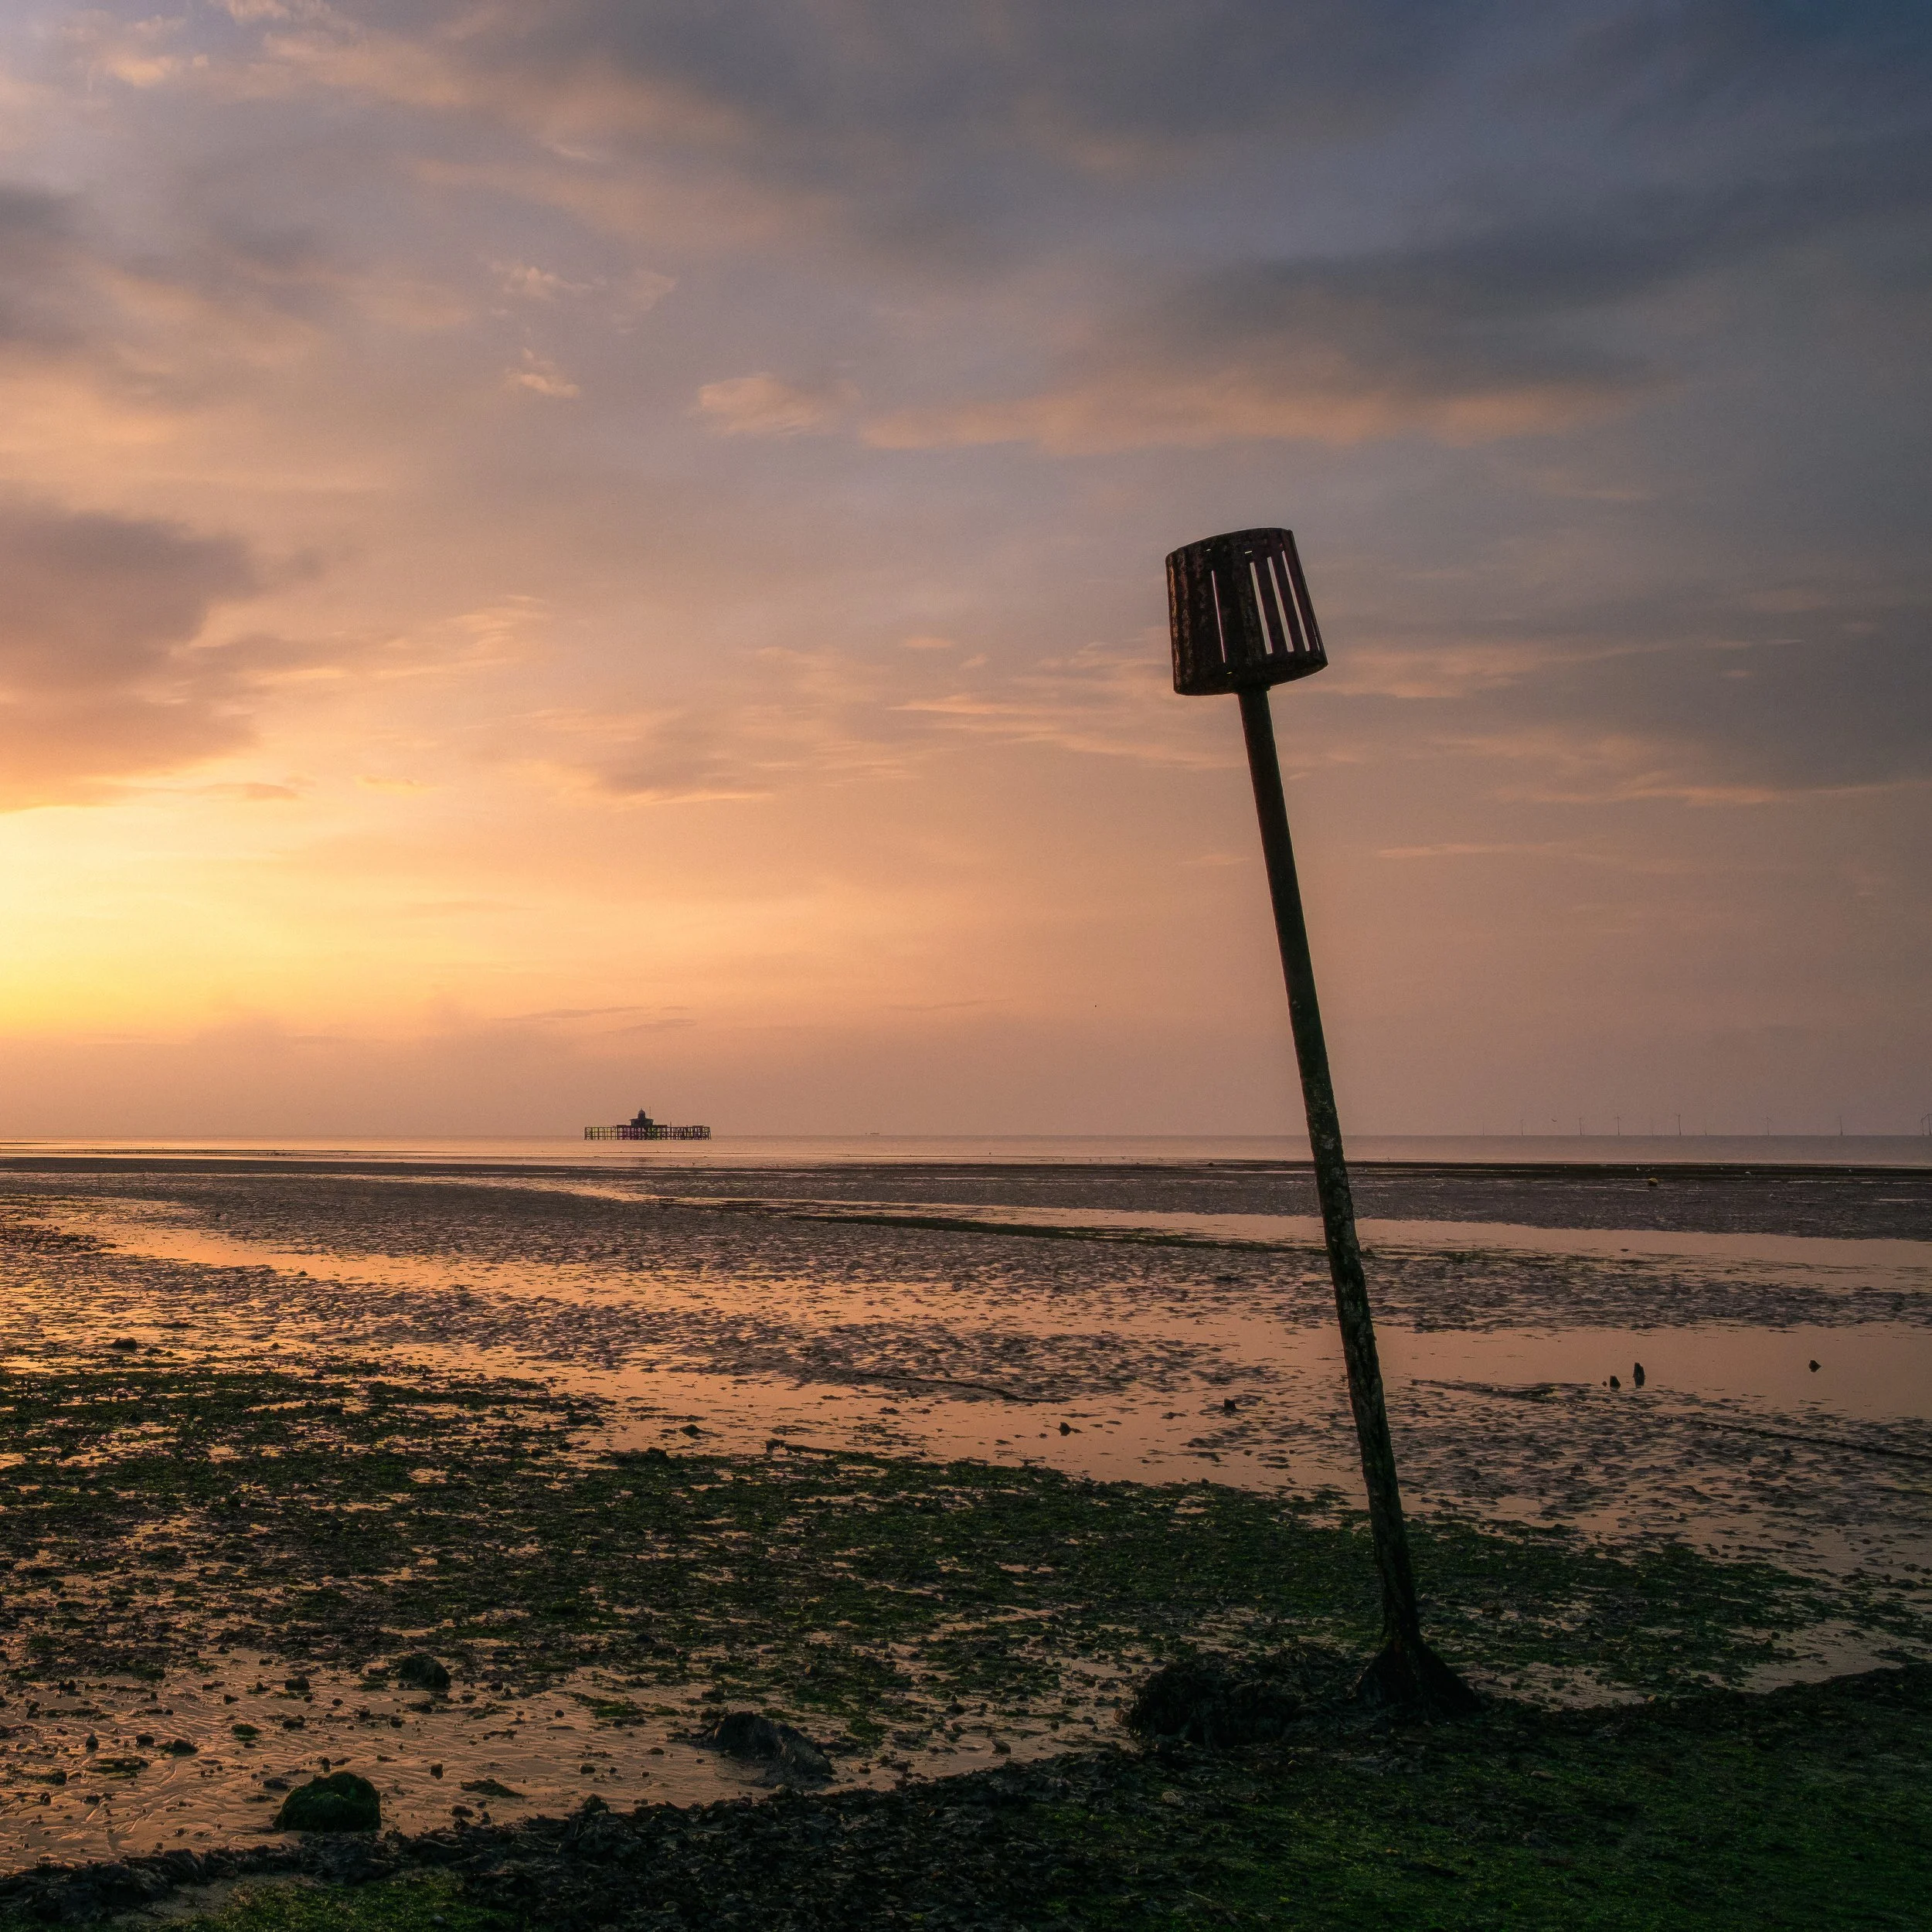
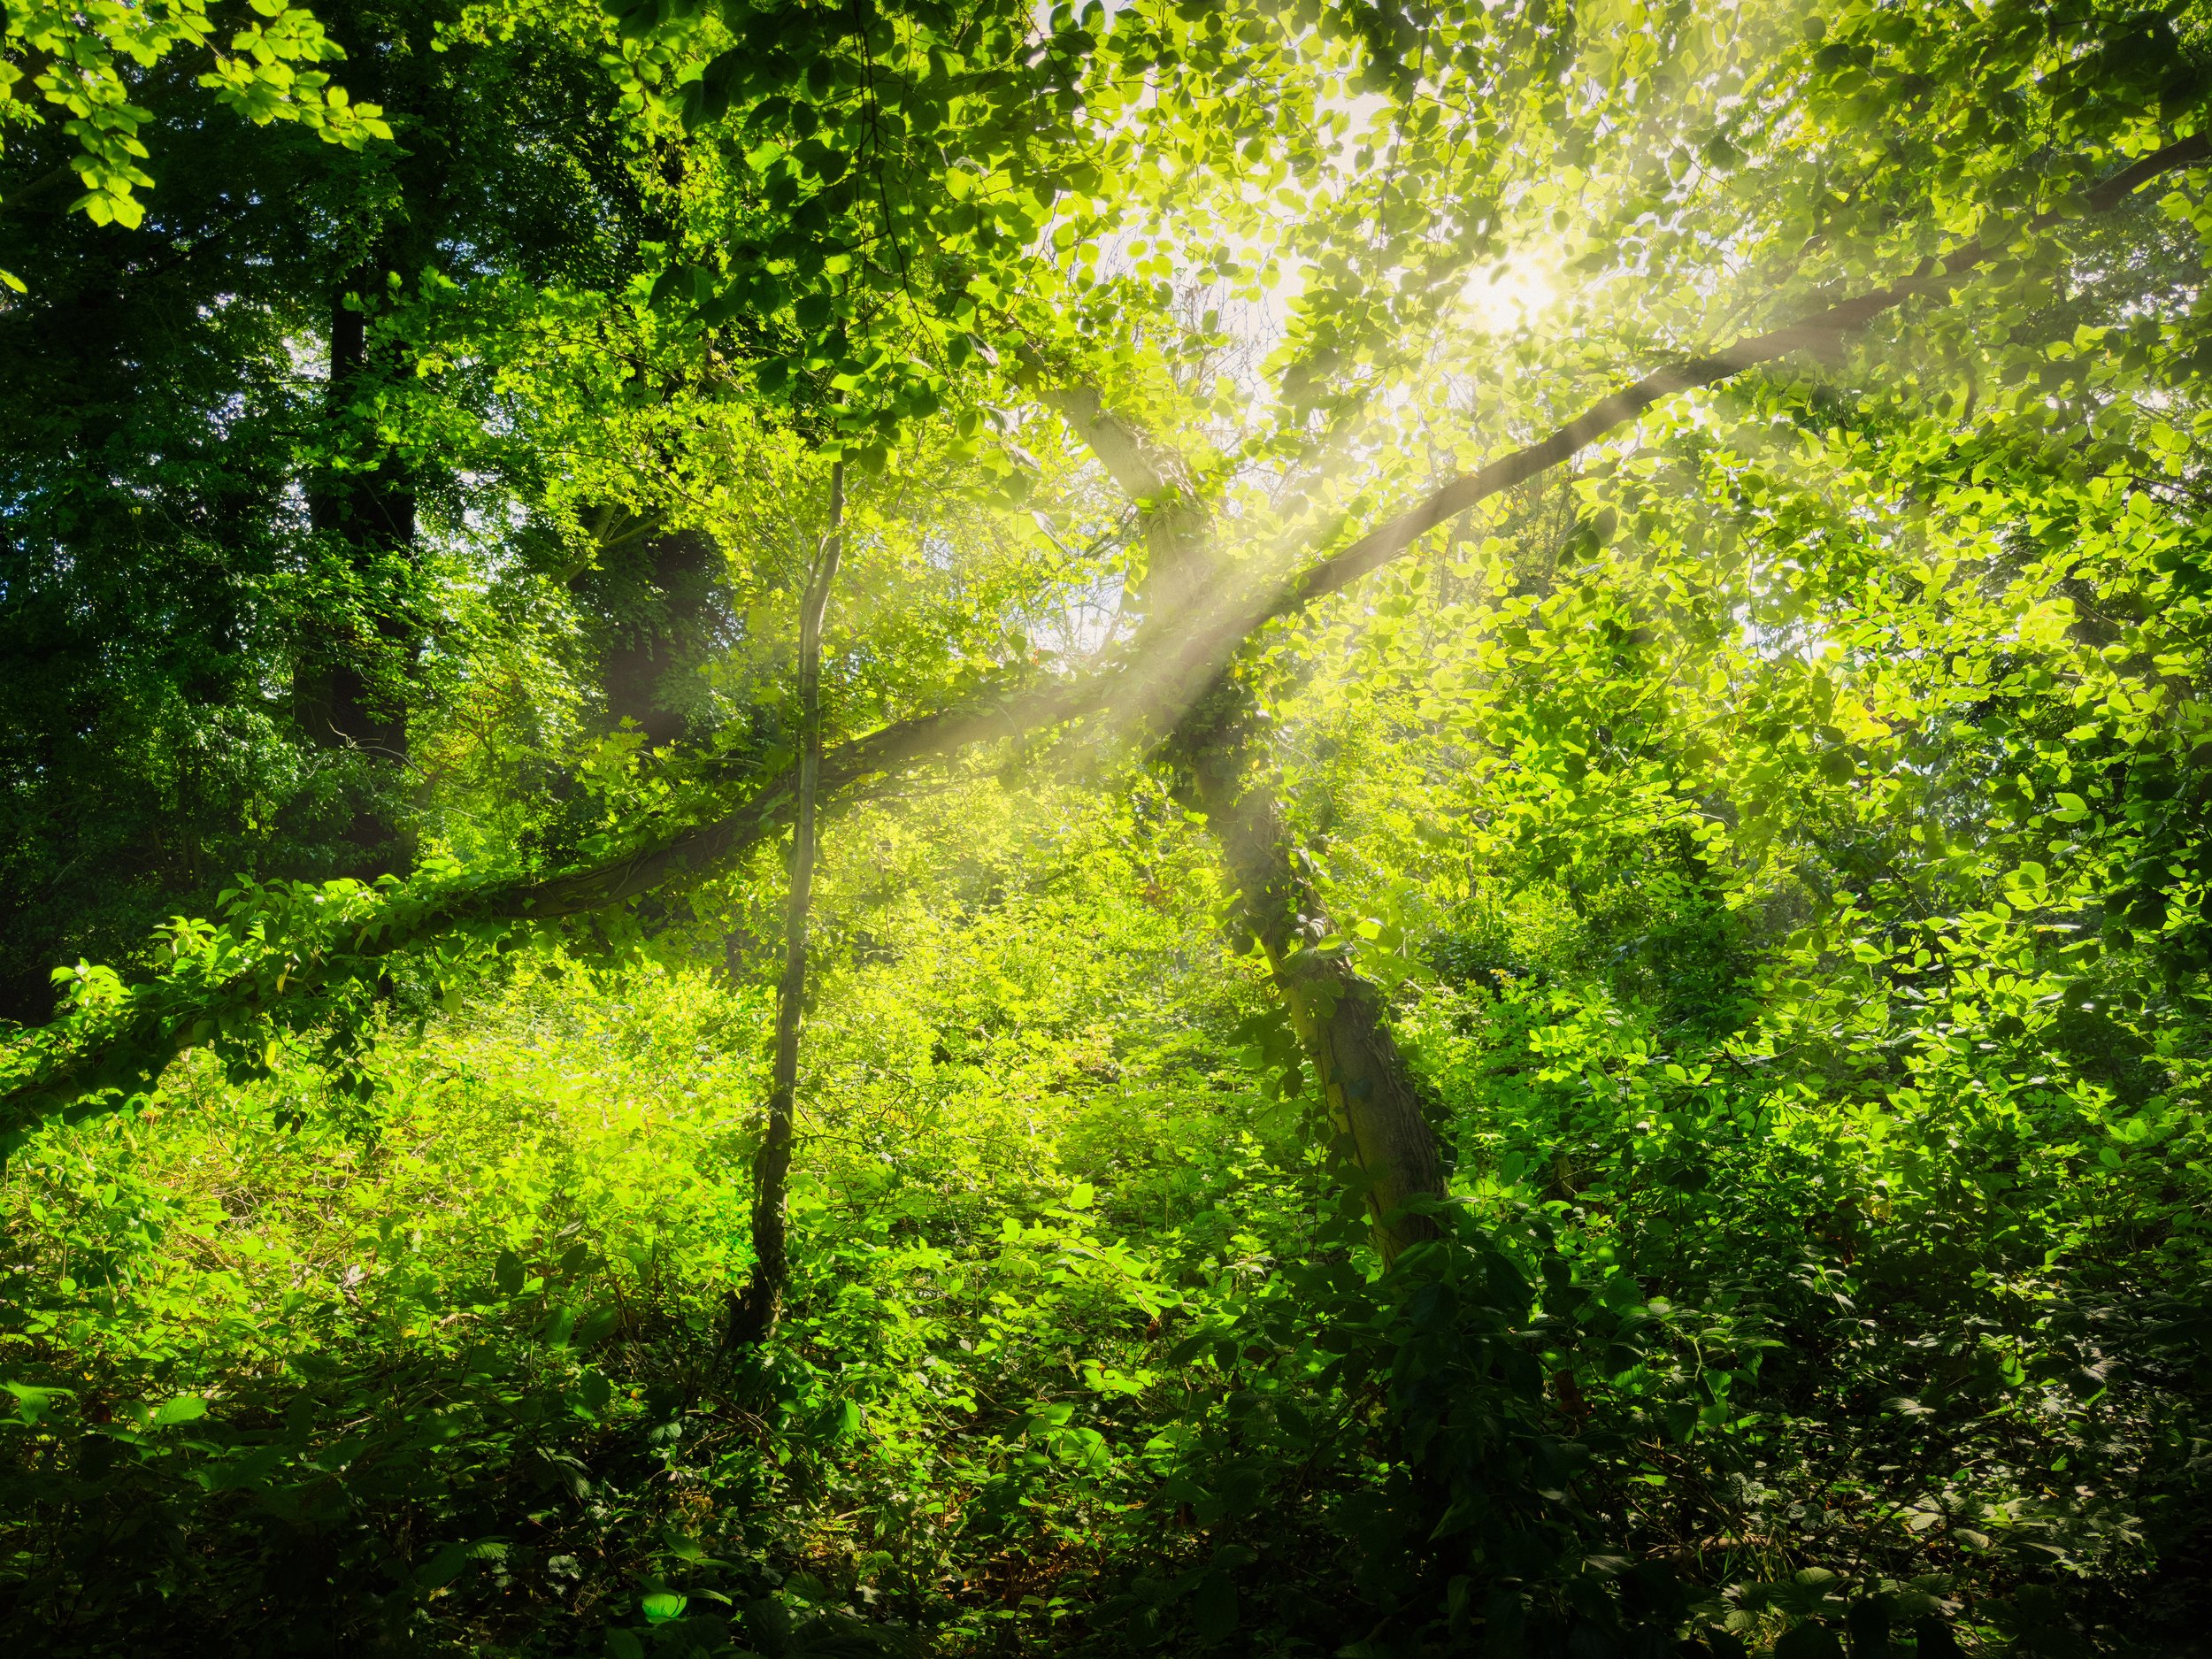
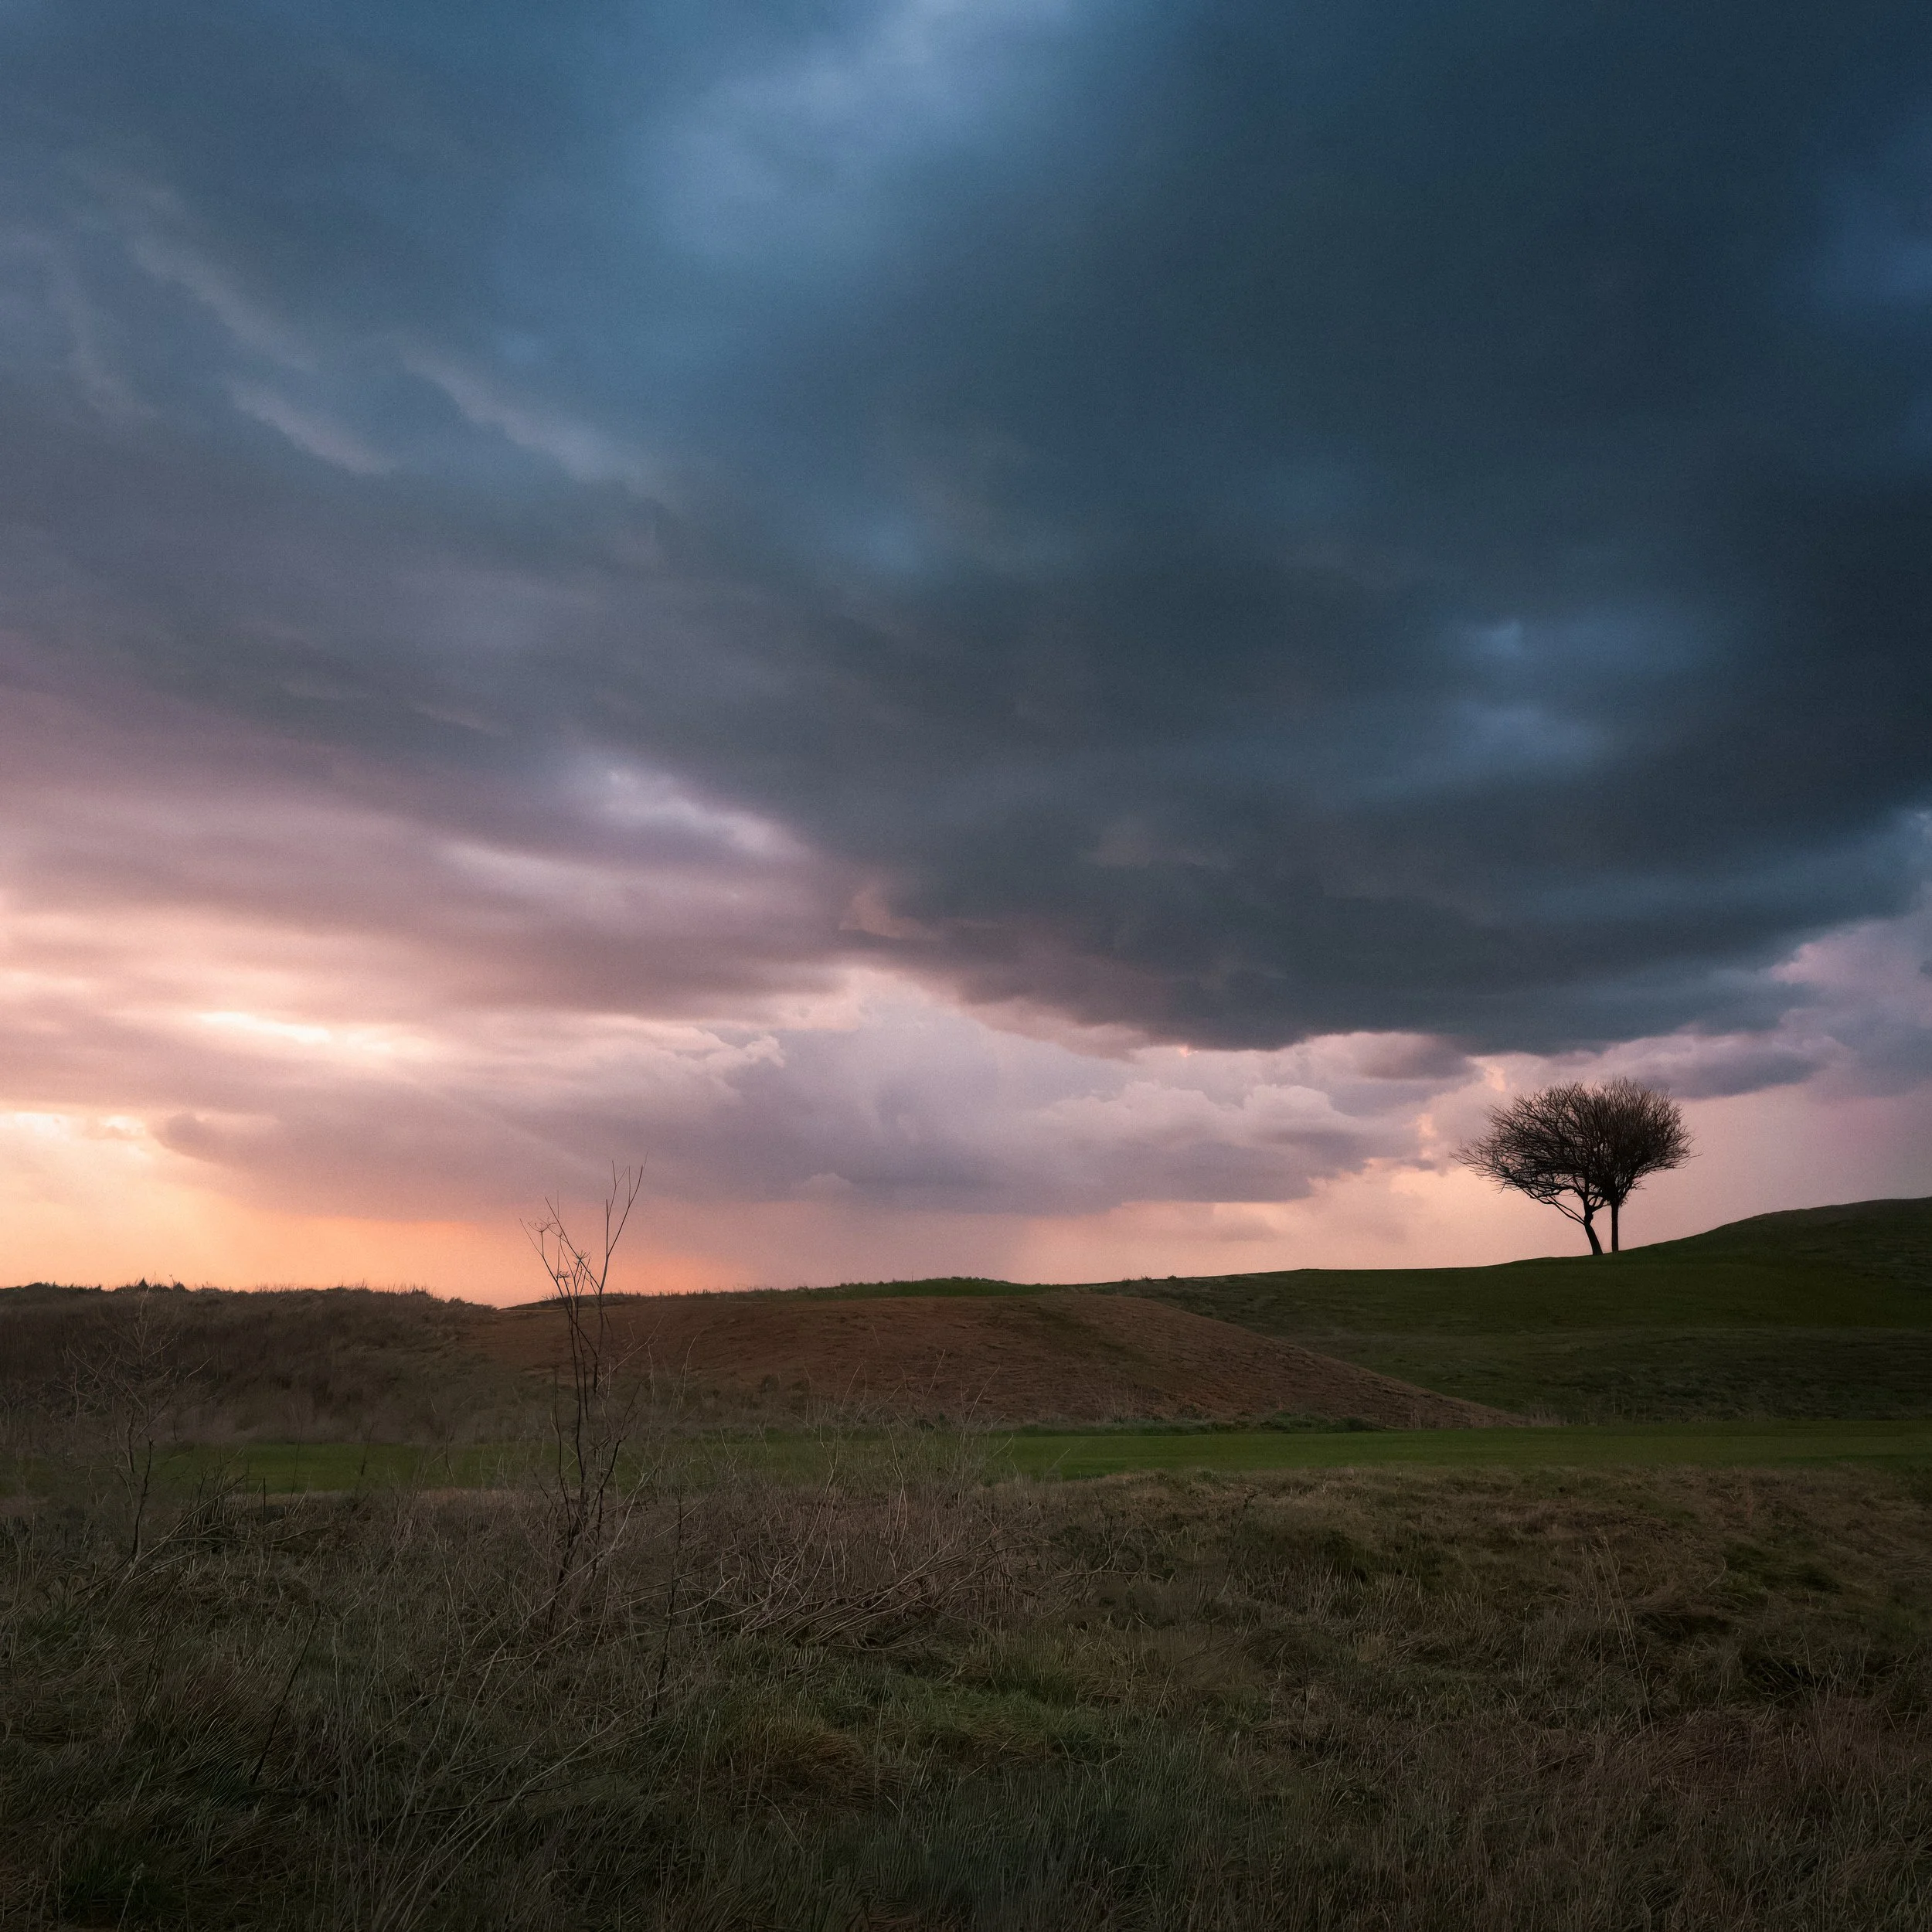
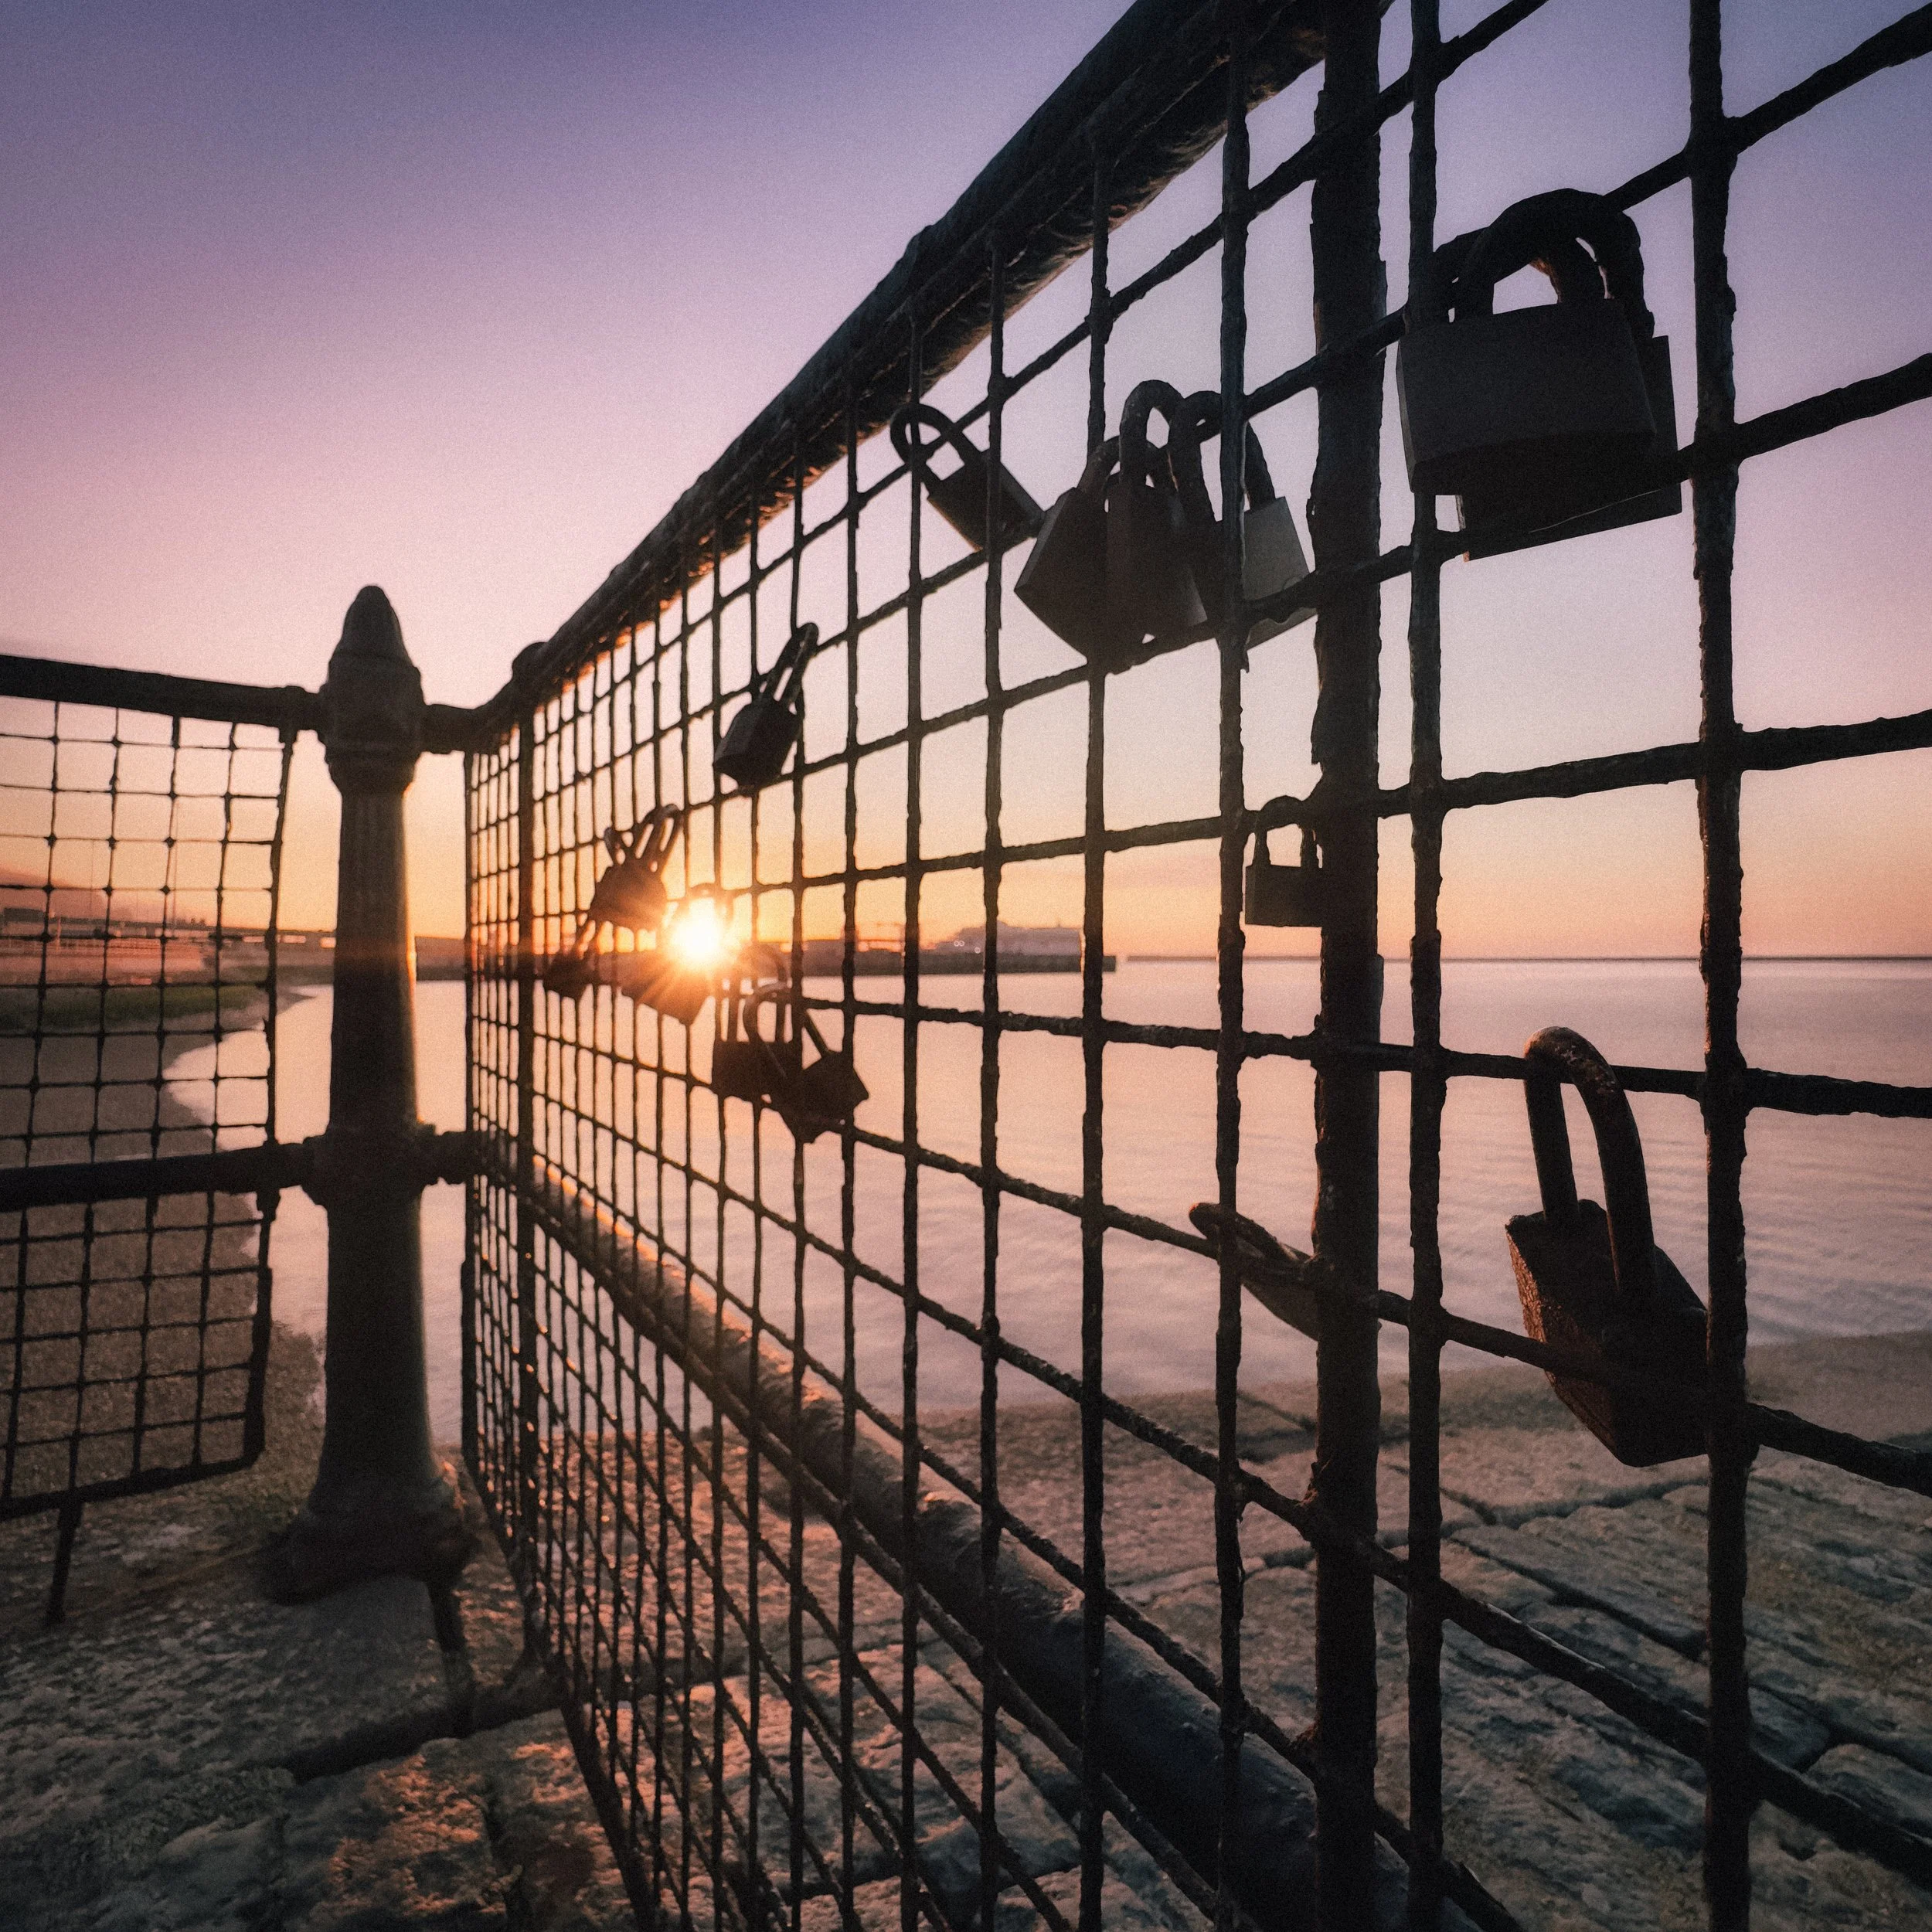
Separation is critical. Your silhouetted subject needs clear space around it, particularly around the head and any defining features. If the top of a person's head merges with a dark treeline in the distance, the silhouette loses its clean edge and becomes part of a muddle. If a bird's wingtip disappears into a dark cloud, the wing shape is incomplete. You are working with outlines, and outlines require a clear boundary between subject and background. When scouting your composition, check the entire edge of your subject: is there light behind every part of it?
A note on deliberate overlapping. There is a difference between accidental merging — where you did not notice that your subject's shoulder was blending into something behind it — and intentional layered composition, where overlapping silhouettes create a deliberate graphic pattern. The latter can be very effective: a row of trees whose canopies overlap, for instance, creates a layered texture that works precisely because the overlapping is systematic. The former is almost always a problem. The test is whether the merging reads as intentional. If it could be mistaken for a mistake, it probably is one.
Finding Your Background
A silhouette is not really a photograph of your subject. It is a photograph of your background, with your subject blocking part of it. This reframing is useful, because it reminds you that the background is not a neutral support — it is the most important visual element in the image.
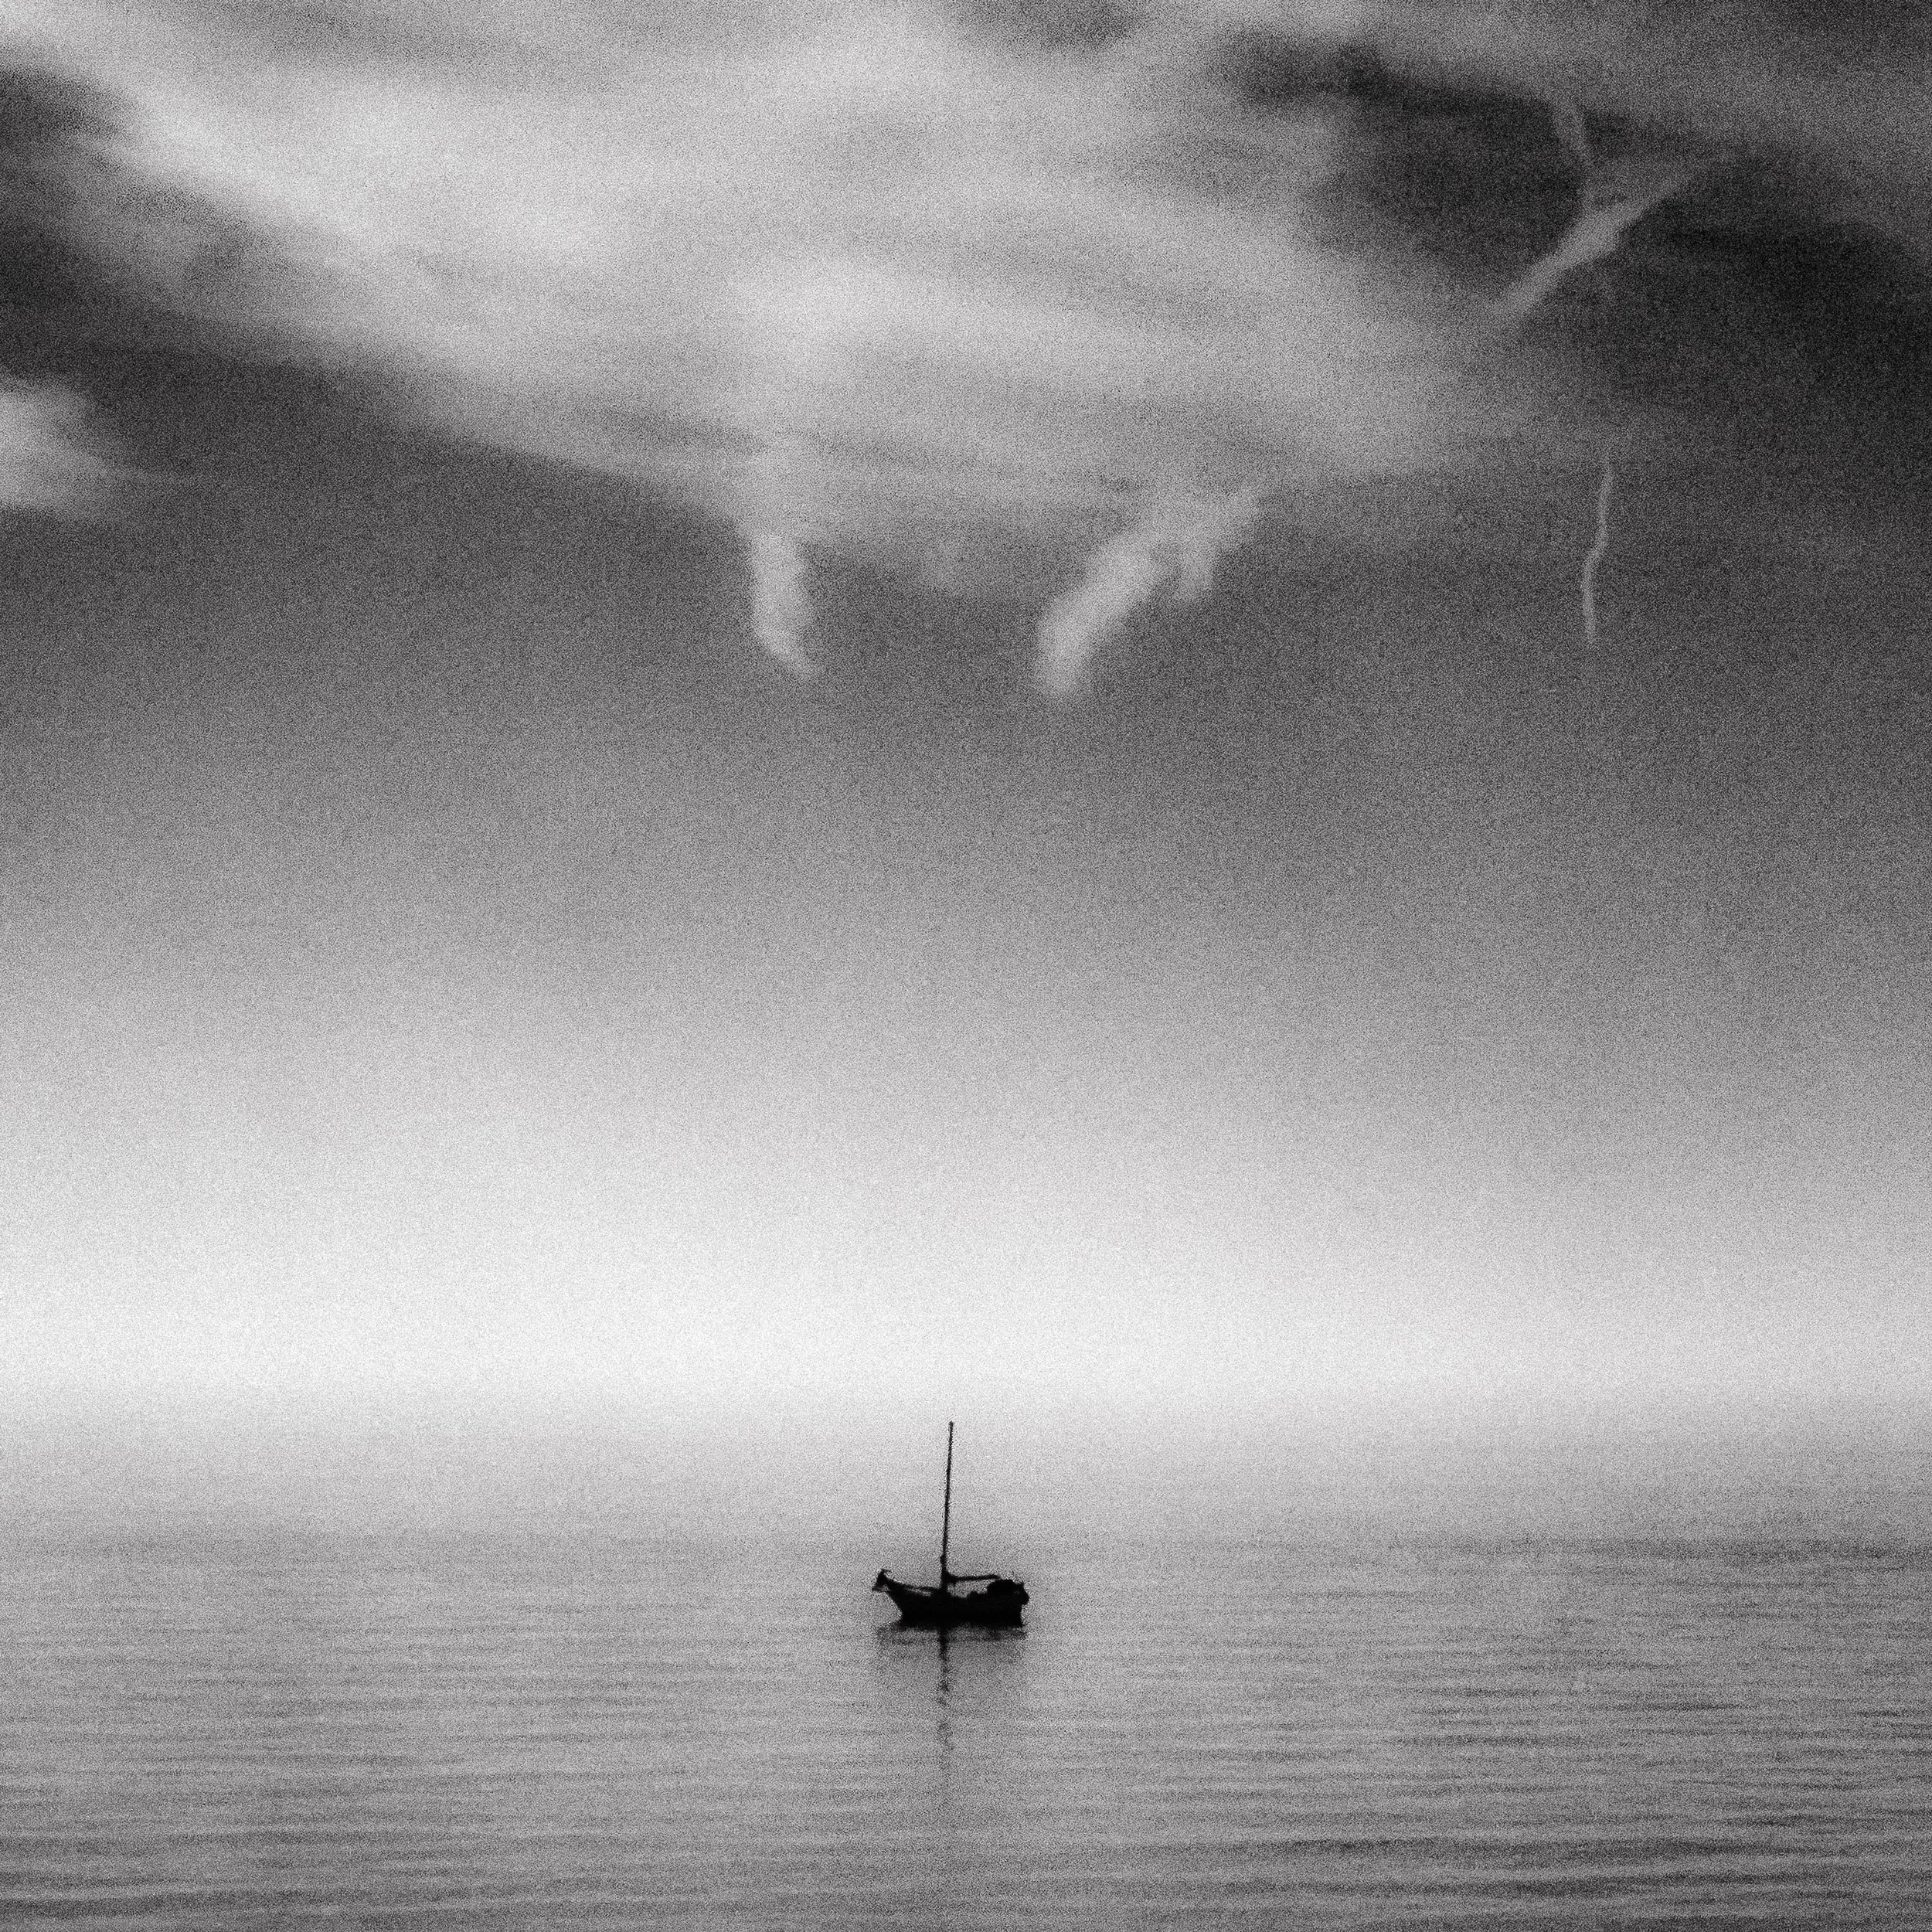
The fundamental requirement is that the background must be significantly brighter than the subject. The greater the exposure difference, the darker and cleaner the silhouette. A one-stop difference will produce a darkened subject with some shadow detail visible; a three-stop difference or more will produce a near-black or pure black silhouette. You are aiming for the larger end of that difference.
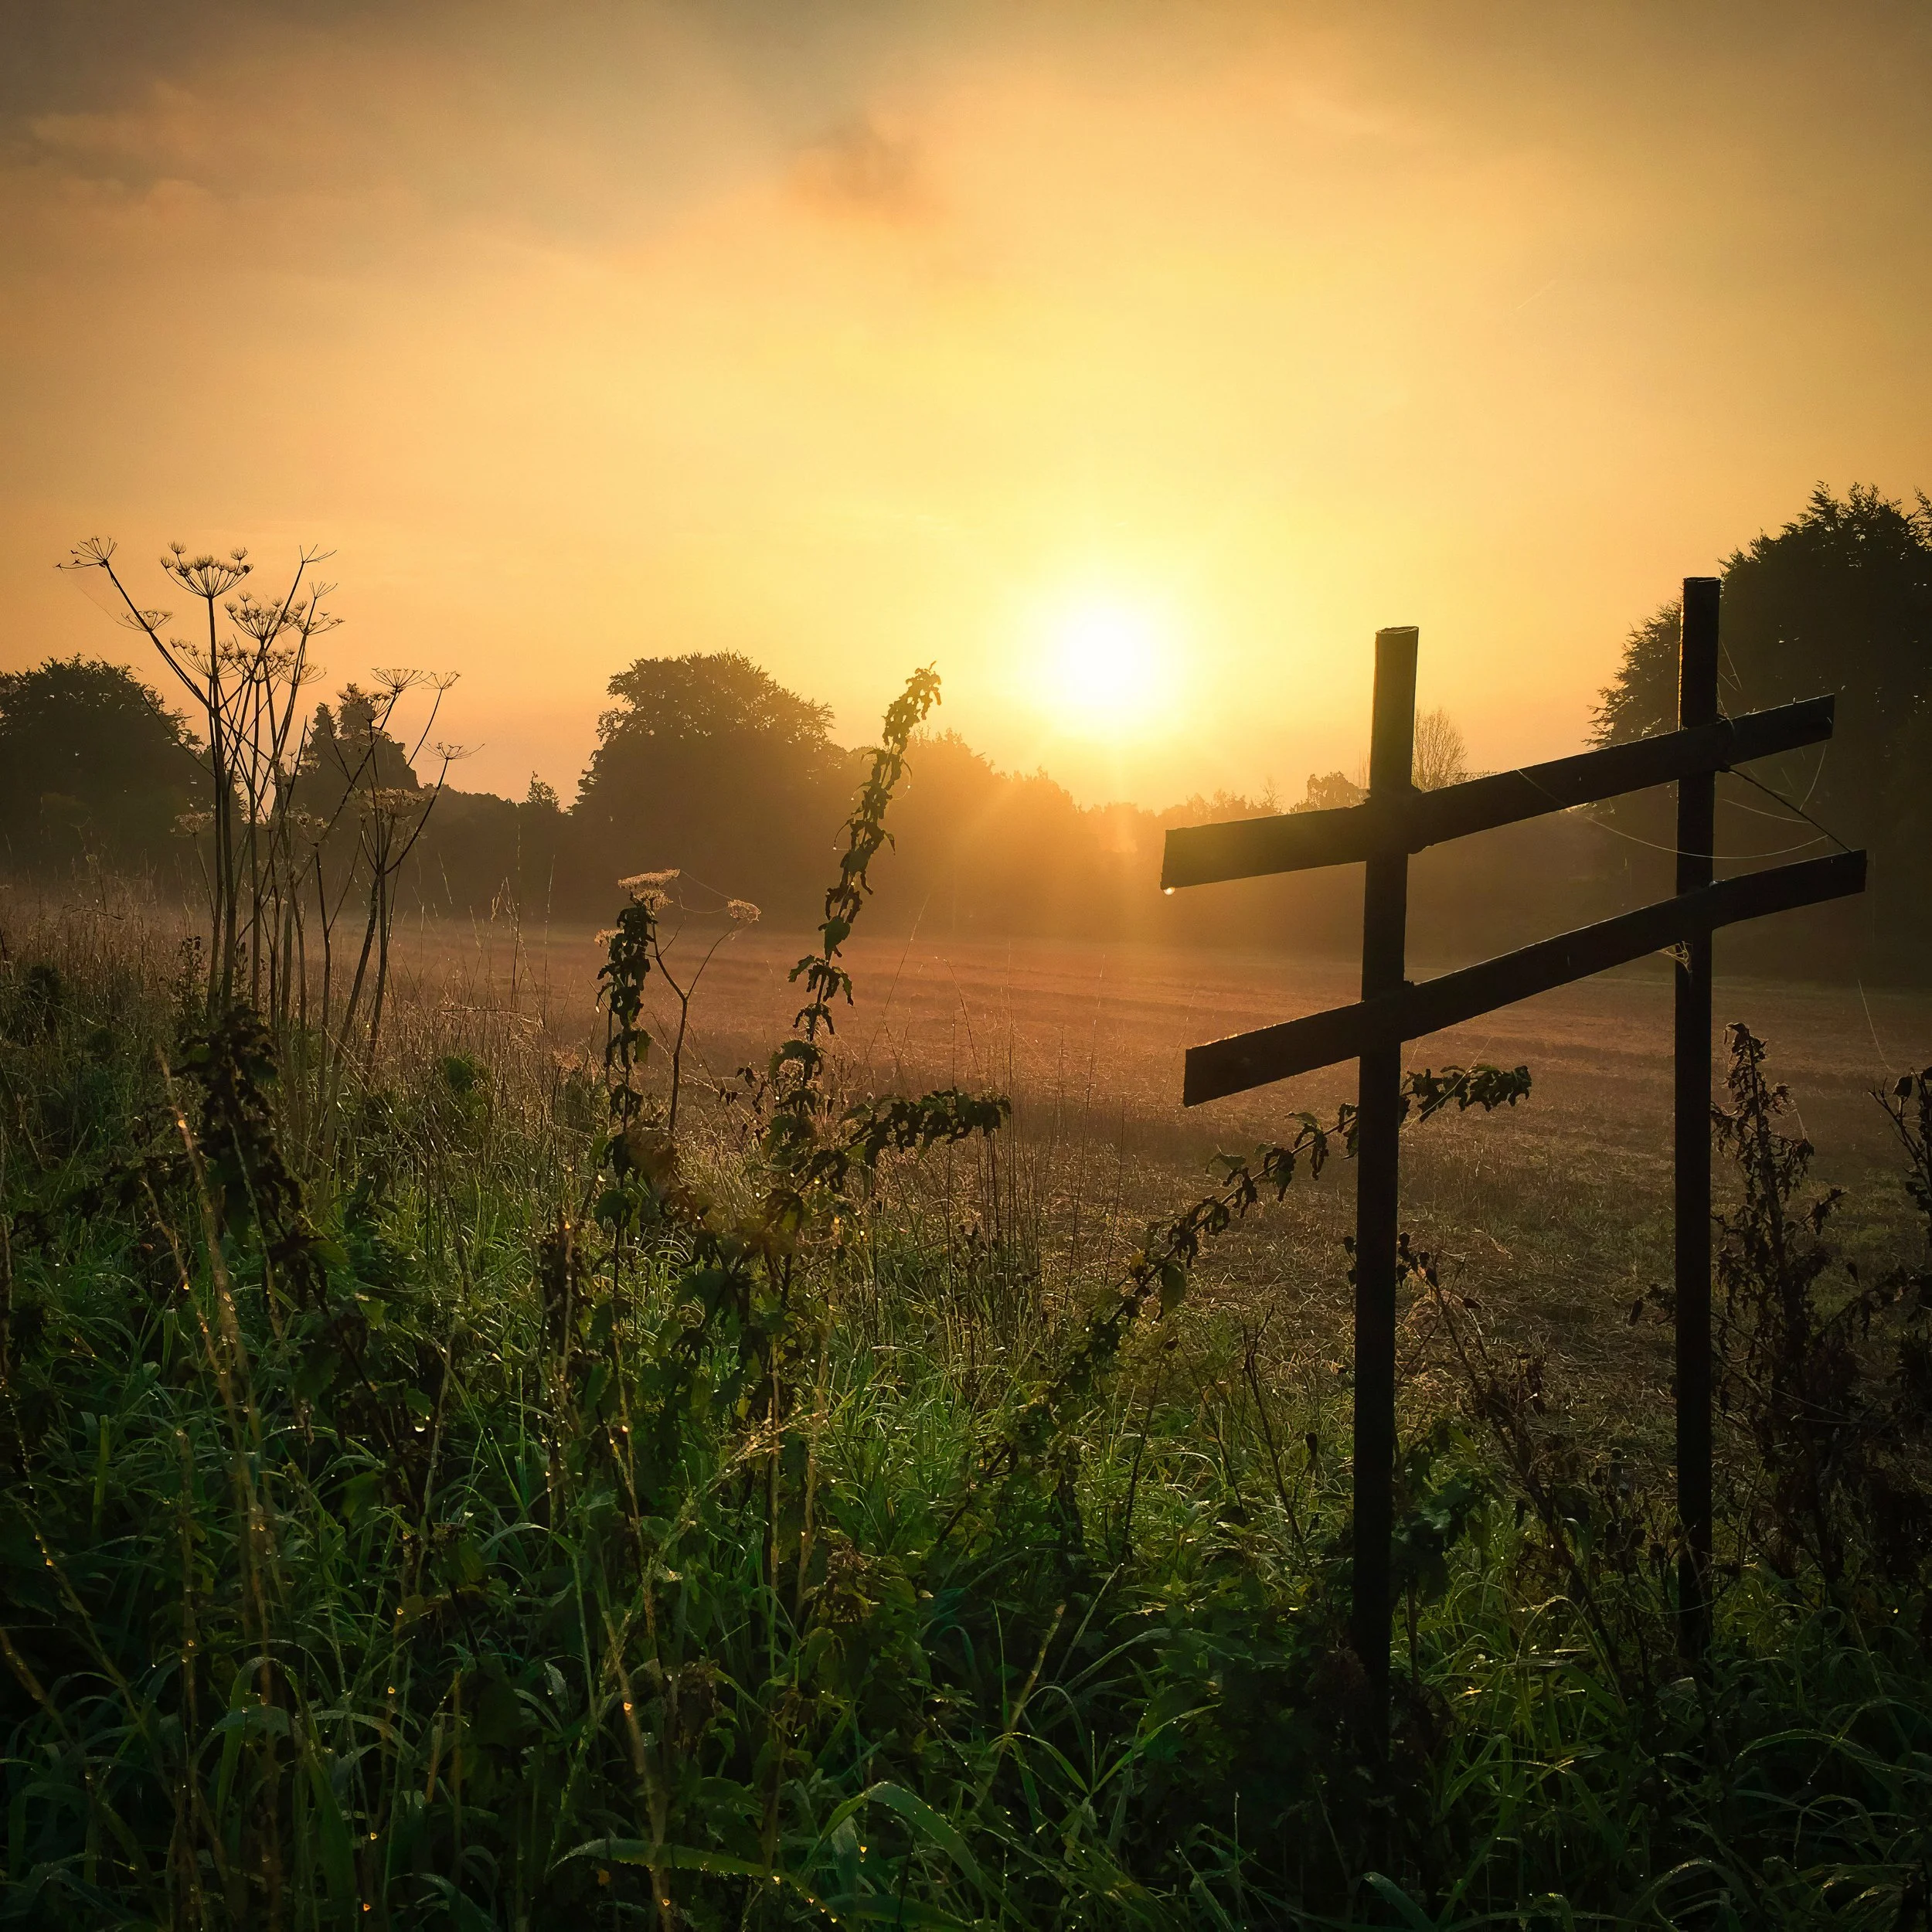
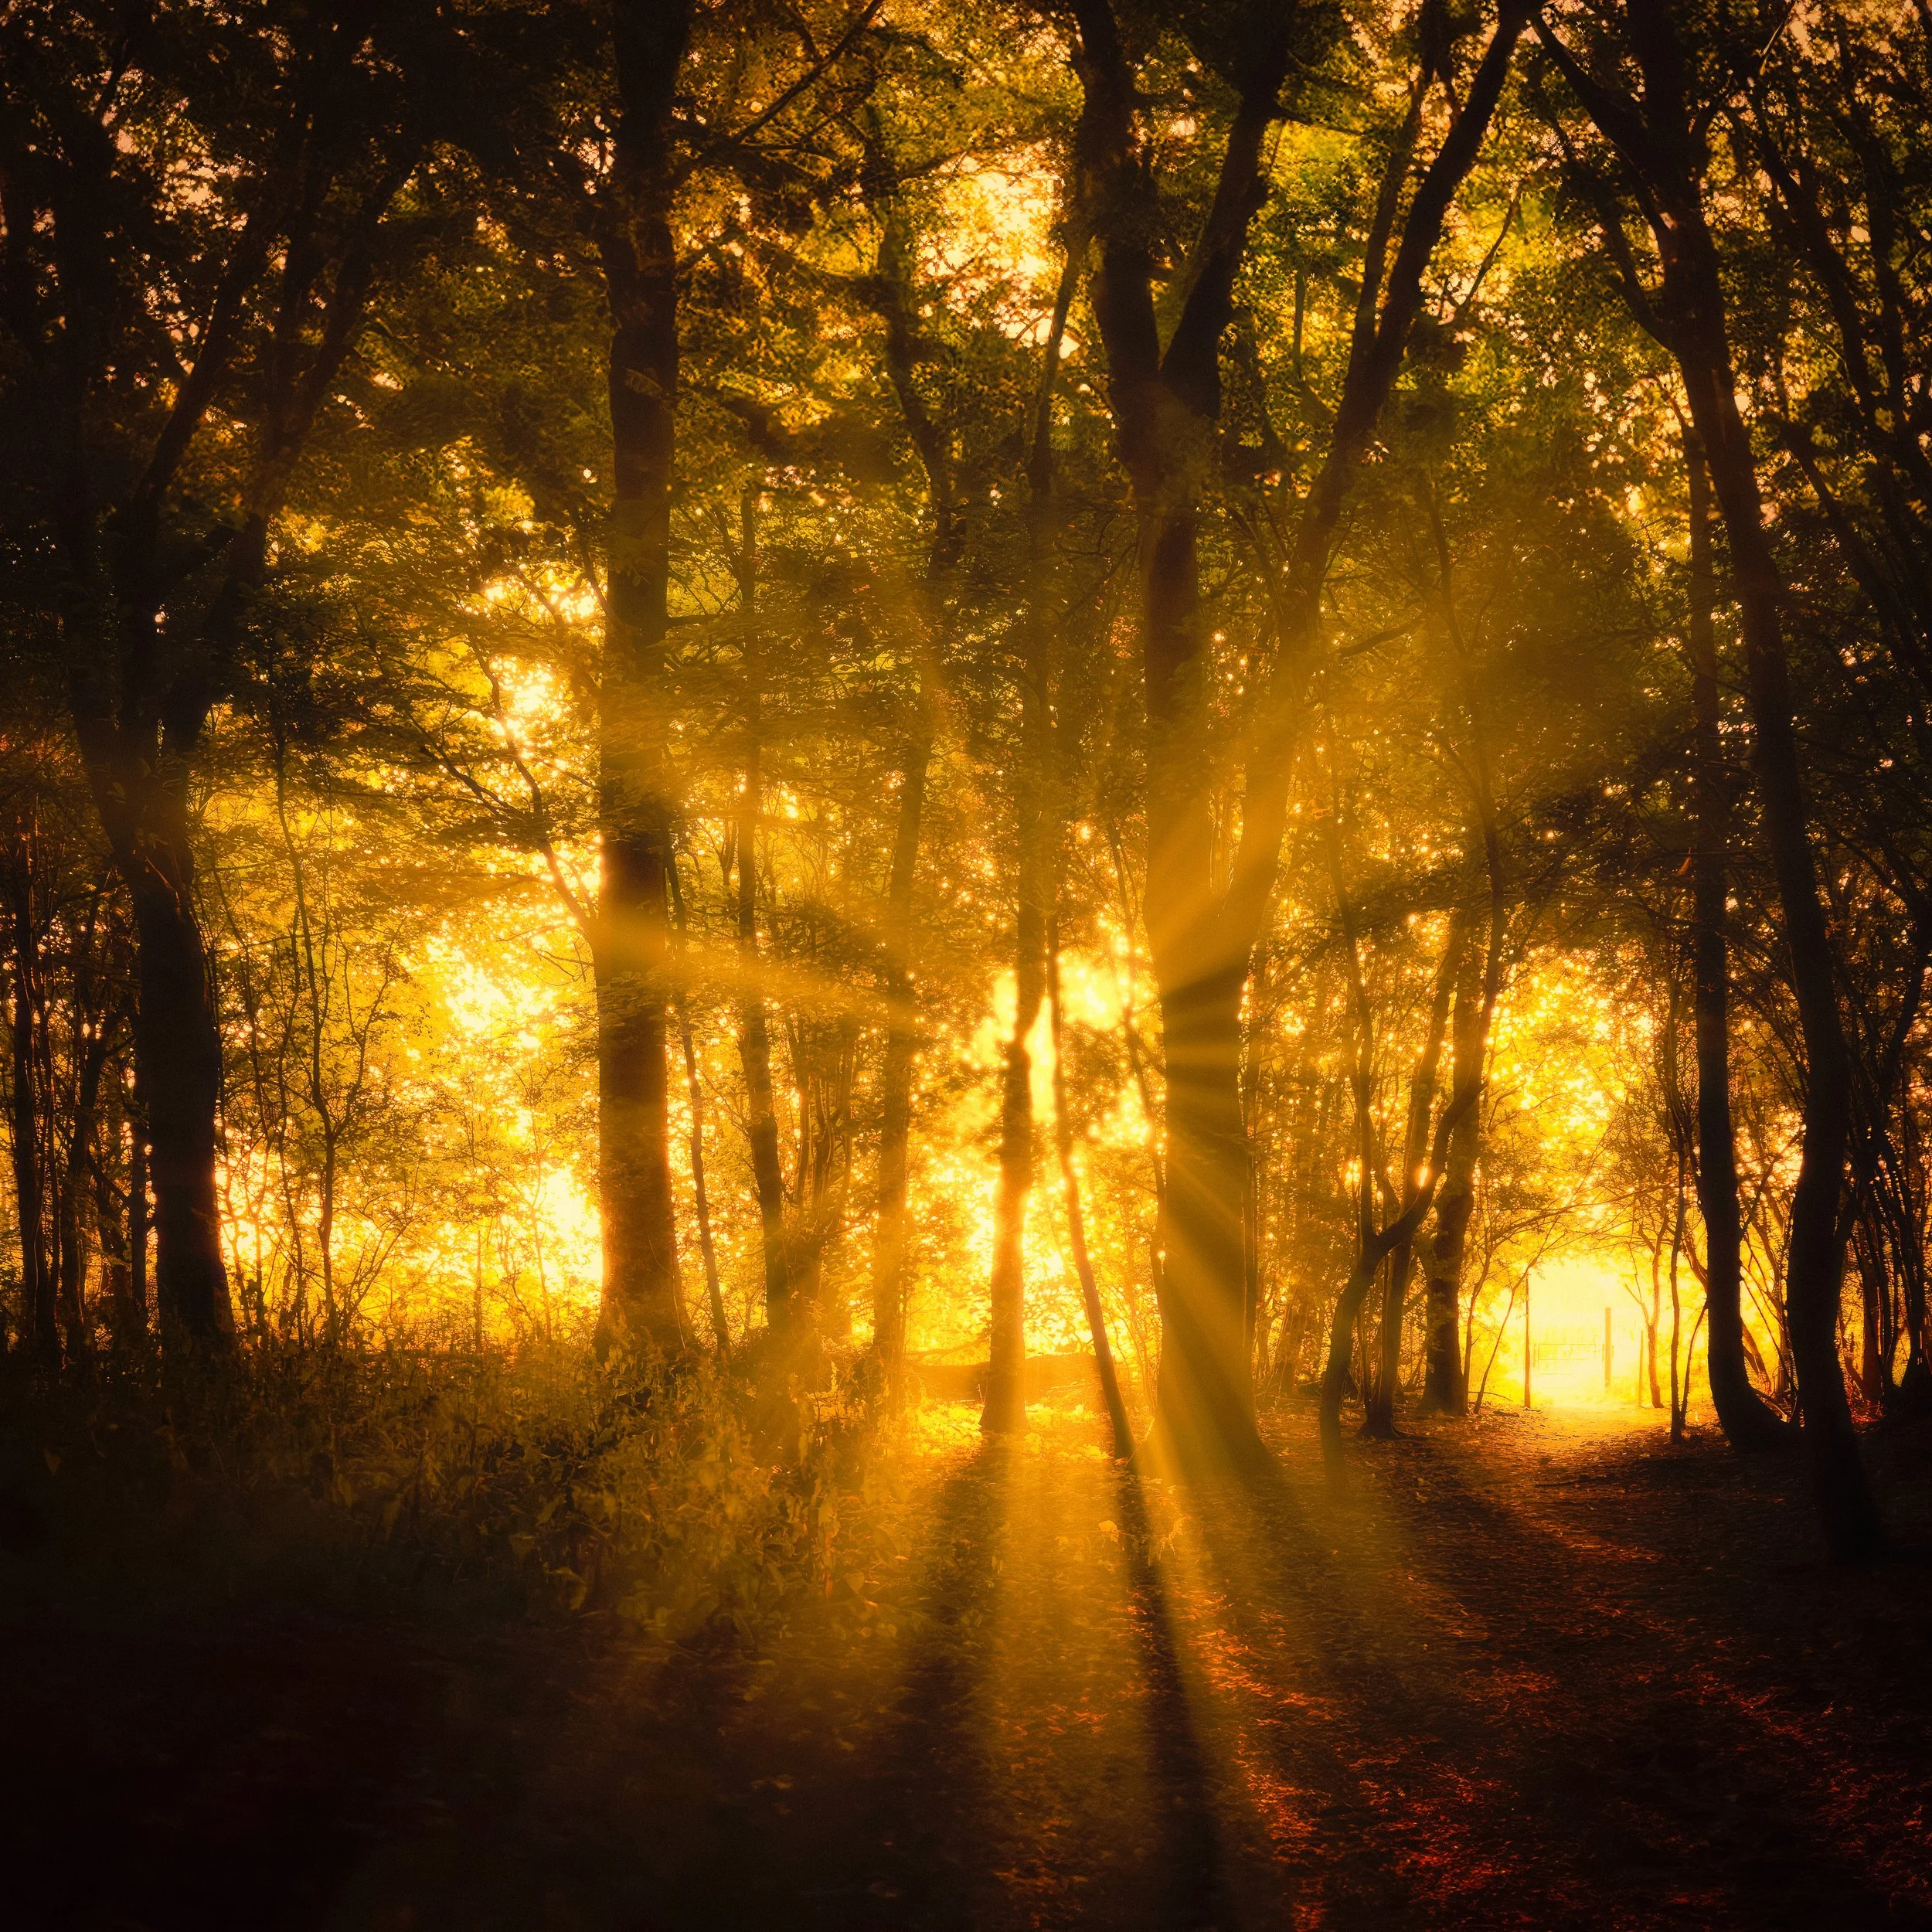
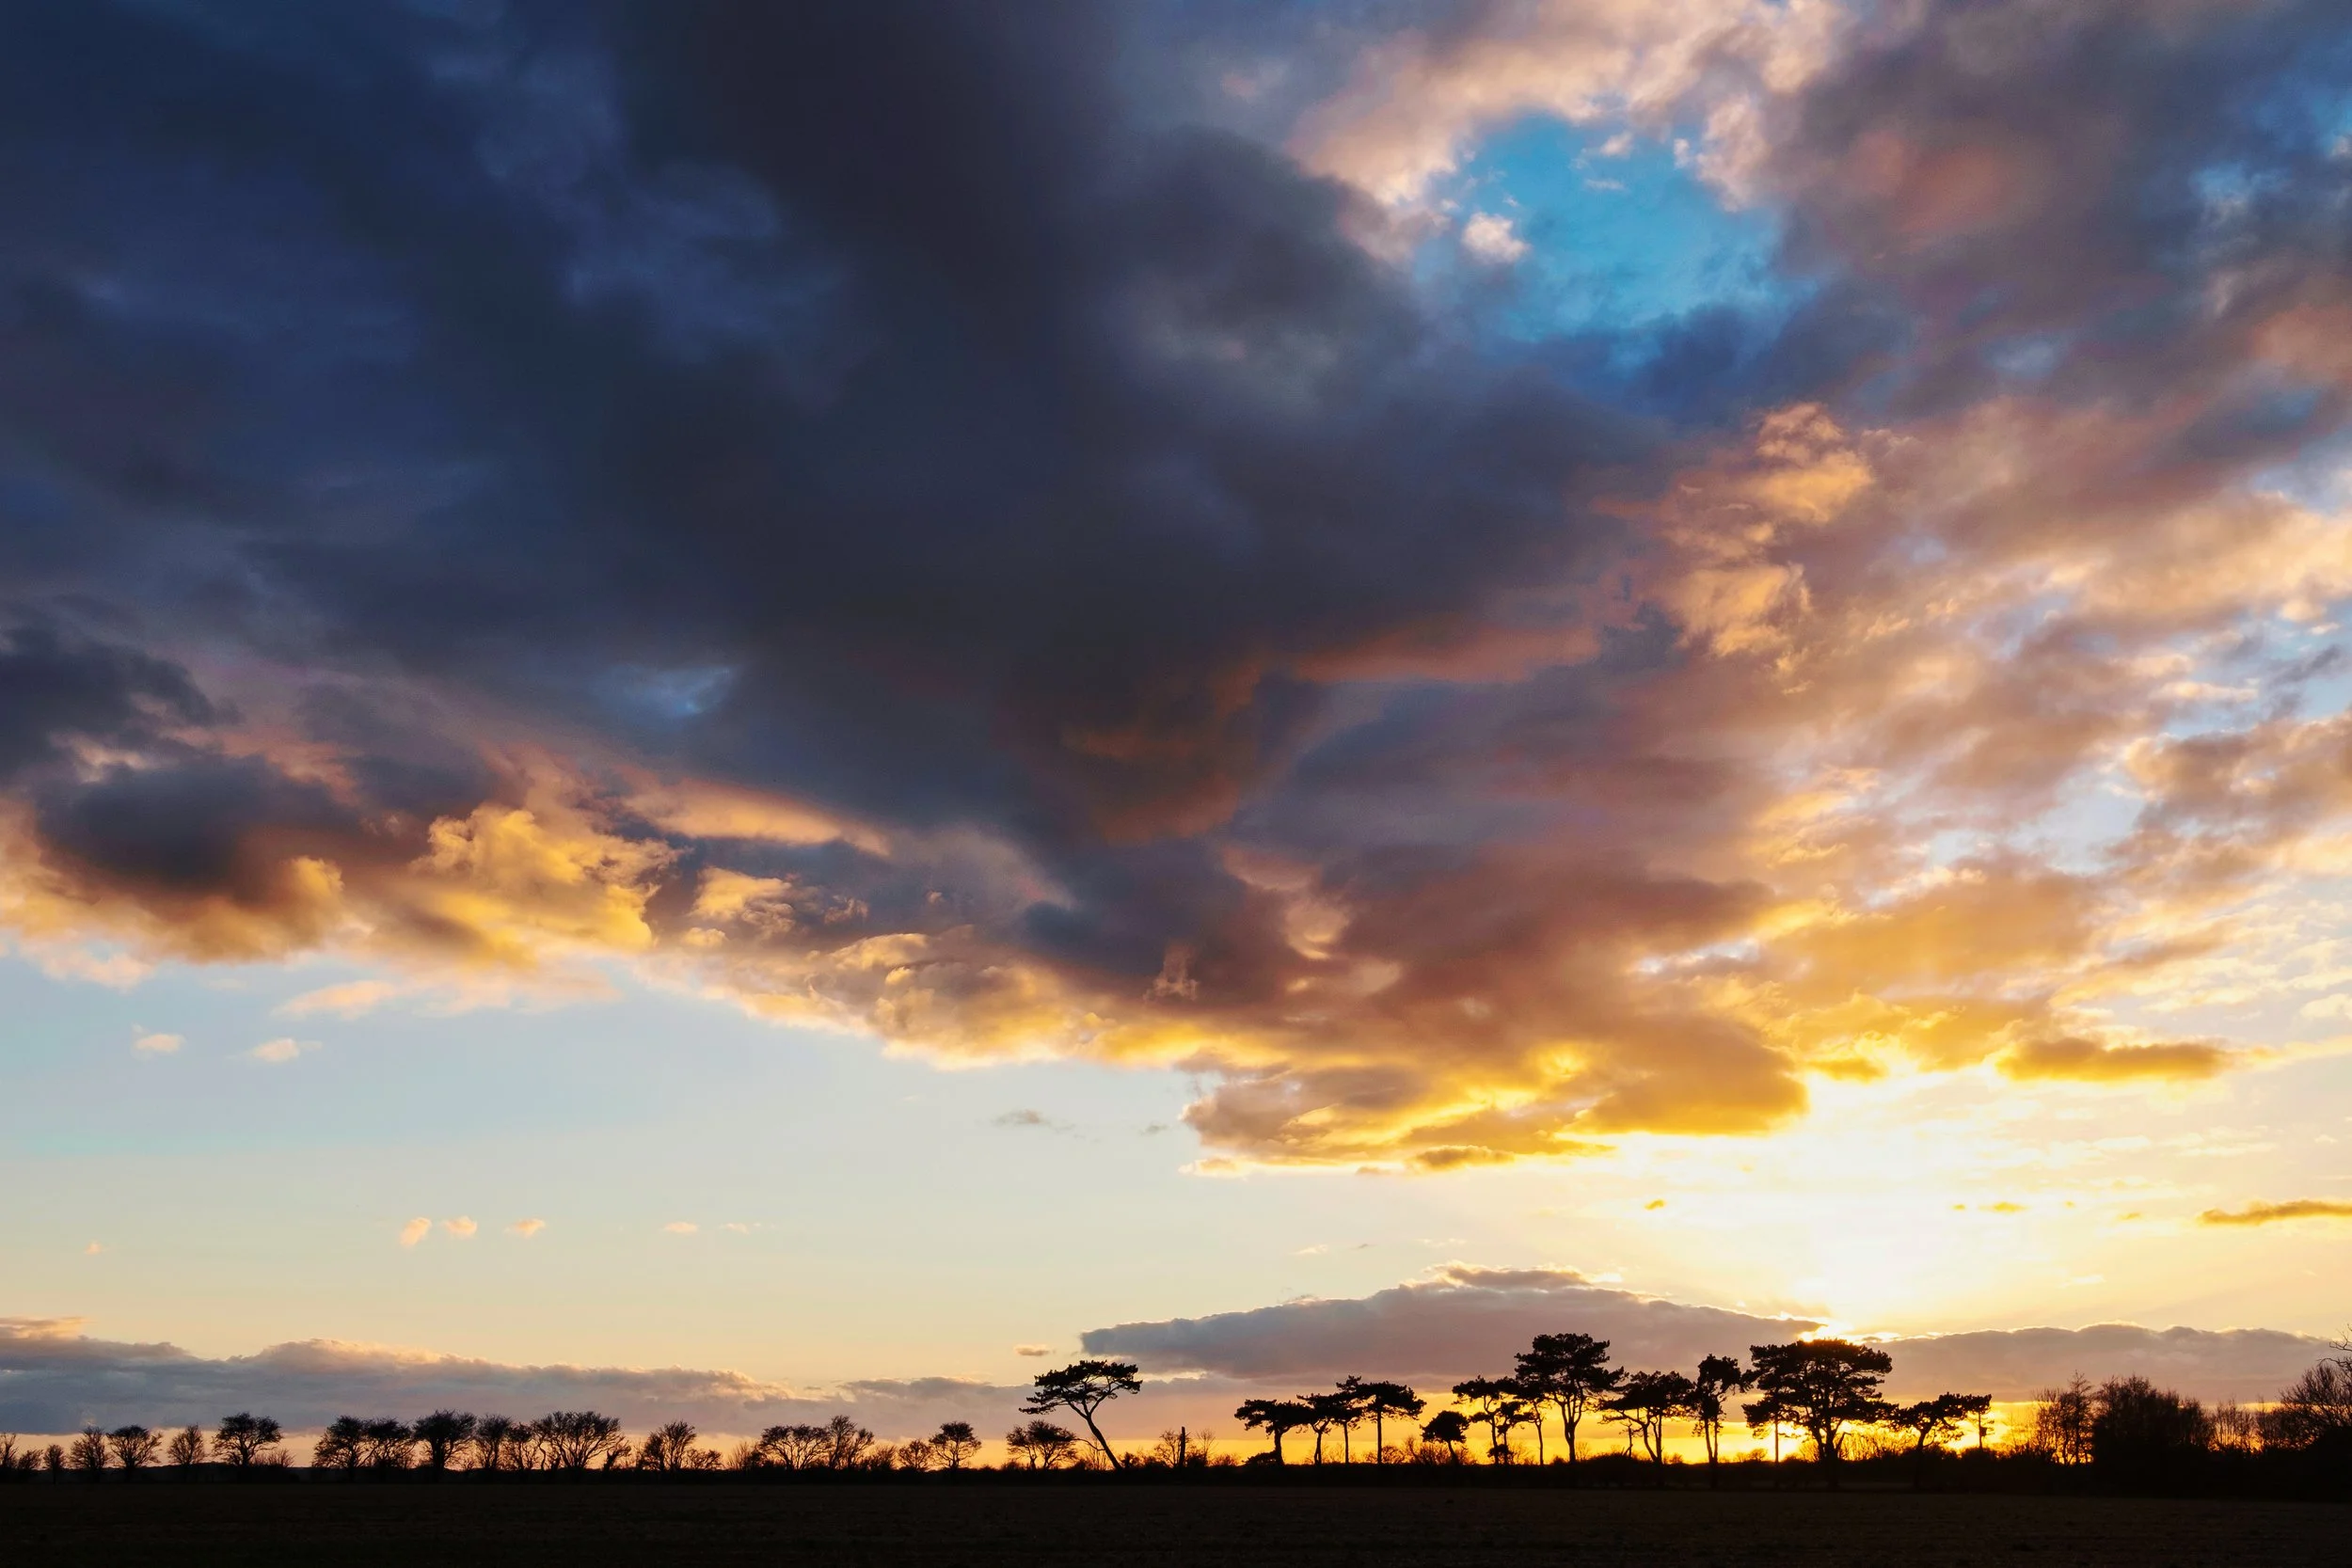
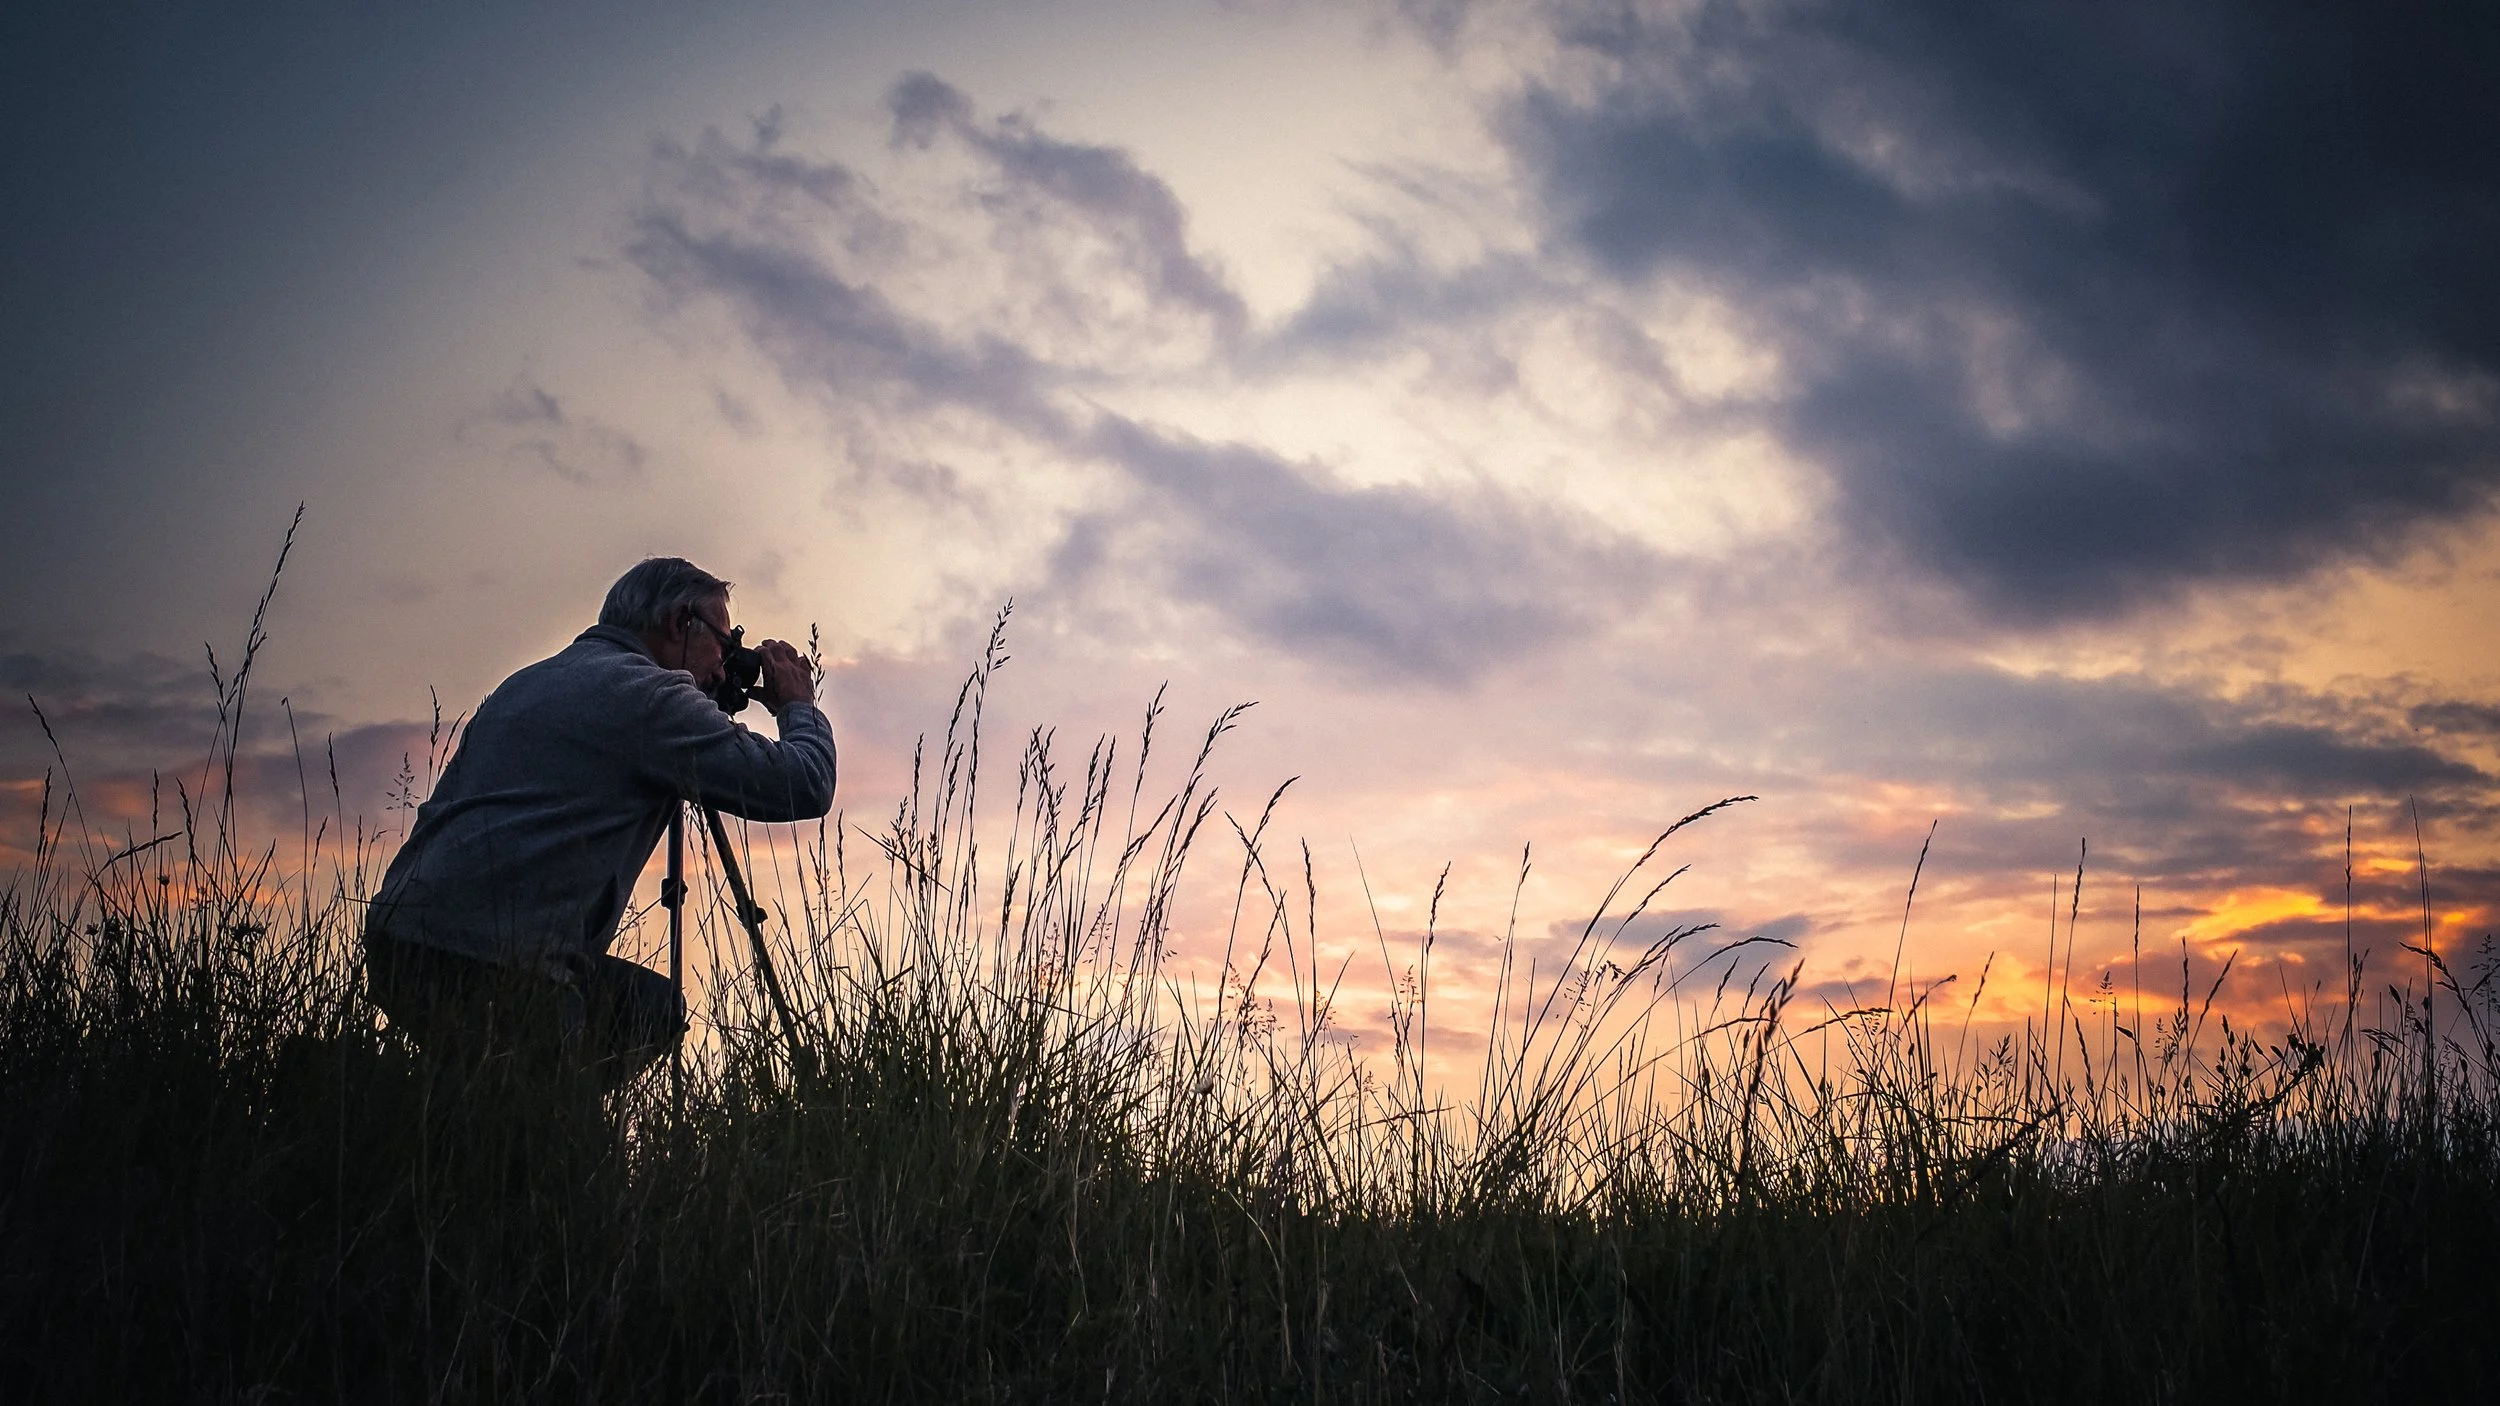
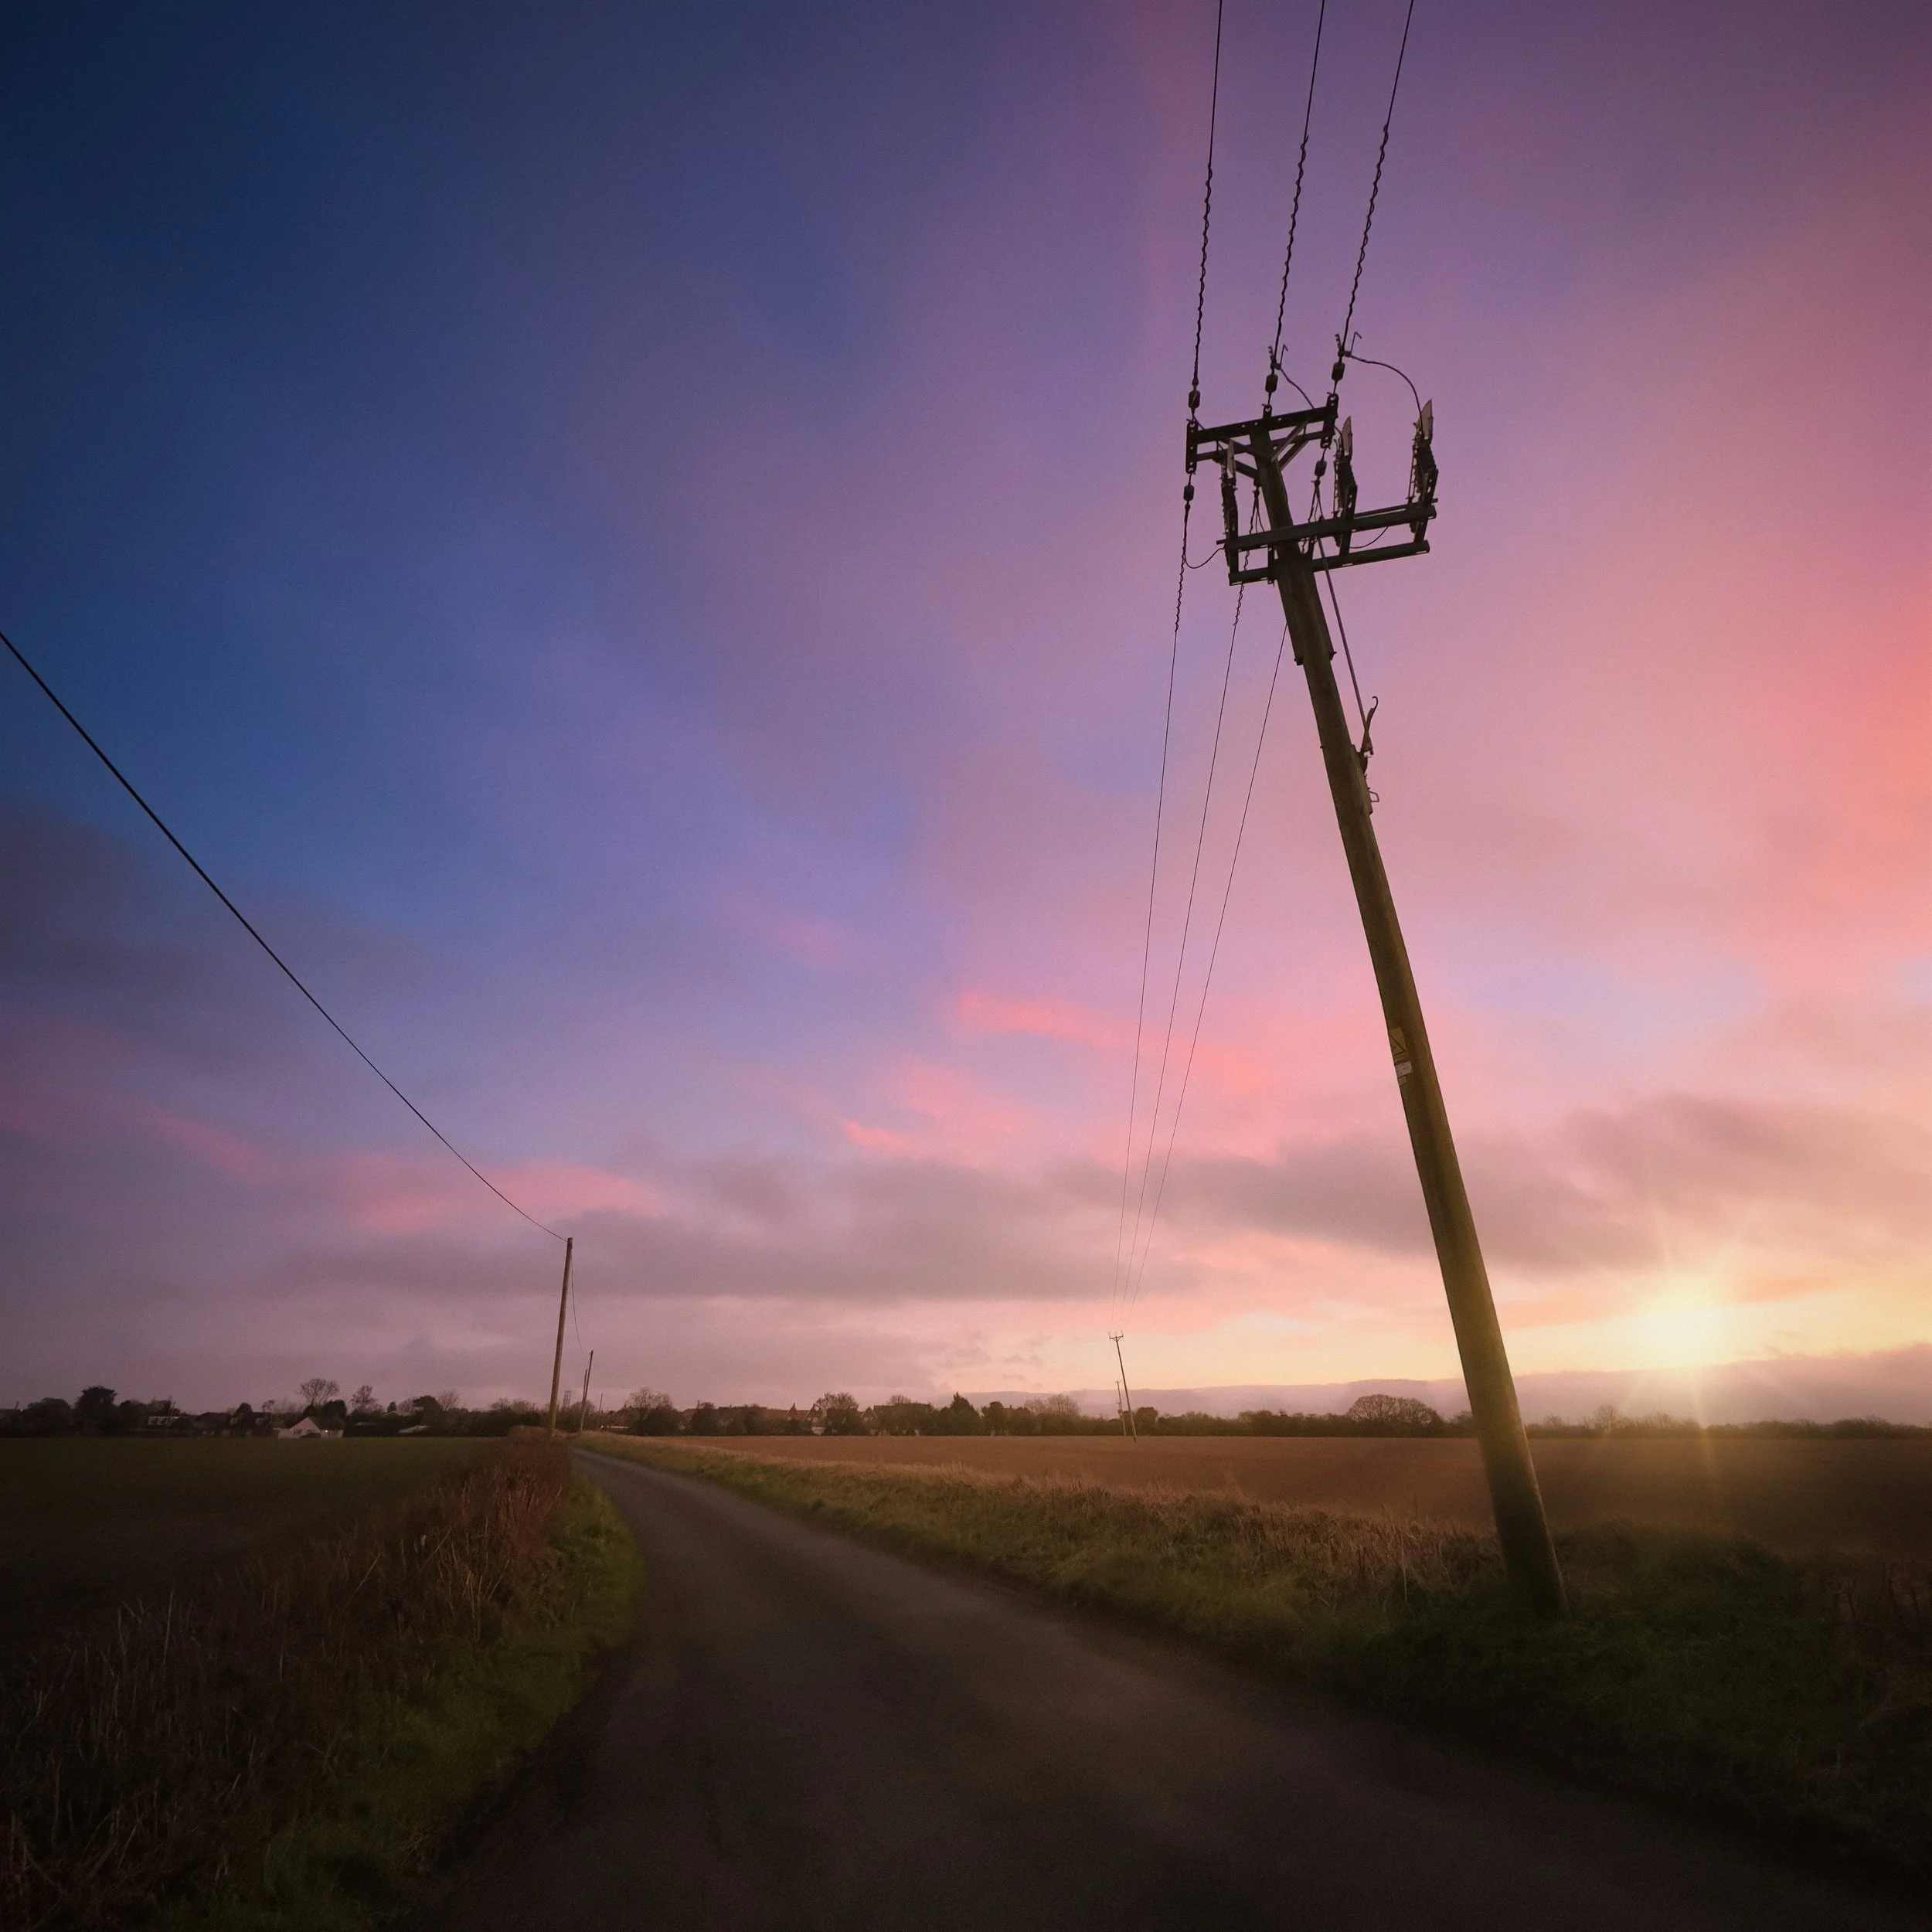
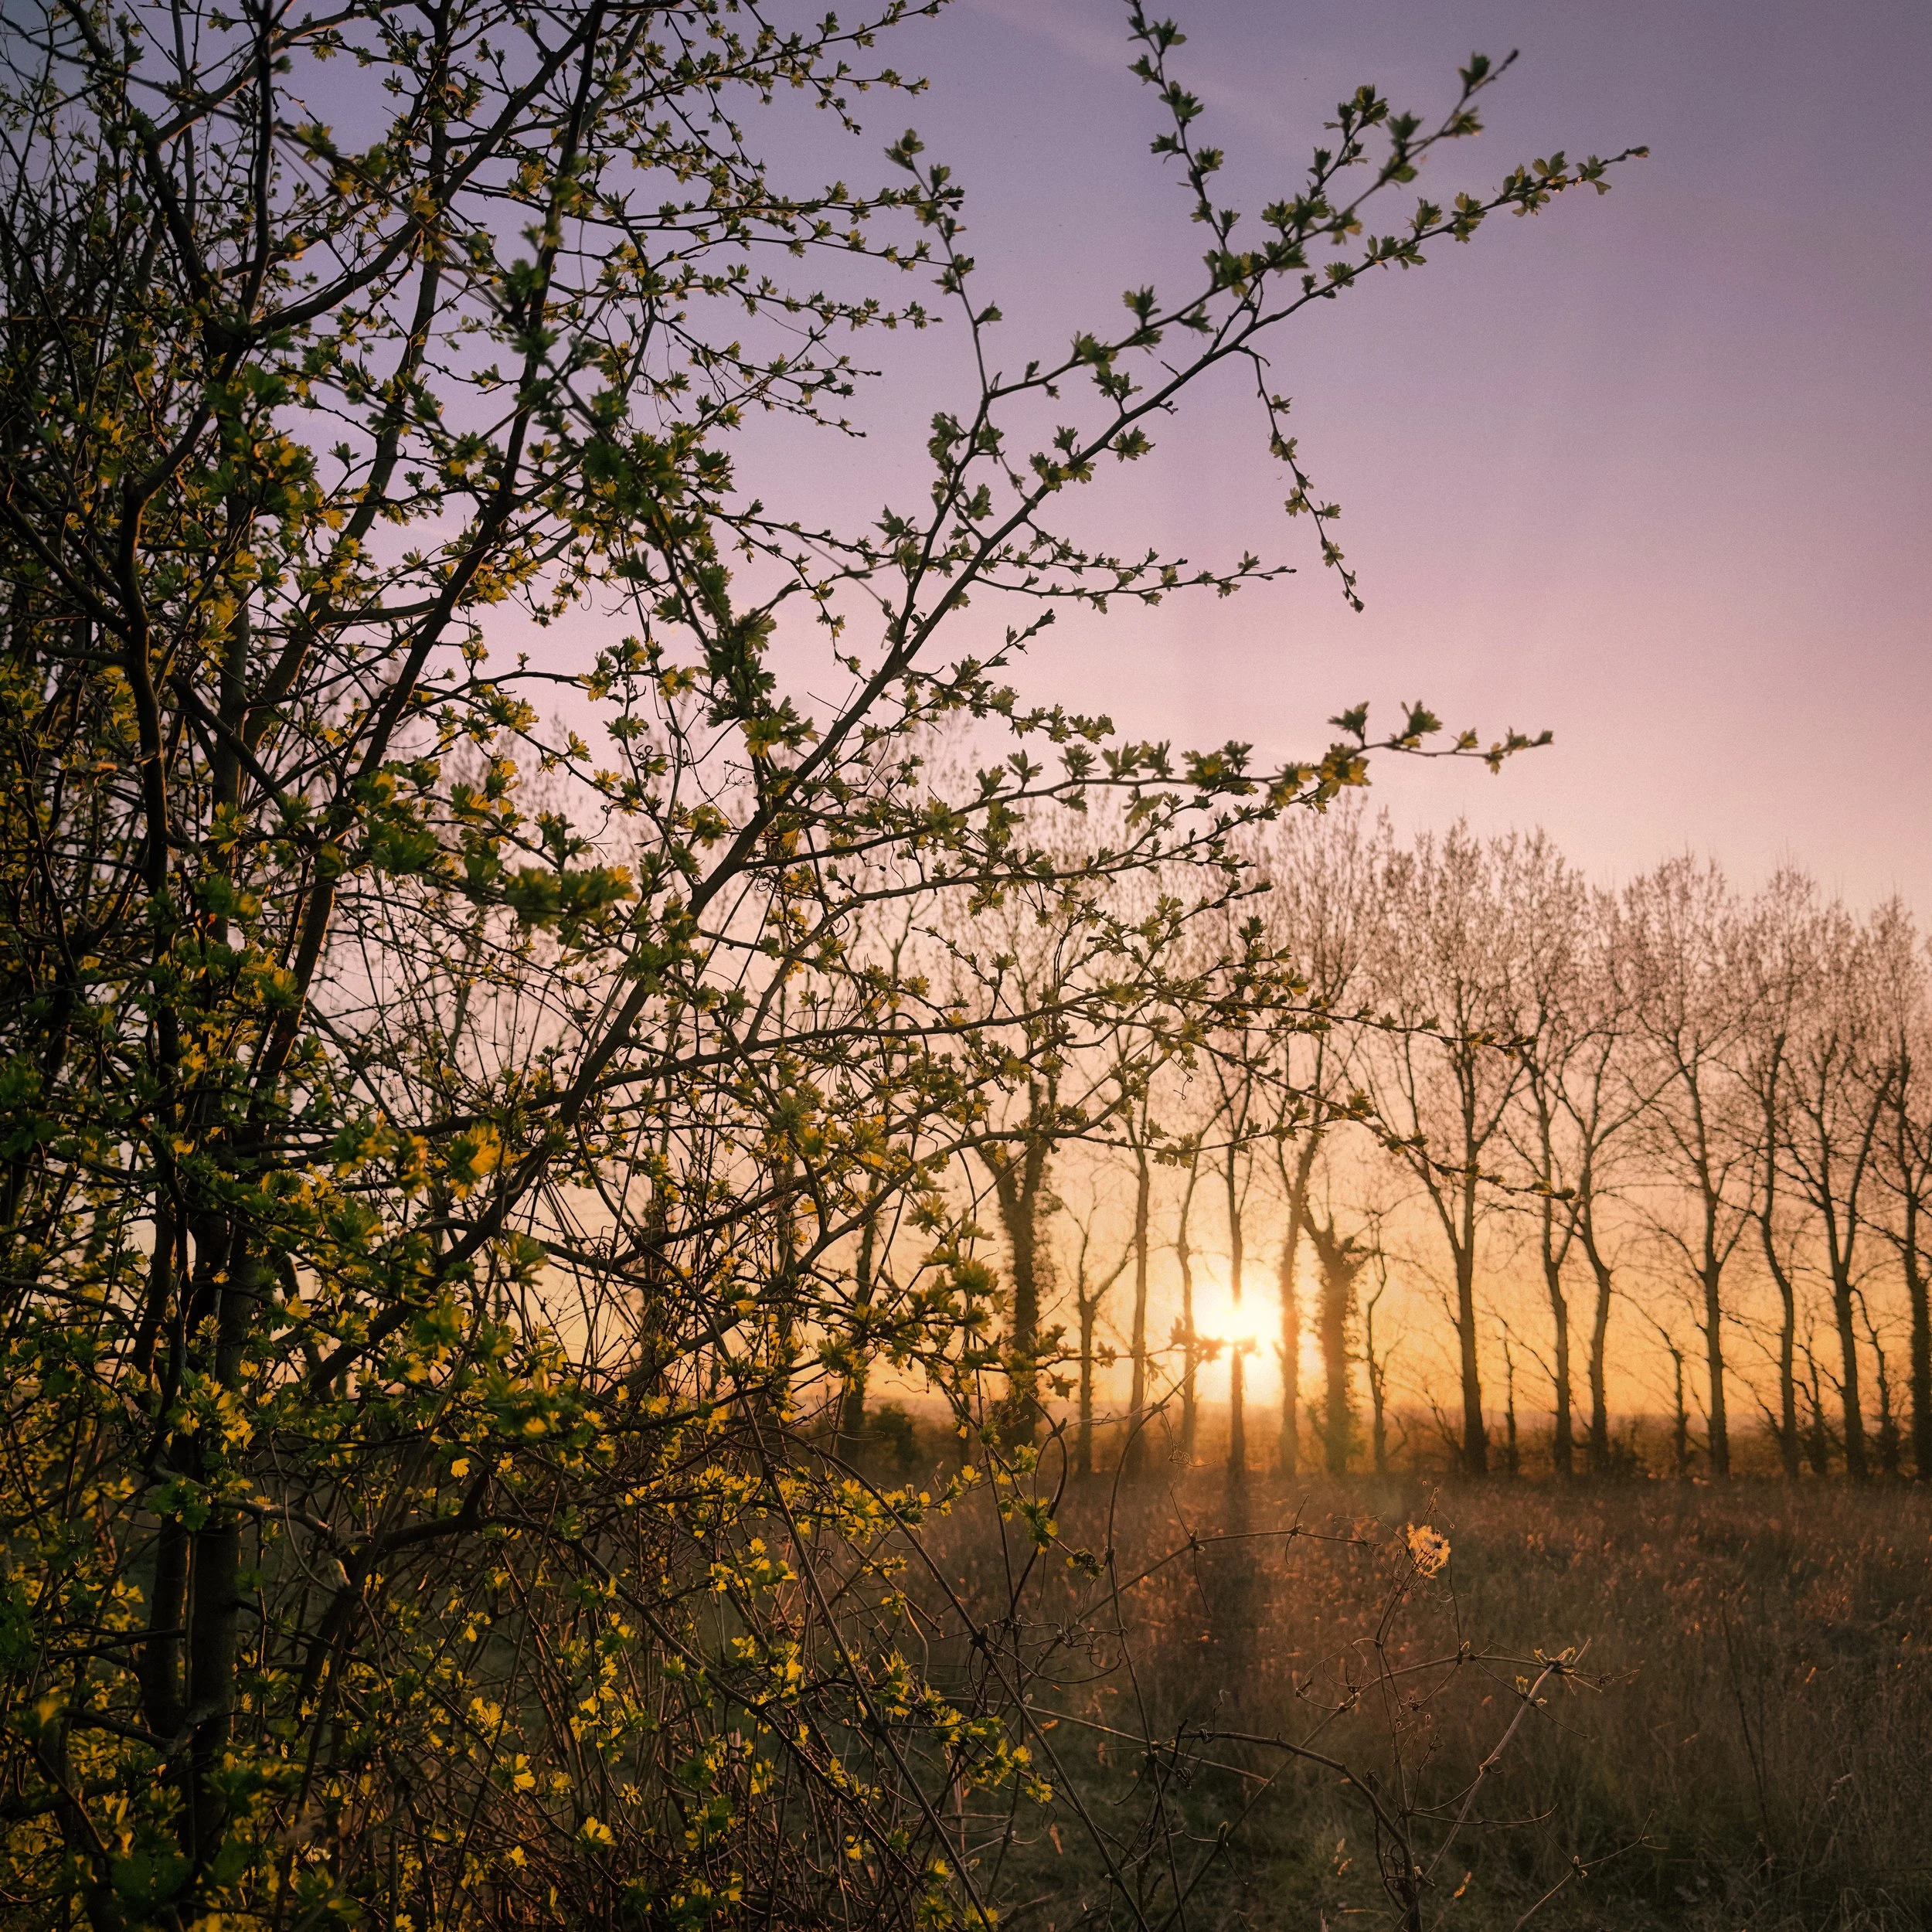
The classic backgrounds are the ones you will see in every silhouette tutorial, and they are classic for good reason. Sunset and sunrise skies offer the combination of brightness and colour that makes silhouettes dramatic: the warm, low light produces gradations from orange at the horizon to violet and blue above, and the colours alone make the background worth photographing even without a subject. The open sky at any time of day — not just golden hour — is bright enough to produce a silhouette against a shaded or naturally backlit subject; even on an overcast day, the sky is considerably brighter than anything in its shade. Water reflecting the sky doubles the bright area available and introduces a pleasing symmetry. Indoors, large windows are the obvious choice: the daylight outside is much brighter than the interior, and a subject standing in front of a window will naturally silhouette against the bright rectangle of glass.
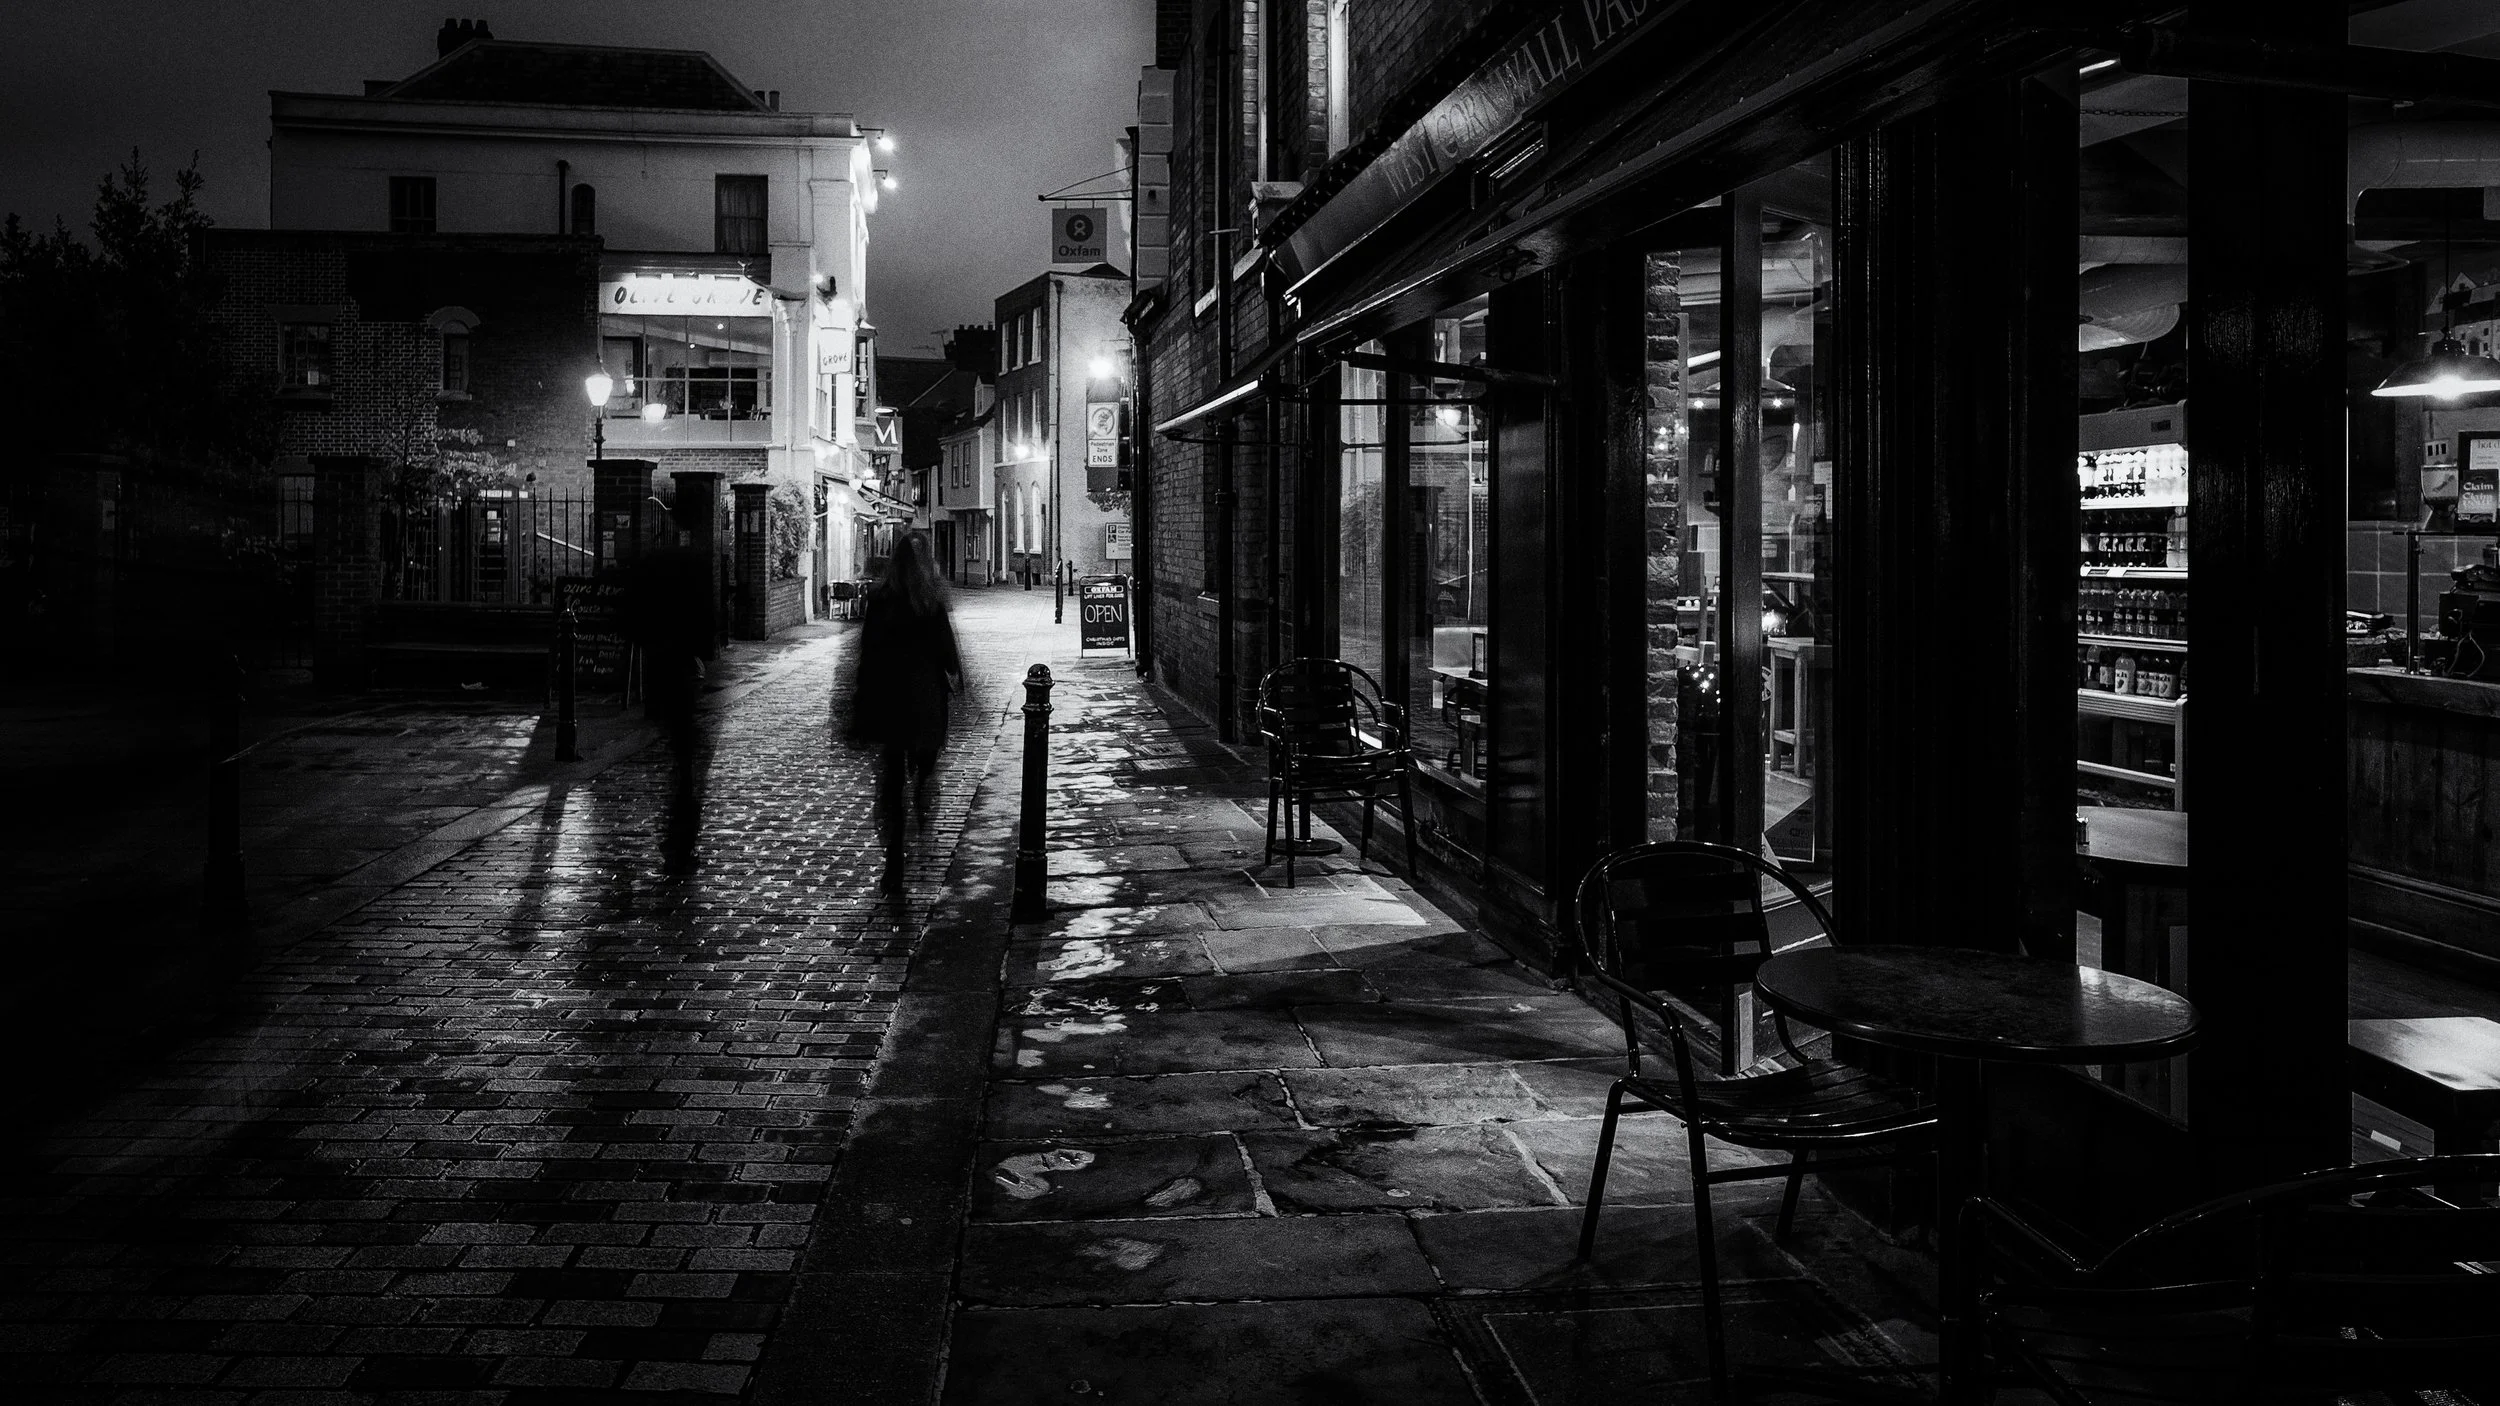
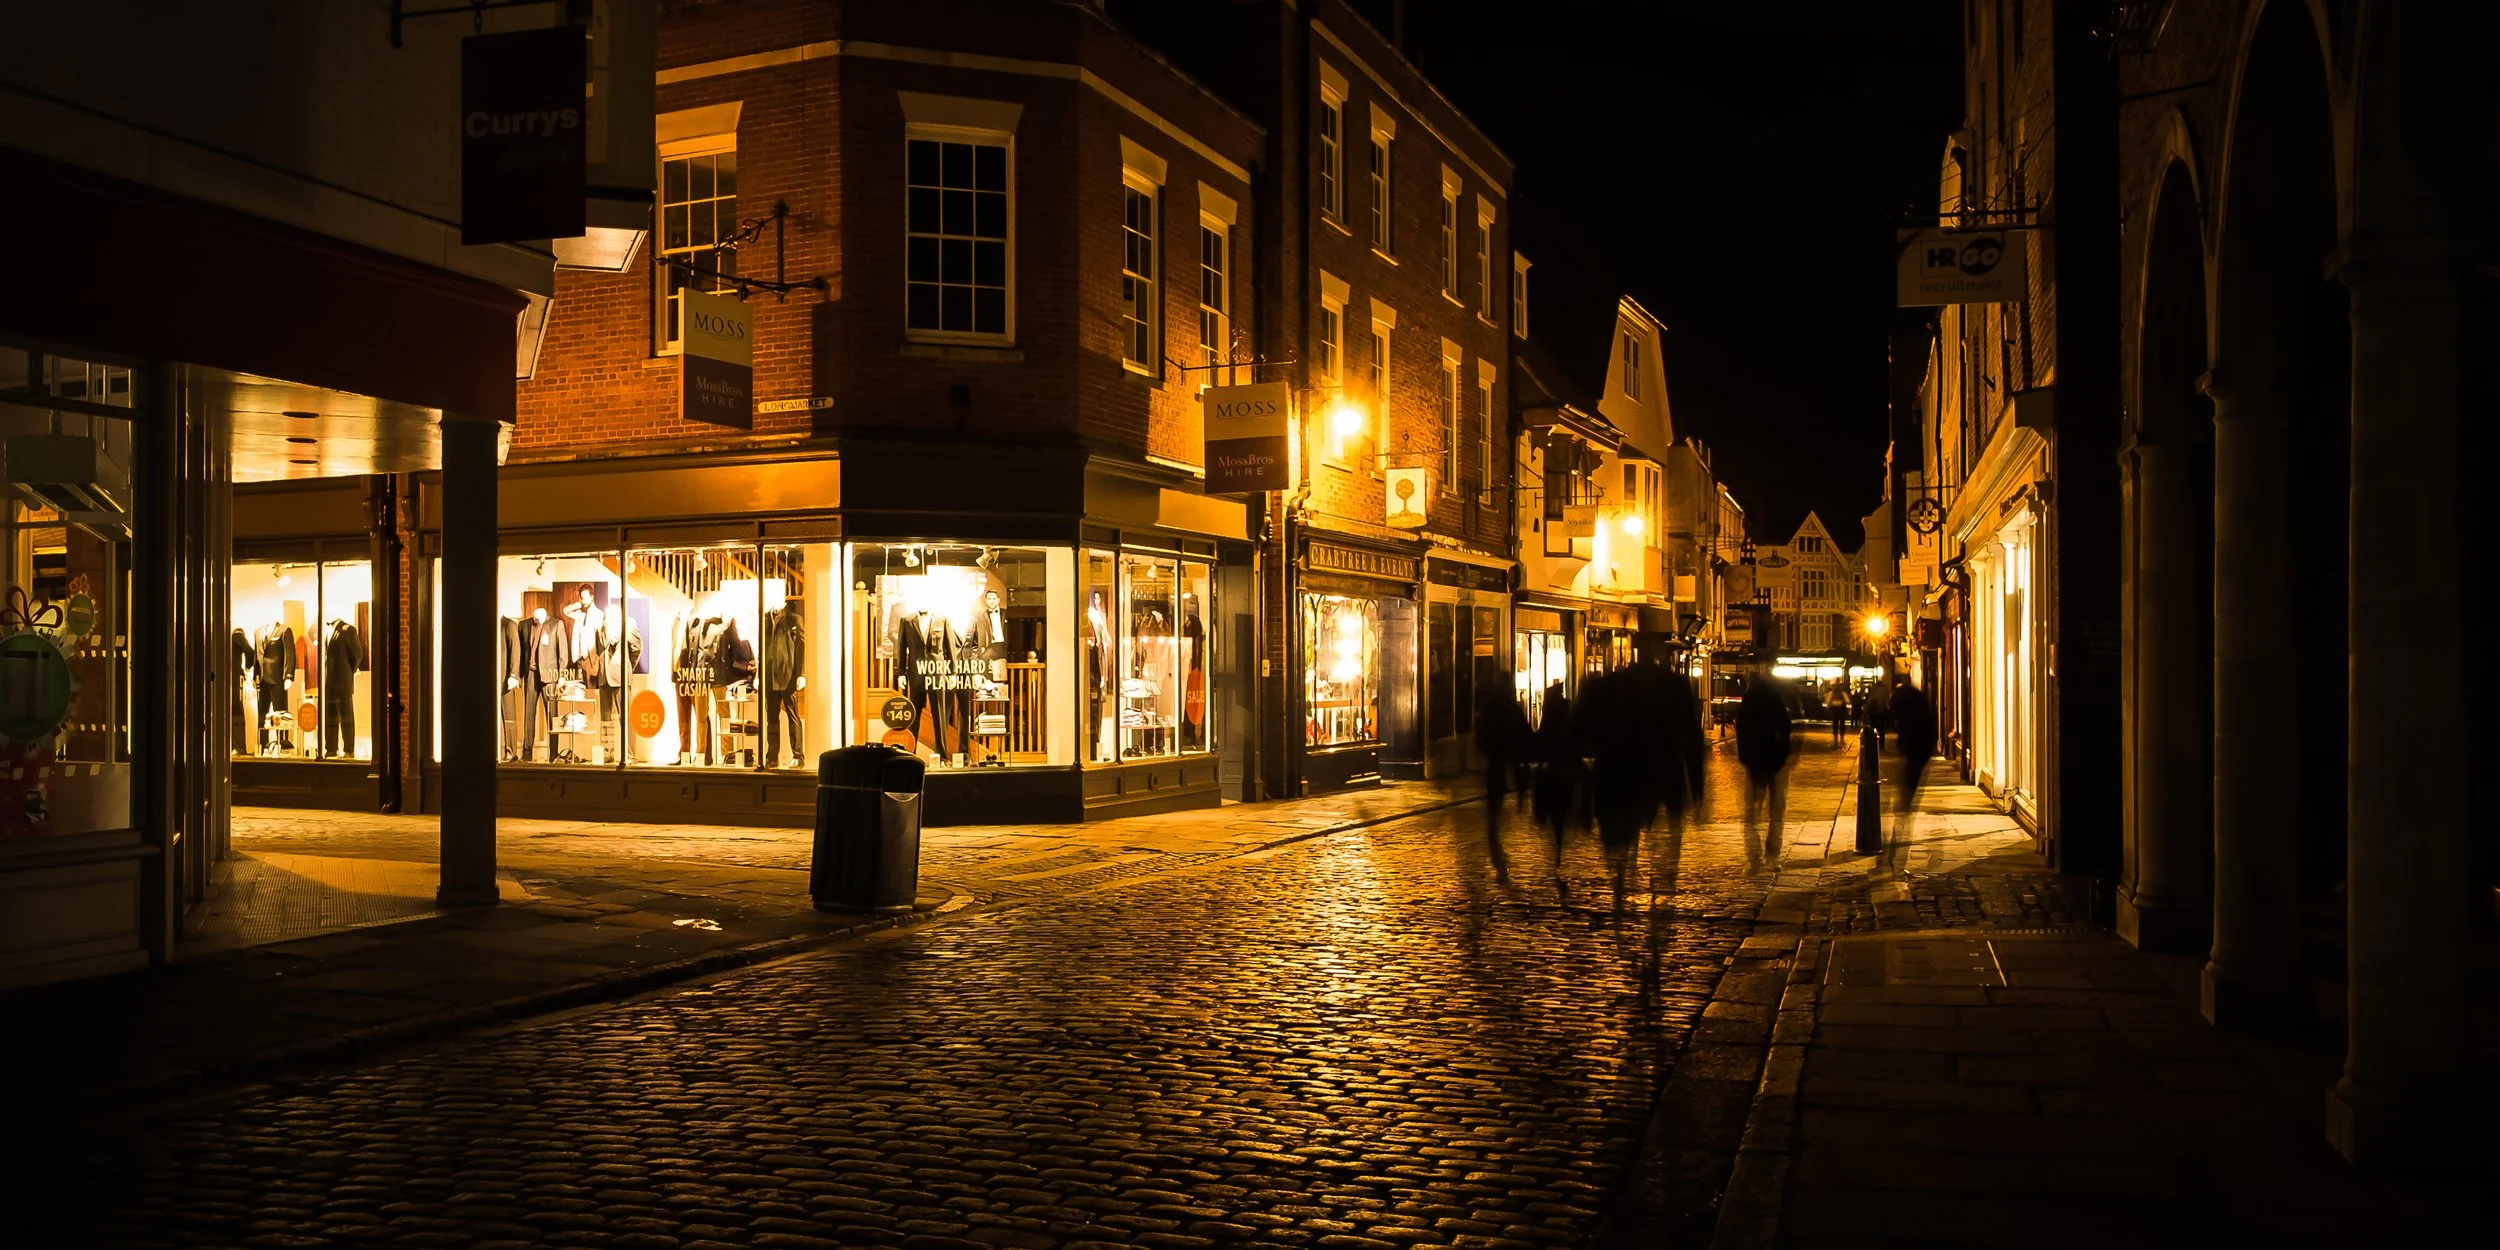
At night, artificial light sources — a lamp post, an illuminated shop sign, vehicle headlights, a neon sign, the lit interior of a building seen through a window — can serve as backgrounds for urban silhouettes. The geometry changes: you are no longer working with a large, diffuse background but with specific pools of light, and your subject needs to be positioned in front of those pools. The challenge increases because the light levels are lower overall, but the graphic results can be very striking — the cold blue of a street lamp or the warm red of neon behind a dark figure has a very different quality from a sunset, and worth pursuing.
The golden hours — roughly the hour after sunrise and the hour before sunset — are favoured for silhouette work not only because of the colour but because of the angle of the light. When the sun is low, it is possible to position yourself so that your subject stands directly in front of it, or in front of the illuminated sky just above the horizon. The sun is low enough to be in the frame, or just out of it, and the entire horizon becomes usable as background. As the sun climbs, this zone narrows; by mid-morning, the sun is high enough that pointing your camera at the sky produces a pale, textureless background that is usable but less interesting.
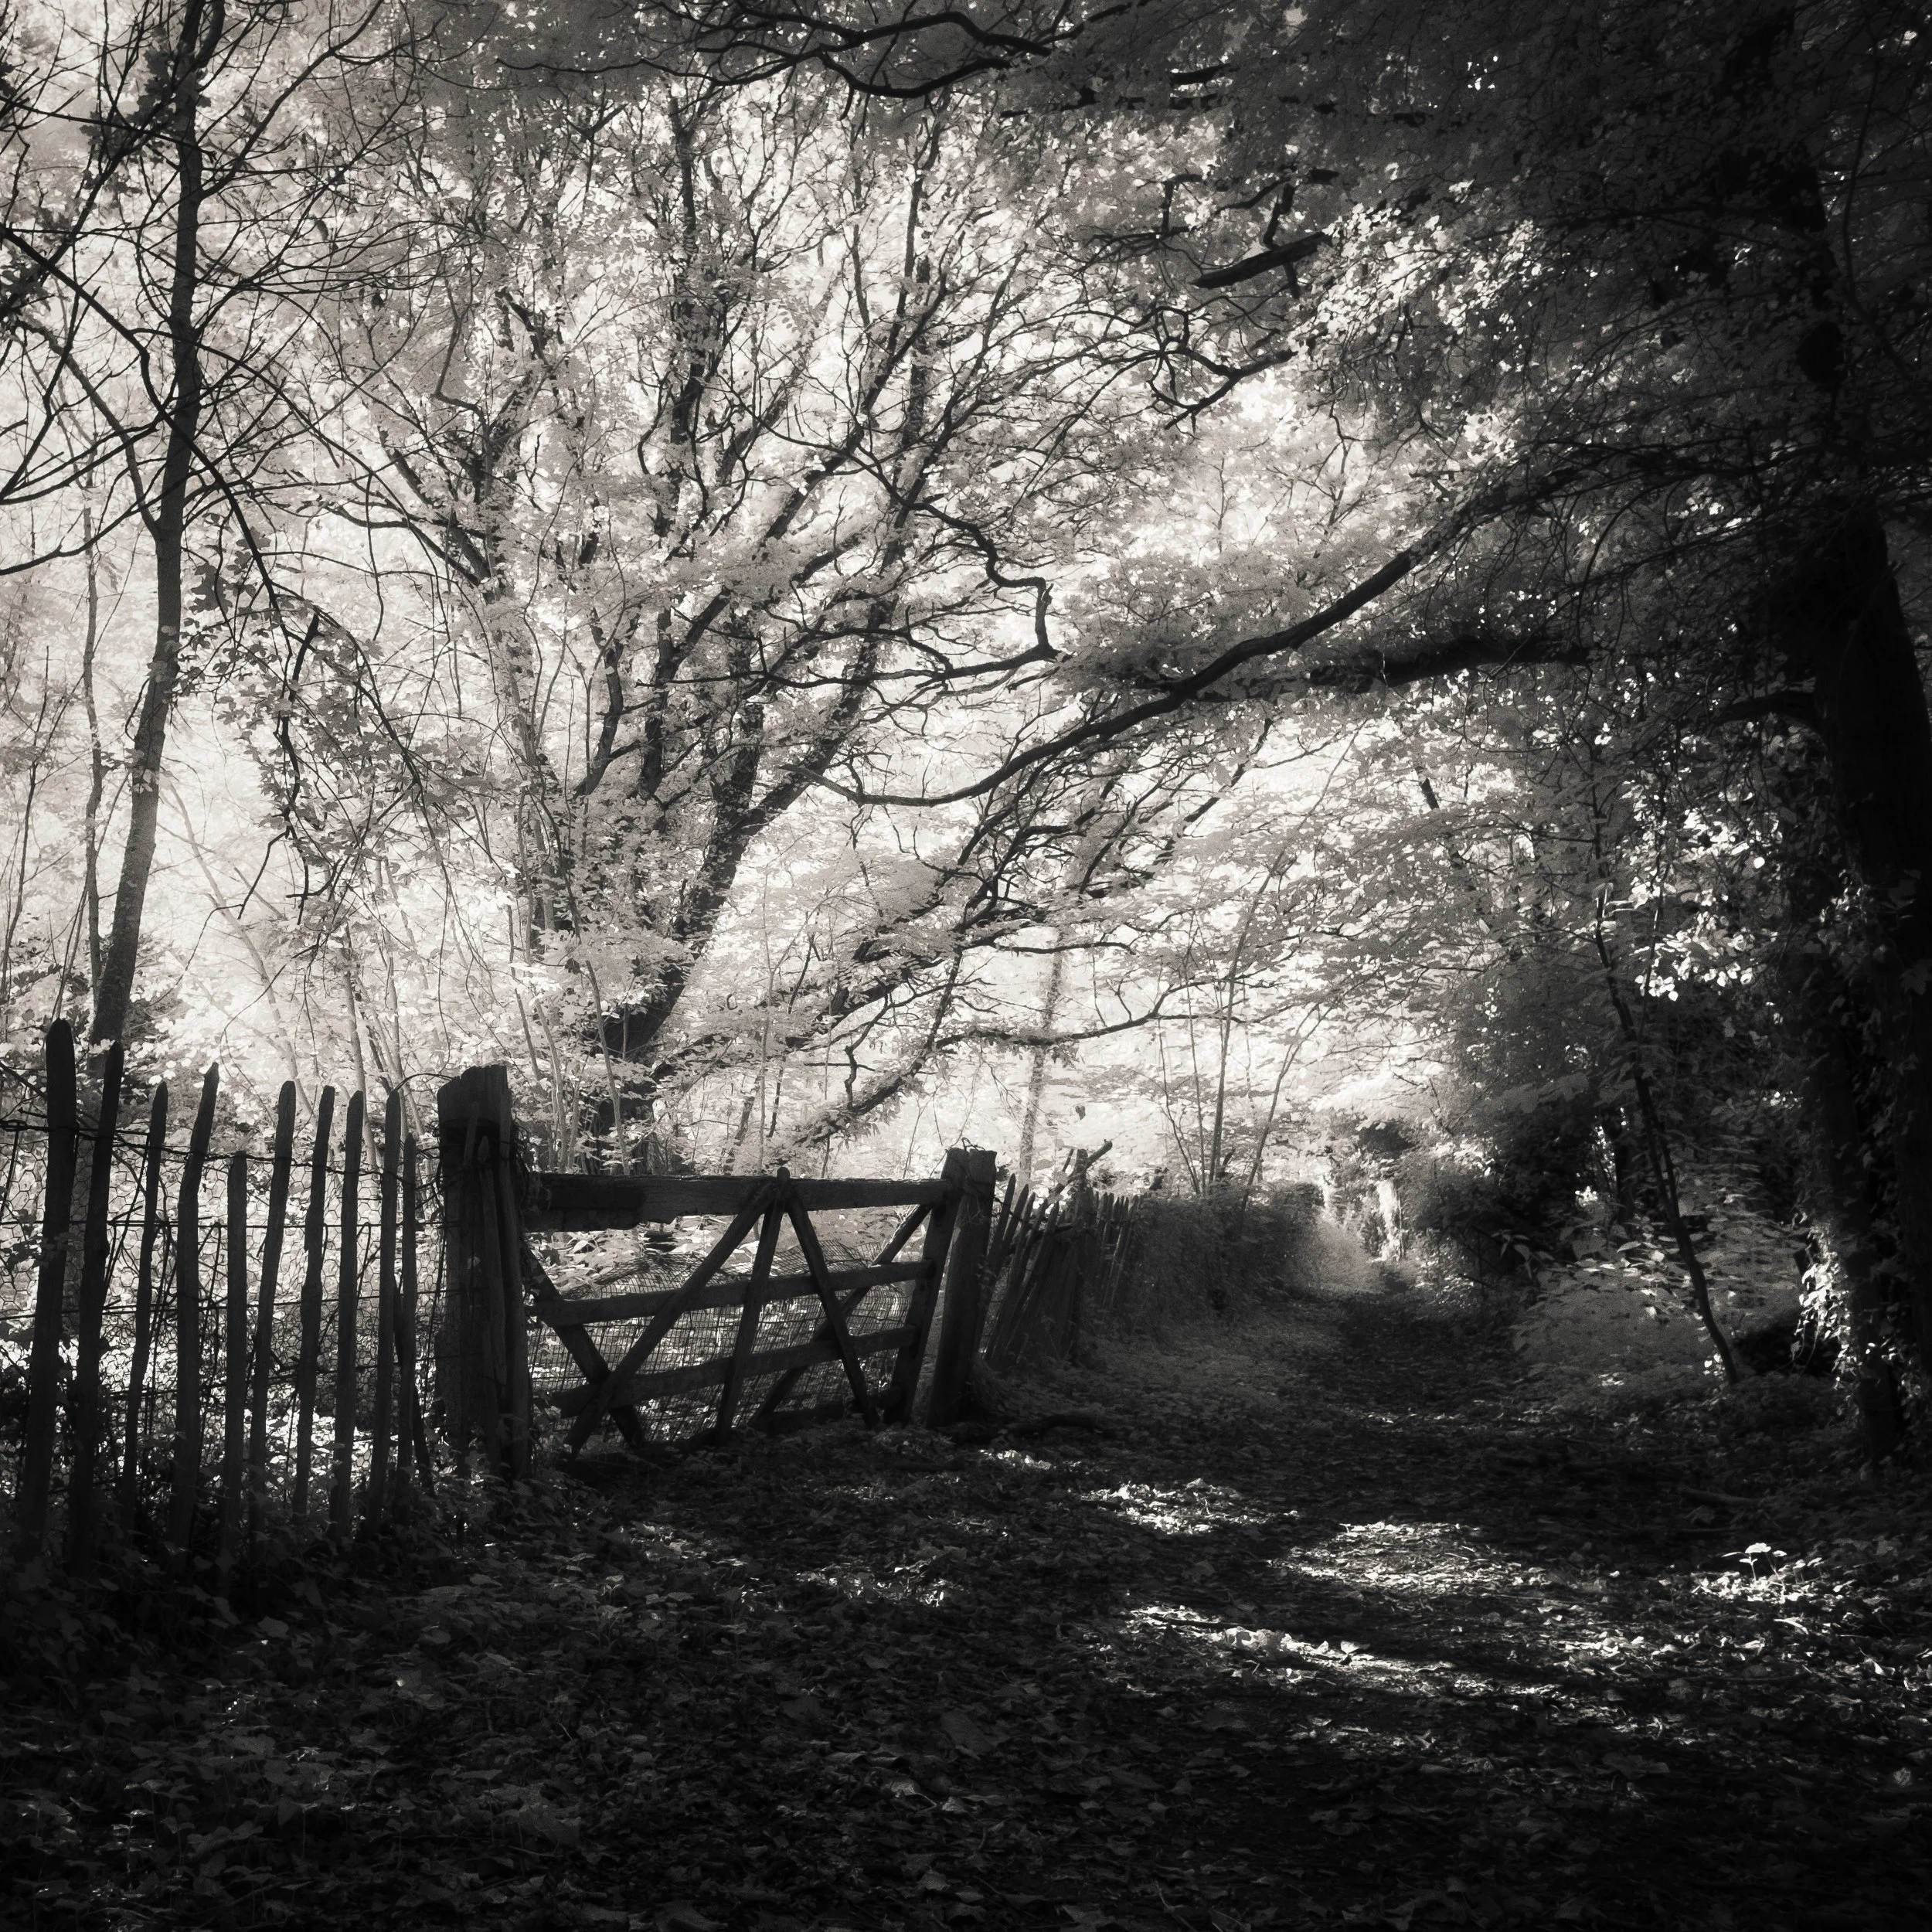
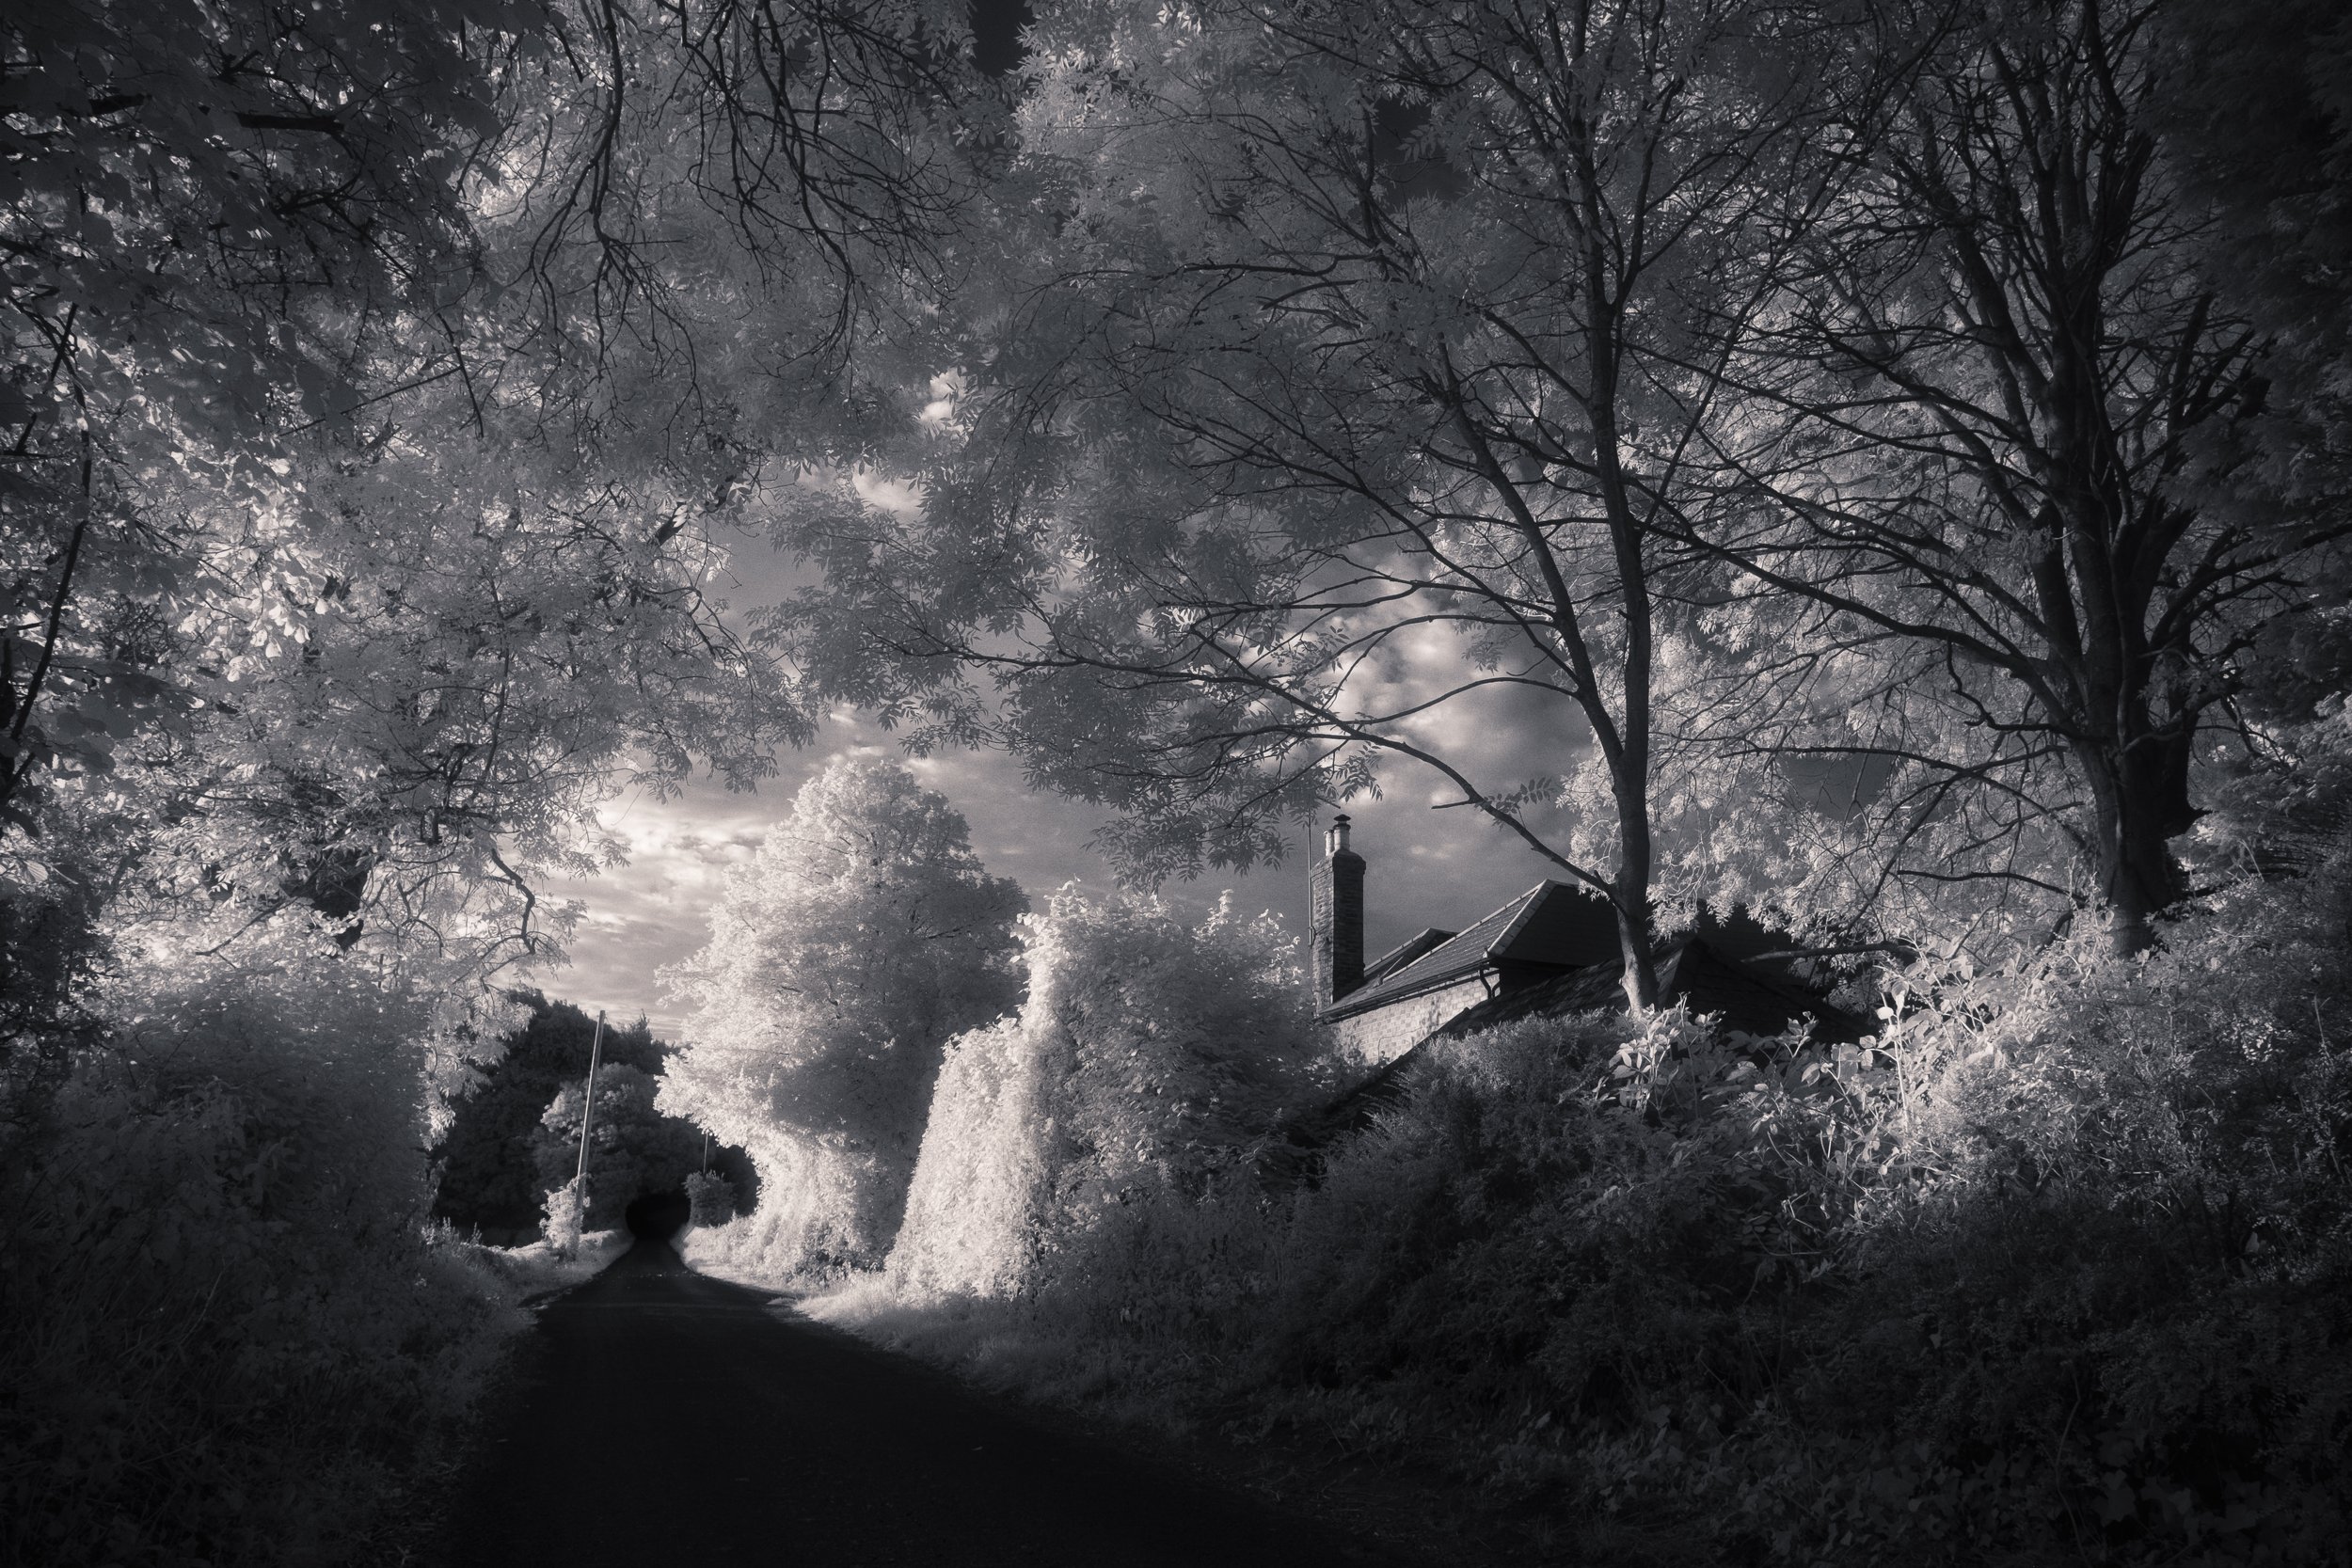
Overcast days are more useful than many photographers assume. The sky on a grey day is still significantly brighter than shaded subjects below it, and the flat, even light produces clean, neutral backgrounds. This works particularly well for architectural silhouettes and branch silhouettes, where the interest is in the geometry of the subject rather than the drama of the background. A bare oak tree against a white winter sky is a perfectly good silhouette subject; it does not need an orange sunset behind it.
Indoor window silhouettes deserve a specific note on white balance. The light coming through the window is daylight — typically around 5,500–6,500K. The interior is likely lit by tungsten or LED bulbs, which are significantly warmer. Your camera or phone will try to balance these two, and the result is usually a compromise that suits neither. If you are shooting in RAW and processing afterwards, you have full control. If you are shooting JPEG or the standard smartphone format, set your white balance to the dominant light source — usually daylight for silhouette work, since the window is the background — and accept that the interior will appear warm. In post-processing, the warm ambient glow of an interior behind a silhouetted figure at a window is often rather pleasant rather than a problem.
Exposure : The Core Challenge
This is where most automatic cameras go wrong, and understanding why they go wrong is the first step to fixing it.
Why smartphones — and indeed most cameras — get it wrong automatically. Modern smartphone cameras are designed to produce pleasing, well-exposed photographs of the things people care about. When a person is in frame, the camera detects the face and exposes for the face. When a brighter-than-average background is present, the metering system averages it against the subject and arrives at a compromise — the subject is reasonably exposed, and the background is somewhat bright but not blown out. This is exactly what you do not want. You want the subject dark and the background correctly exposed. The camera is working against you.
The problem is compounded by automatic features: HDR mode on smartphones captures multiple exposures and blends them, specifically to compress high-contrast scenes — which is to say, to make your silhouette less silhouetted. Night mode lifts shadow detail in low-light conditions — the opposite of what silhouette work requires. These automatic helpers are there to fix the look of precisely the kind of high-contrast, dark-subject image you are trying to create. Turn them off before you start.
How to override exposure on a smartphone. The core technique is the same on any device: tap on the bright background area, not on the subject. When you tap to focus, the camera also sets its exposure for that area. If you tap the sky, the camera exposes for the sky — which means it allows the subject, receiving less light, to go dark. On iOS, tap the background area, and a sun icon will appear next to the focus square; drag this downwards to further reduce exposure and push the subject towards pure black. On Android, tap the bright area; the exact controls vary between manufacturers, but most modern Android phones will show an exposure slider after tapping. Drag it towards the minus end.
AE/AF lock is a refinement that is very useful for silhouette work. On iOS, press and hold on the bright background area for about two seconds until you see the "AE/AF Lock" banner appear at the top of the screen. This locks both focus and exposure so they will not re-meter when you reframe. On Android, the same long-press gesture typically achieves the same result. Why does this matter? Because once you have set your exposure to the background, you may want to reframe your composition — moving the subject slightly in the frame, adjusting the horizon position, waiting for the subject to move into a better position. If exposure is not locked, the camera will re-meter as you reframe and may lift the exposure again as the subject comes more centrally into view.
Exposure compensation is a more deliberate control available on most camera apps and many native smartphone apps. After tapping to set focus, you can use the exposure slider (or a dedicated exposure compensation dial on a traditional camera) to deliberately push the exposure in the direction you want. For silhouette work, you almost always want to underexpose relative to what the camera suggests — dragging the slider into negative territory, or dialling in -1 to -2 stops on a traditional camera, is a reasonable starting point. The goal is for the subject to be pure black or very close to it, with the background correctly exposed or slightly bright.
The challenge of the bright background. As you underexpose to darken the subject, the background will tend towards overexposure — the sky may blow out to pure white, losing colour and detail. Whether this matters depends on the image you want. A pure white sky can be very clean and graphic, especially in a minimal composition with a single strong silhouette. But if you want to retain the colour and texture of a sunset sky, you are looking for a balance point: exposed enough to show the colour and gradation of the sky, but dark enough that the subject is still clearly black. In practice, this often means accepting some highlight recovery in post-processing rather than getting it perfect in-camera.
Shooting in RAW gives you considerably more headroom for this recovery. If your phone supports RAW capture (iPhone ProRAW, or third-party camera apps such as Halide or Camera+ on iOS, and various options on Android), use it for silhouette work. A RAW file may contain several stops of recoverable highlight detail in a sky that appears blown in the JPEG preview, and that latitude allows you to push the exposure further towards the background without losing everything. RAW is particularly valuable for sunset silhouettes, where the colour in the sky is the whole point and losing it to overexposure is a significant problem.
Traditional cameras have a broader set of tools for this. Spot metering — setting the camera to meter from a very small area of the frame, typically the centre — allows you to point the metering circle directly at the bright background and lock that reading, then reframe. Evaluative or matrix metering tries to assess the whole scene and arrive at a balanced exposure; in high-contrast situations with a bright background, it often underexposes the background relative to ideal, which in this context is actually in your favour, but you will likely still need to add exposure compensation to push the subject to black. Manual exposure — setting shutter speed and aperture yourself — gives you complete control and is worth learning for silhouette work, as conditions change quickly and automatic modes require constant correction.
Composition for Silhouettes
Without colour, texture, or internal detail to guide the eye, composition in silhouette work becomes unusually important. The placement of the dark shape in the bright field, the position of the horizon, the use of negative space: these are the levers you have, and they need to be used with intention.
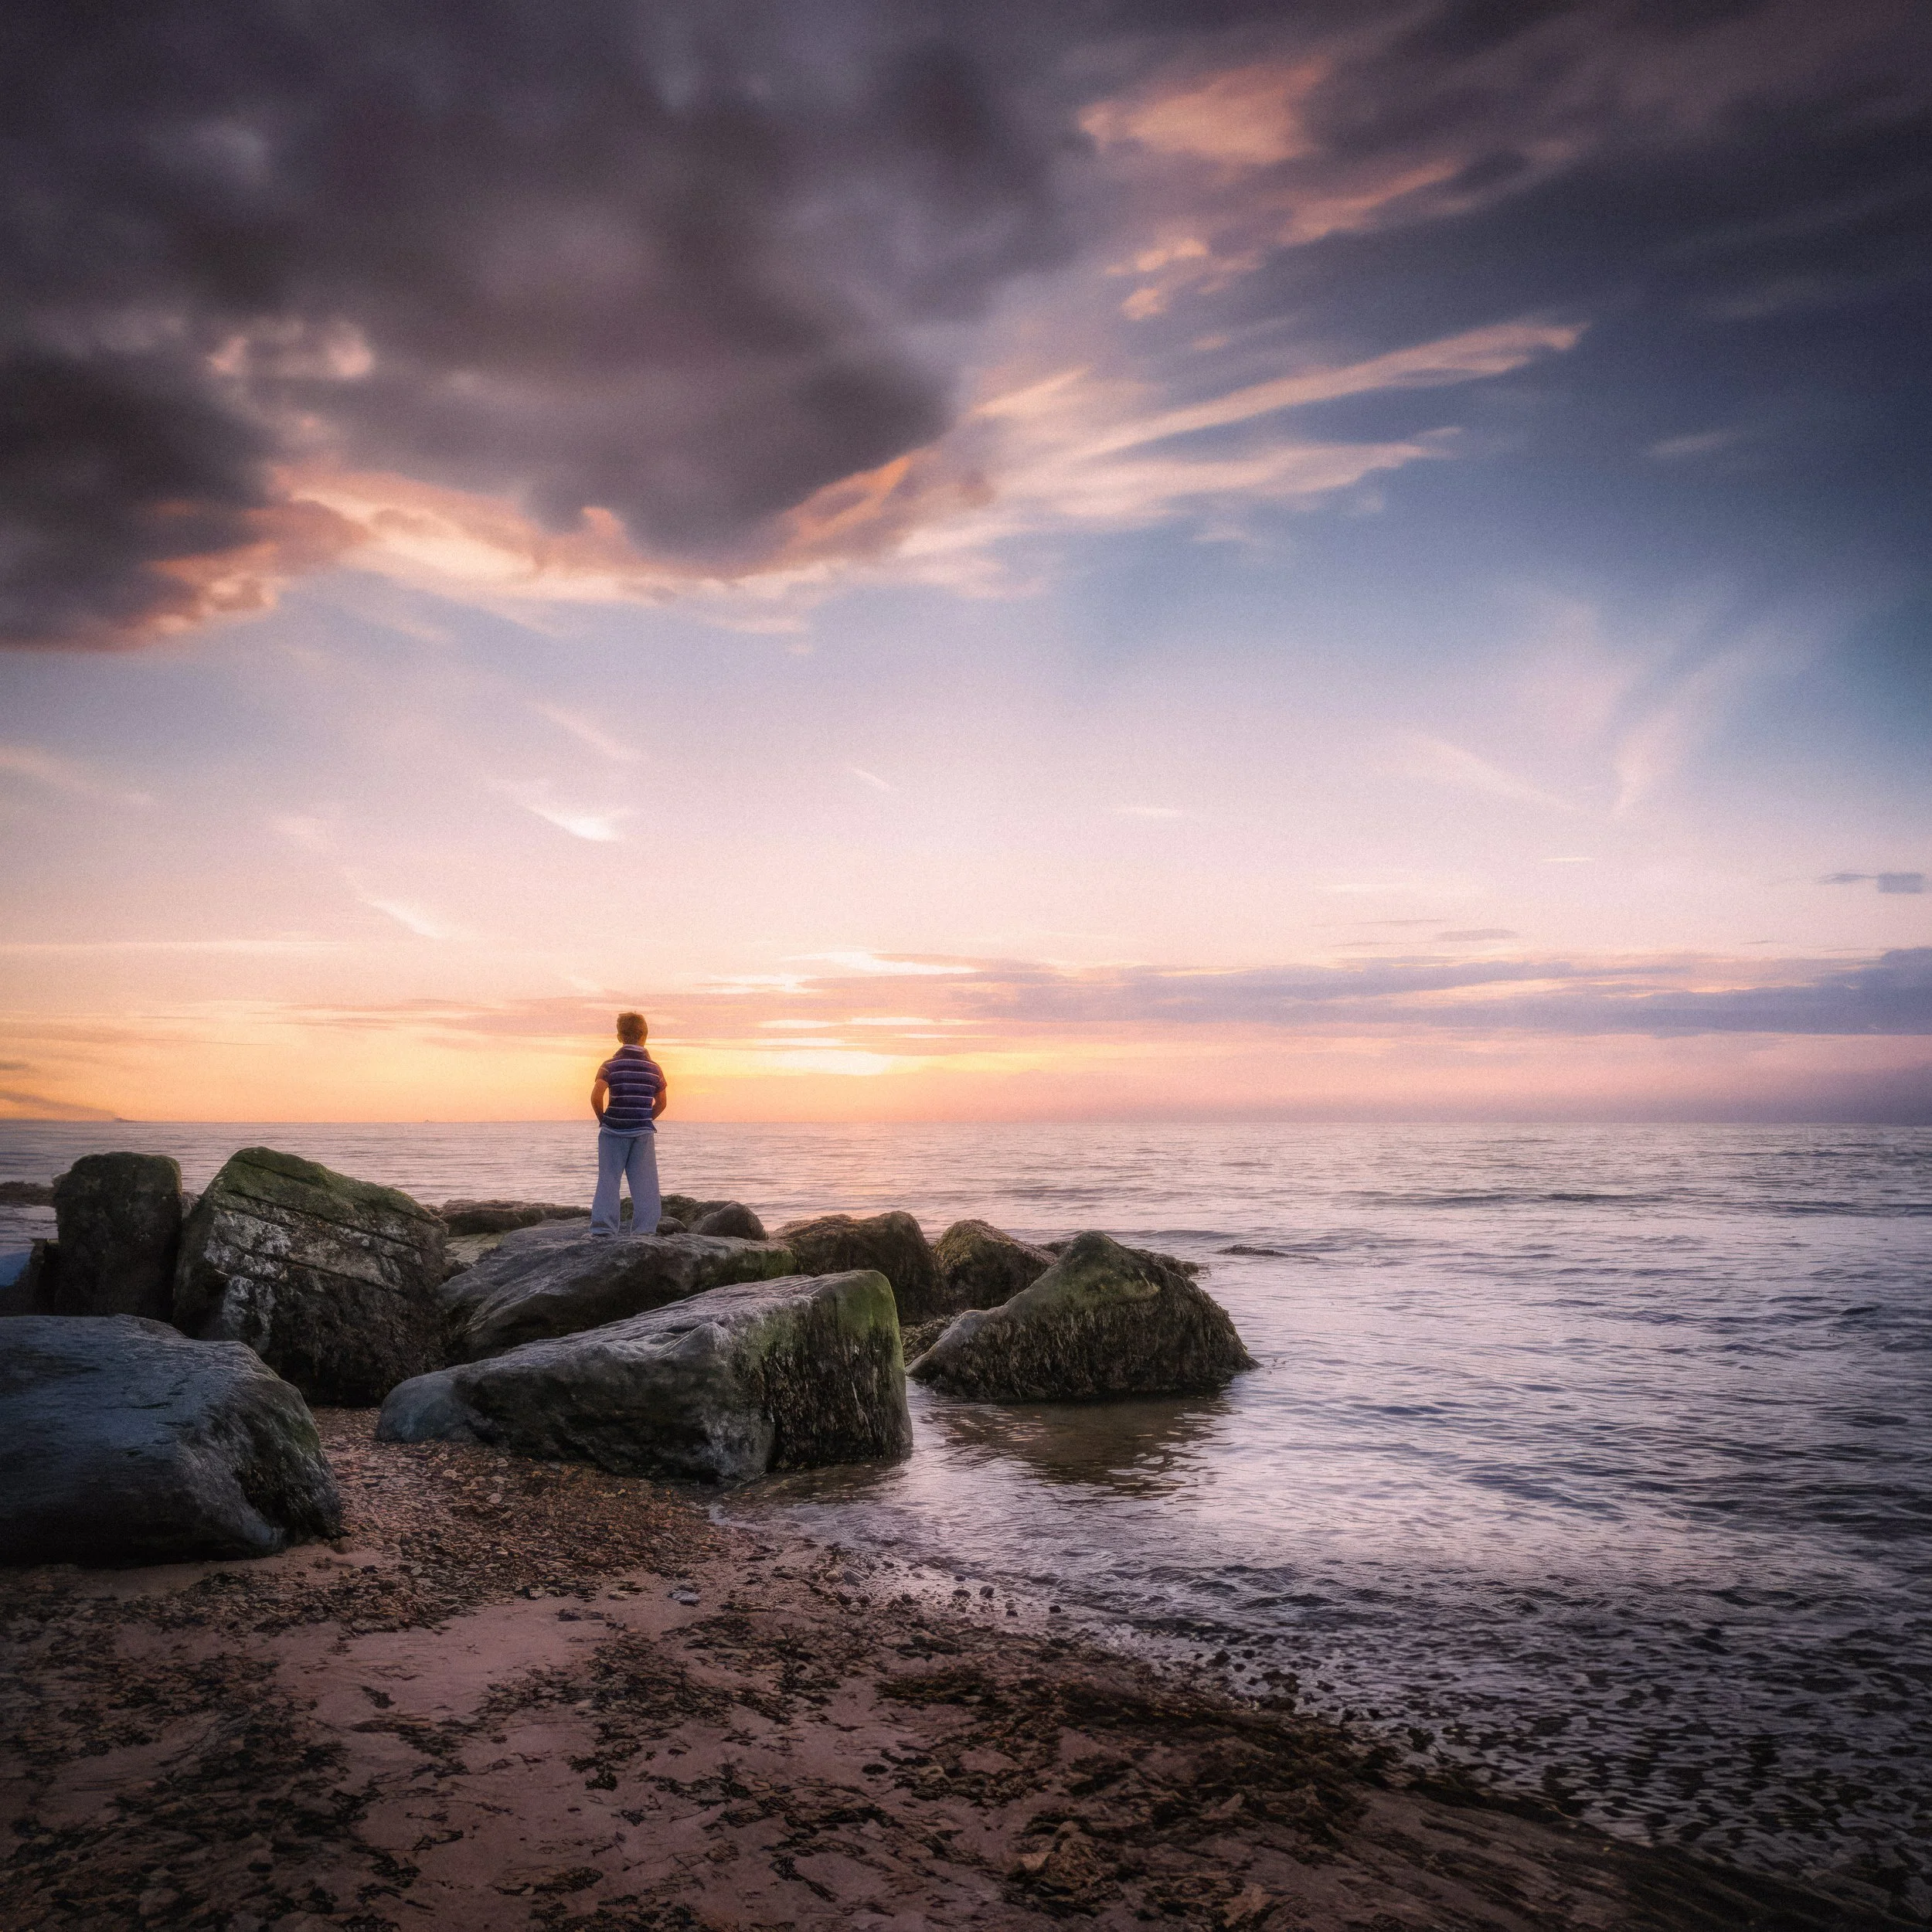
Placement of the silhouette in the frame. The rule of thirds applies here as elsewhere, but silhouette subjects are unusual in that central placement can also work well, particularly for symmetrical subjects — a tree centred against the sky, a person centred in a doorway. The reason is that the silhouette itself is a graphic element, and graphic compositions can handle the visual weight of a centrally placed dark form in a way that representational photographs often cannot. That said, asymmetric placement — the figure in the left third of the frame, the remaining two thirds of sky — creates tension and gives the image a sense of movement or direction. A figure placed to the left of centre is implicitly moving into the frame; placed to the right, it reads as leaving. These are small choices that have a noticeable effect on how the image feels.
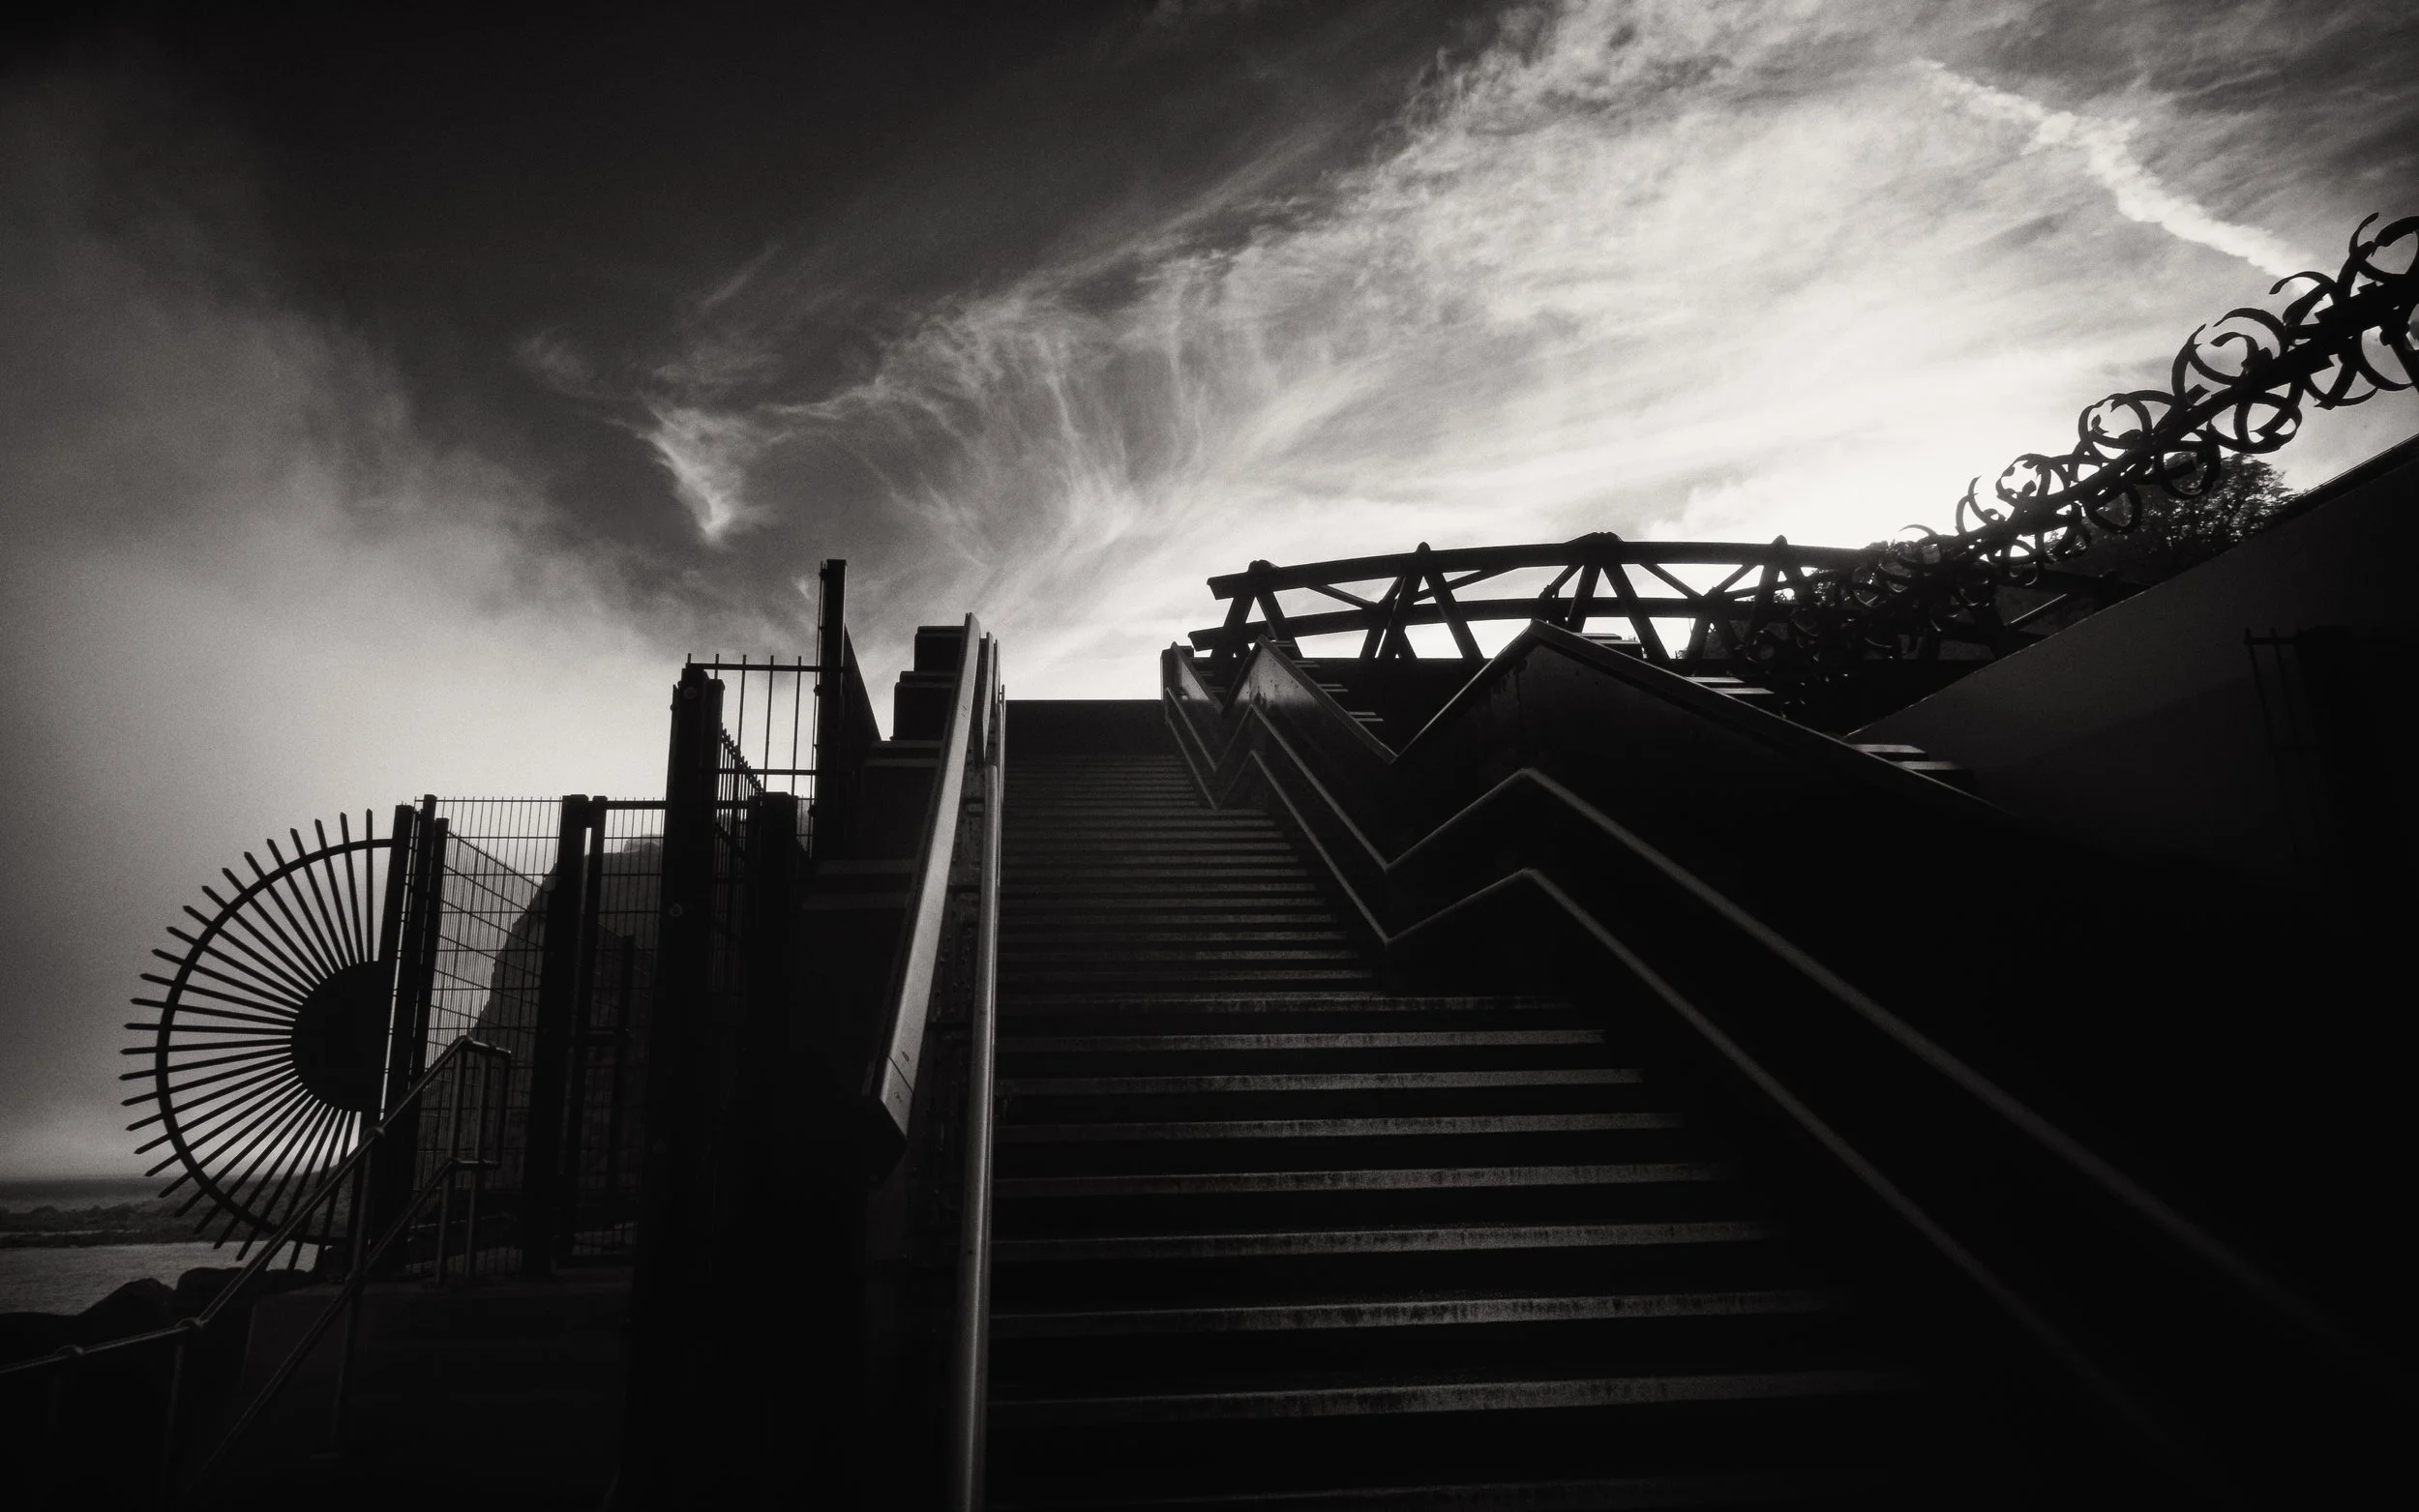
The horizon line. Getting it level is more important in silhouette work than in most other photography, for the simple reason that there is nothing else in the image to distract from a wonky horizon. In a detailed landscape photograph, a slightly tilted horizon might pass unnoticed. In a silhouette image with a clean sky and a single dark figure, every degree of tilt is visible. Turn your gridlines on and use them.
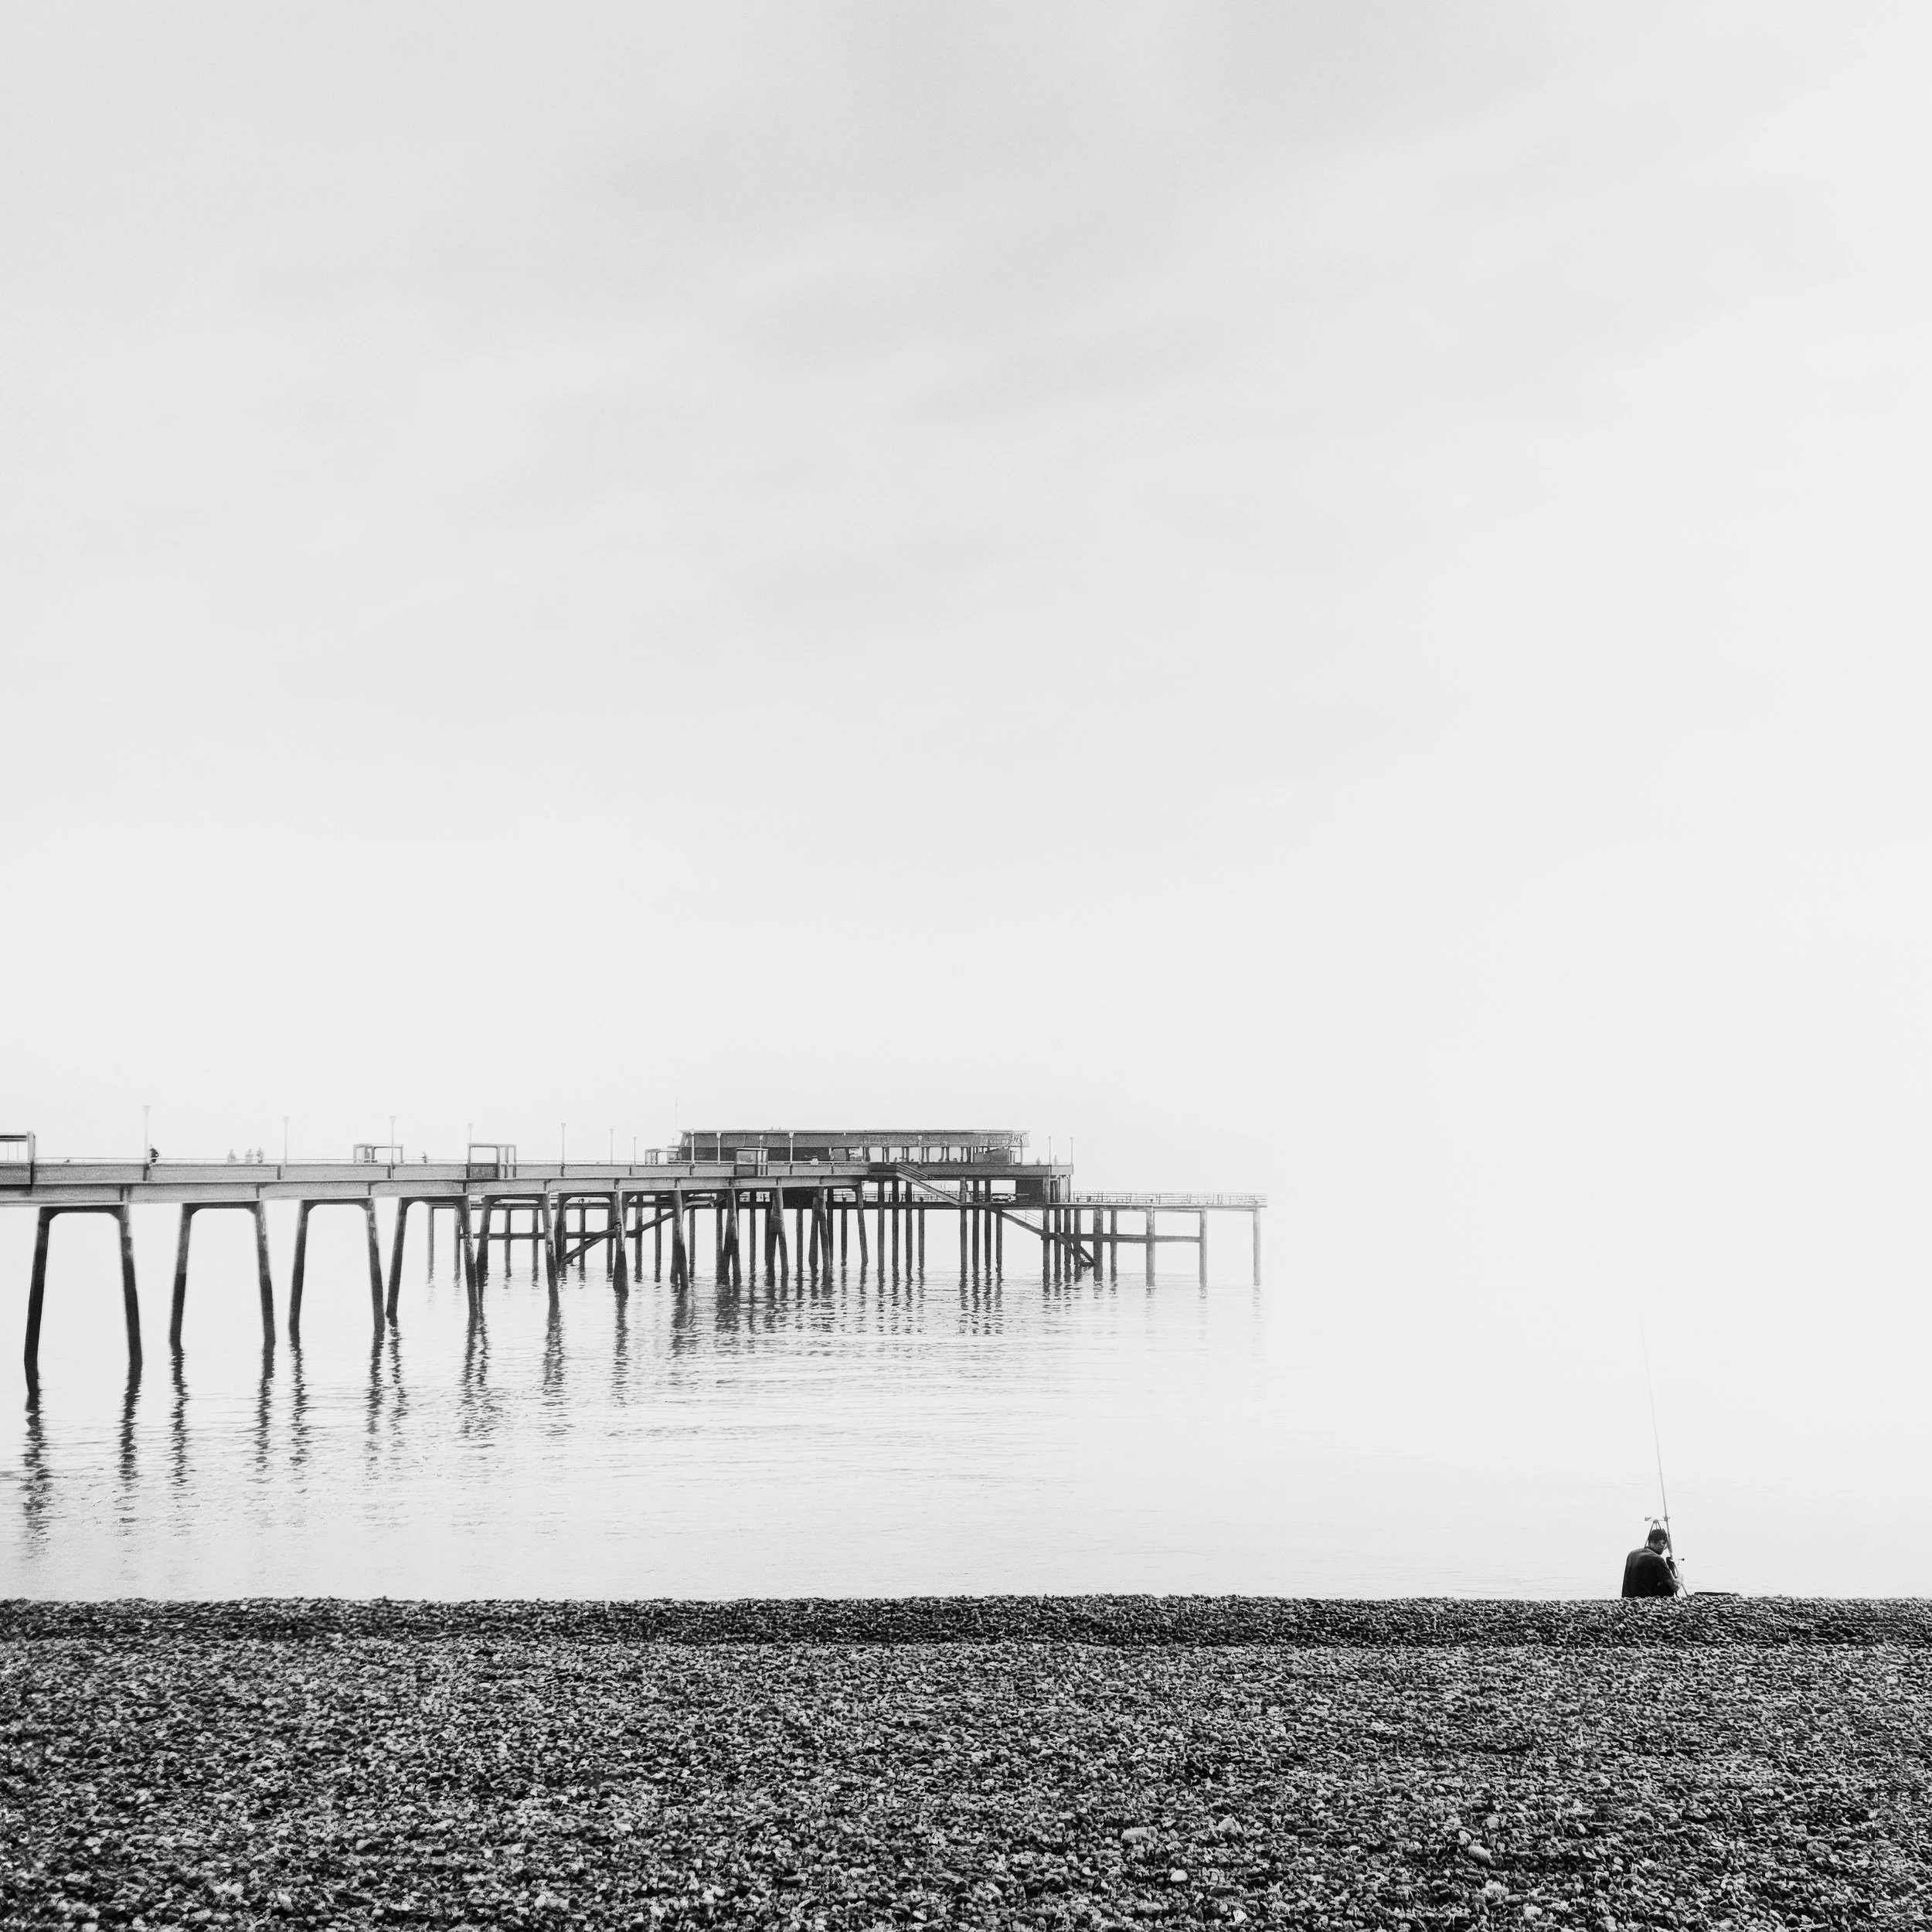
Beyond levelness, consider where in the frame you place the horizon. A low horizon — placing the dividing line between sky and ground in the lower third of the frame — gives more sky and makes the subject appear to loom against it, slightly monumental. A mid-frame horizon creates balance, with equal areas of sky and ground or water. A very high horizon works when there is a body of still water below, and you are deliberately including the reflection: in that case, the reflection extends the visual interest downwards and justifies the high placement. This is a case where breaking the usual guidance about horizon placement makes compositional sense.
Using the foreground. Foreground elements — grasses, branches, rocks, fences — can frame the main silhouette and add depth to an otherwise flat image. A silhouette of a figure against a sky, framed by the silhouettes of grasses in the lower corners, has layers of interest. The key is that the foreground elements themselves need to be clearly silhouetted, or they introduce a tonal complexity that competes with the main subject. A sharp, well-lit foreground element combined with a silhouetted background subject creates a depth of field mismatch that is usually distracting.
Movement and gesture. For human and animal subjects, the moment of peak action matters more in silhouette work than in any other genre. In a standard photograph, a slightly early jump — before the apex — is still a photograph of a person jumping; you can see who they are, what they are wearing, what their face looks like. In a silhouette, the only thing you have is the shape, and a shape caught at the wrong moment may not read as a jump at all. The apex of a jump — arms wide, legs bent, the shape at its most extended — is the silhouette. The moment before and after it are just a shape that is becoming something. Burst mode, available on every smartphone, is your friend here: hold the shutter button for a sequence of frames and choose the one where the outline is at its clearest and most expressive.
Multiple elements in the frame. A useful compositional structure for silhouette images is the classic three-layer arrangement: a clean sky above, a dark landscape or ground line below, and your subject in between — clearly separated from both, framed by the contrast on either side. This structure works precisely because the subject has to be separated from the dark ground. If your silhouette merges with the dark lower portion of the frame, you lose the outline on that side. Positioning matters: you may need to lower or raise your camera angle to ensure your subject is clearly set against the bright sky rather than dipping below the horizon line.
Reflections. Wet sand, puddles, still water, polished floors — any reflective surface that gives you a doubled image of your silhouette. The reflection creates a symmetrical composition that the eye finds inherently satisfying, and it doubles the visual weight of the subject without adding clutter. The geometry of the reflection shifts with small changes in camera height and angle: a very low camera position (holding the phone close to the wet sand, for instance) produces a longer, more complete reflection; raising the camera shortens it. Experiment with this; even a five-centimetre change in camera position makes a visible difference. The near-symmetry of a reflected figure or tree is one of those compositional devices that tends to reward the effort put into finding the right position.
Smartphone-Specific Tips
If you are shooting silhouettes on a smartphone, some specific settings and modes deserve attention, most of them in the direction of turning things off.
Portrait mode: avoid it for silhouette work. Portrait mode uses computational edge-detection to separate the subject from the background, then applies artificial bokeh to blur the background. This process is designed for the exact opposite of what you are trying to do: it sharpens the subject boundary and creates a clear separation between subject and background in terms of sharpness. With a silhouette, where the subject and background are separated by contrast rather than focus, the edge-detection often produces artefacts — soft halos, odd transitions, areas where the background blur bleeds into the subject outline. The artificial blur can also soften the clean edge that makes the silhouette work. Keep portrait mode off.
Night mode: turn it off. Night mode captures multiple frames and blends them to lift shadow detail and reduce noise in low-light conditions. The lifting of shadow detail is exactly what you want to avoid in silhouette work: it will illuminate your subject. If you are shooting silhouettes in low light — urban night silhouettes, lamppost backgrounds — night mode will fight you. Disable it before you start.
HDR mode: also off. HDR compresses dynamic range, which is the same as saying it reduces the difference between the bright background and the dark subject. It will lift your silhouette and flatten your background. For most photography, HDR is a useful automatic assistant. For silhouette photography, it is counterproductive. Turn it off.
Gridlines: turn them on. With no internal subject detail to anchor the composition, a level horizon matters more than usual, and good placement of the silhouette in the frame requires conscious thought. The gridlines give you both: a horizontal reference for the horizon, and a thirds-grid for placement. This is one of the minor camera settings that is disproportionately useful for silhouette work.
Burst mode: essential for moving subjects. On iOS, press and hold the shutter button to shoot a burst of frames; on Android, the equivalent is usually a long press on the shutter or a dedicated burst mode in settings. For any silhouette of a person, animal, or other moving subject, shoot a burst and review the frames to find the one where the outline is at its peak — the jump at its apex, the bird's wings at their widest, the cyclist in the clearest position. A single frame at the decisive moment is a fortunate thing; a burst mode sequence containing the decisive moment is a plan.
Editing in the Photos app. A silhouette that came out slightly dark-grey rather than black — perhaps because the metering was not quite where you wanted it — can often be rescued in straightforward editing. The key moves in the iOS Photos app or Google Photos are: pull the Shadows slider down towards the minimum; pull the Blacks slider down as well. Together, these push the shadow tones towards pure black without affecting the highlights of your background as dramatically. Increase Contrast slightly to add bite to the boundary between subject and background. For sunset silhouettes, slightly boosting Saturation or Vibrance will intensify the background colours without affecting the black subject. These are not sophisticated edits, but they are effective and available to anyone with a smartphone.
Creative Variations
Partial silhouettes — not everything needs to be pure black. A subject that is heavily underexposed but still retains some shadow detail can be more interesting than a completely flat shape. The face in near-profile where just the rim of the cheek and jaw catches the light; the figure where the hands, extended towards the light, are slightly brighter than the rest of the body; the rider on a bicycle where the metal of the frame catches a highlight while the figure goes dark. These are partial silhouettes — still reading as dark against bright, but with just enough internal detail to add a sense of depth and physicality to the subject. They require slightly less aggressive underexposure and slightly more attention to the position of the light source relative to the subject.
Silhouette with colour. A strongly coloured background — an orange and red sunset, a deep blue twilight sky, a reflection with its own colour cast — makes the background itself the visual subject while the silhouette provides graphic structure. This is a case where you are not just using the background as a support for the dark shape, but treating the two as a pair. The black of the silhouette and the colour of the background work together. Consider the relationship between the shape of the silhouette and the colour zones in the background: a figure positioned so its head falls in the warmest part of a sunset sky, for instance, creates a particular relationship between subject and light source that feels considered.
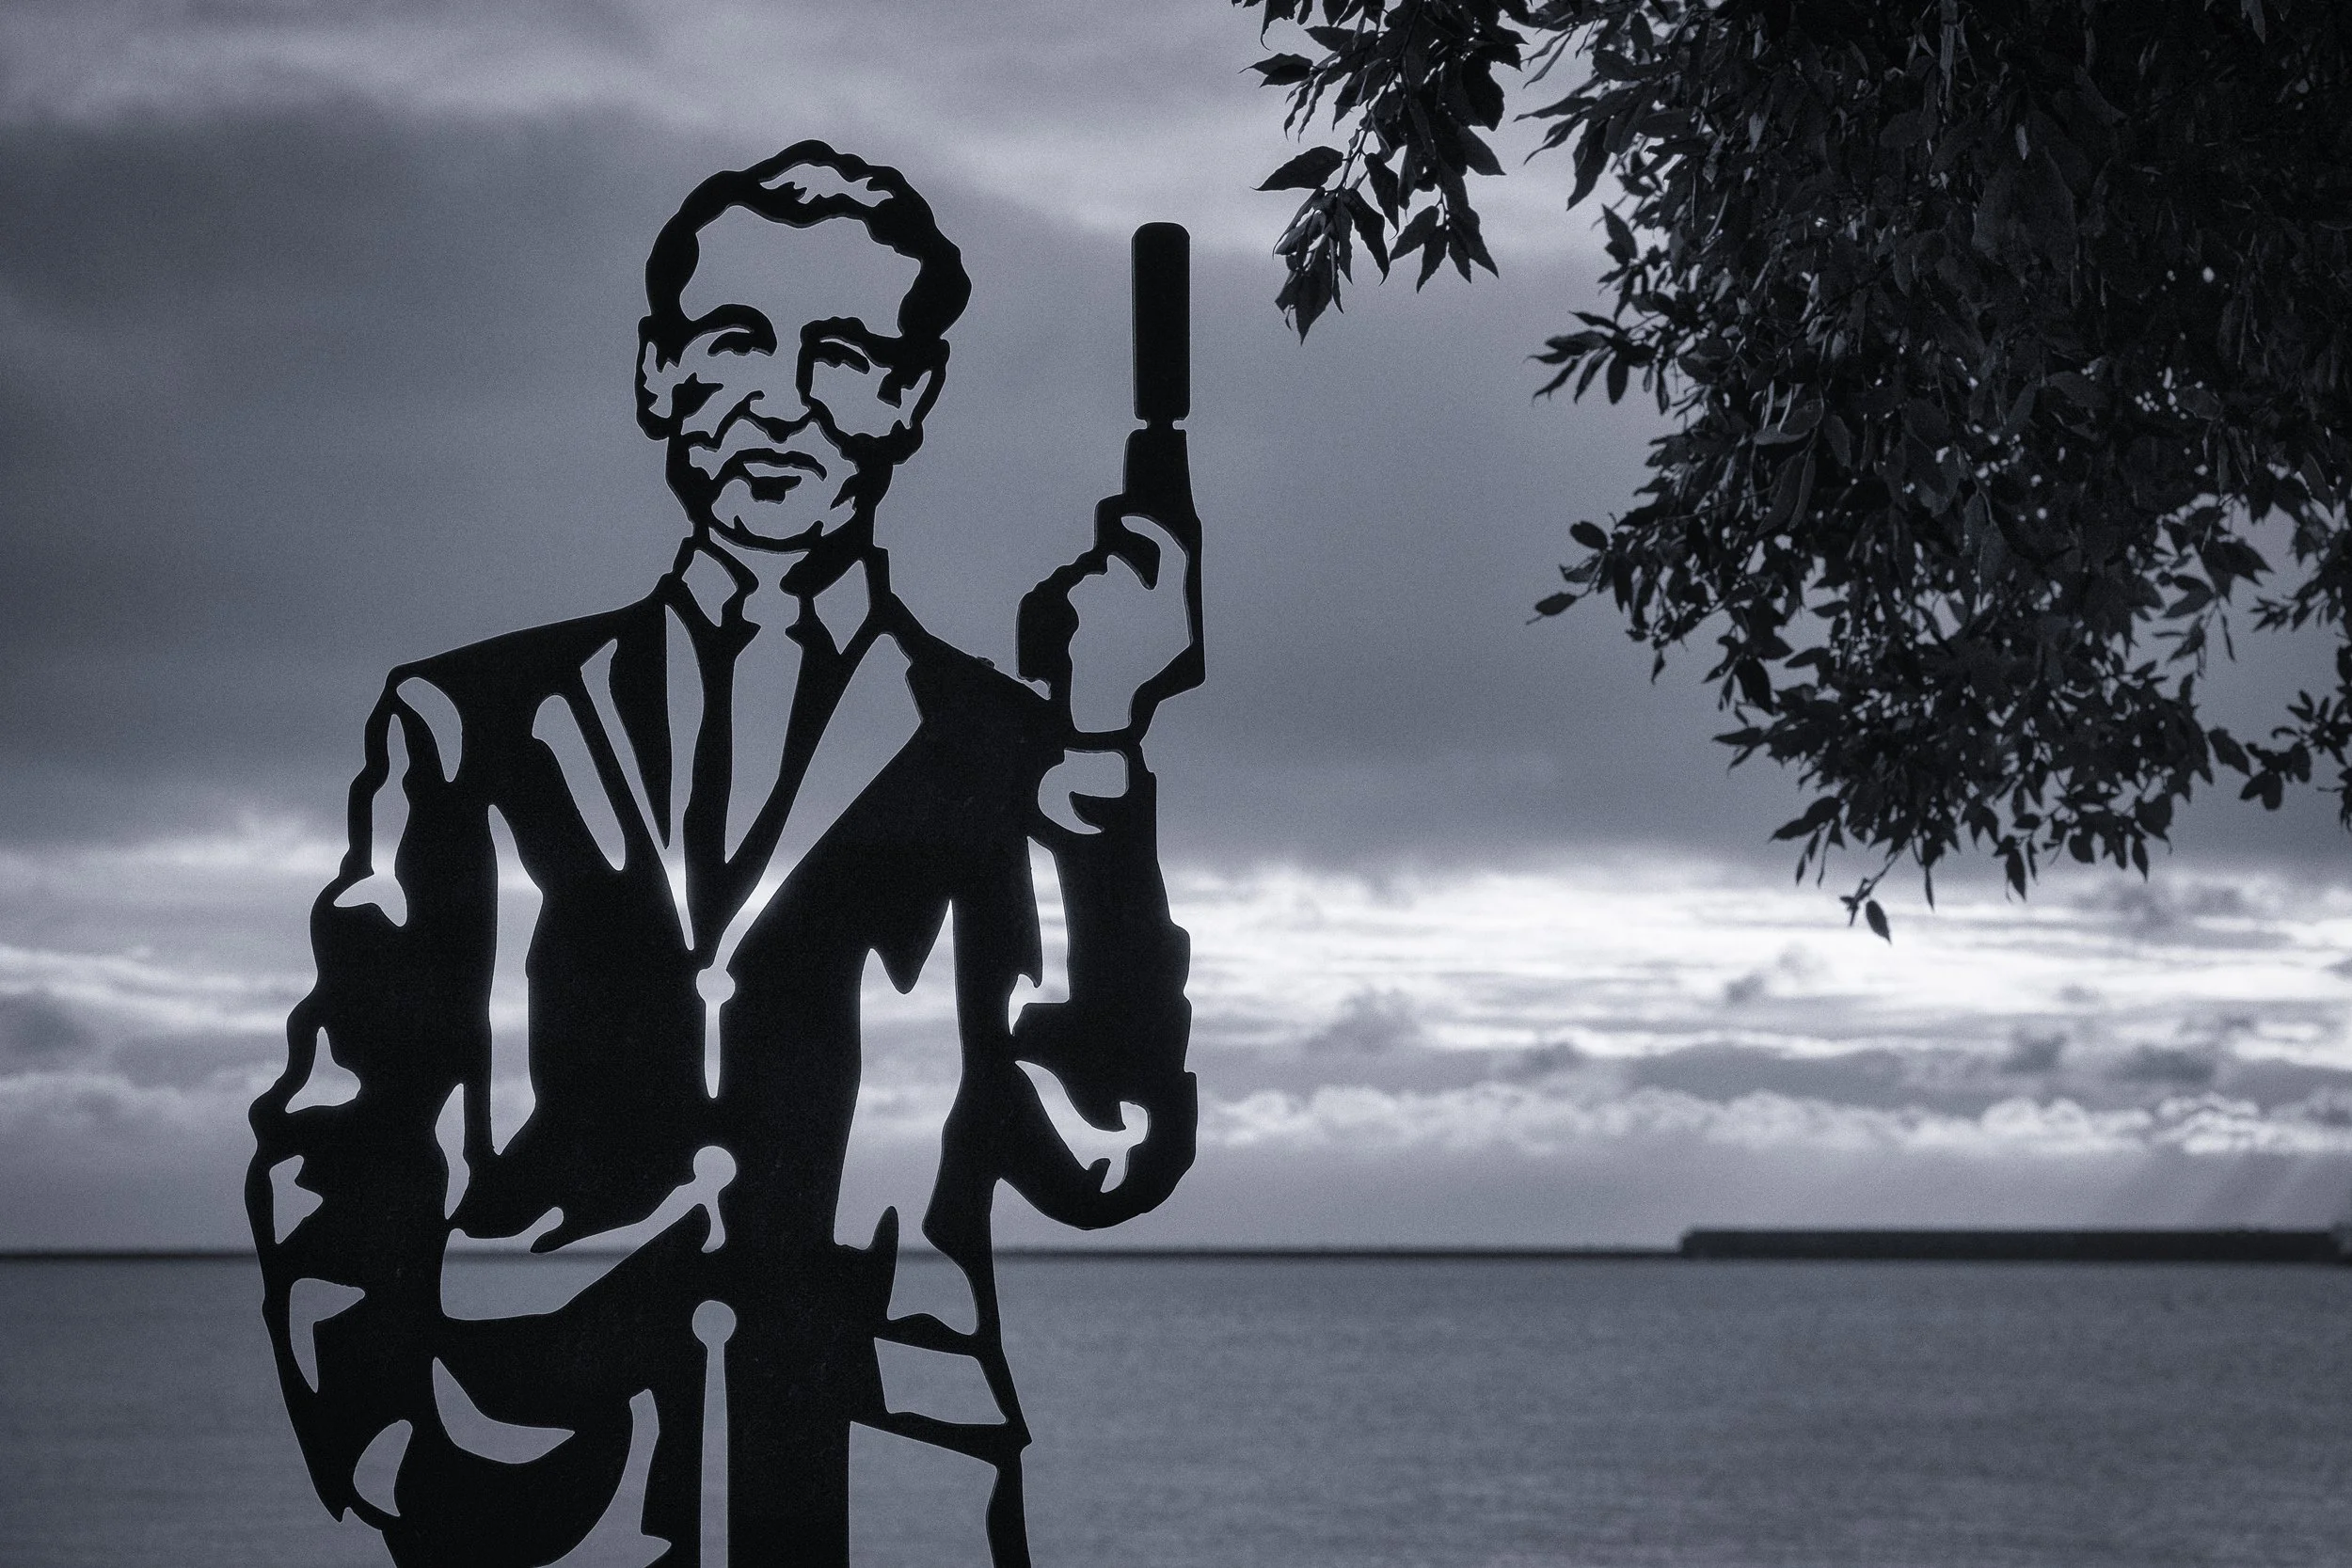
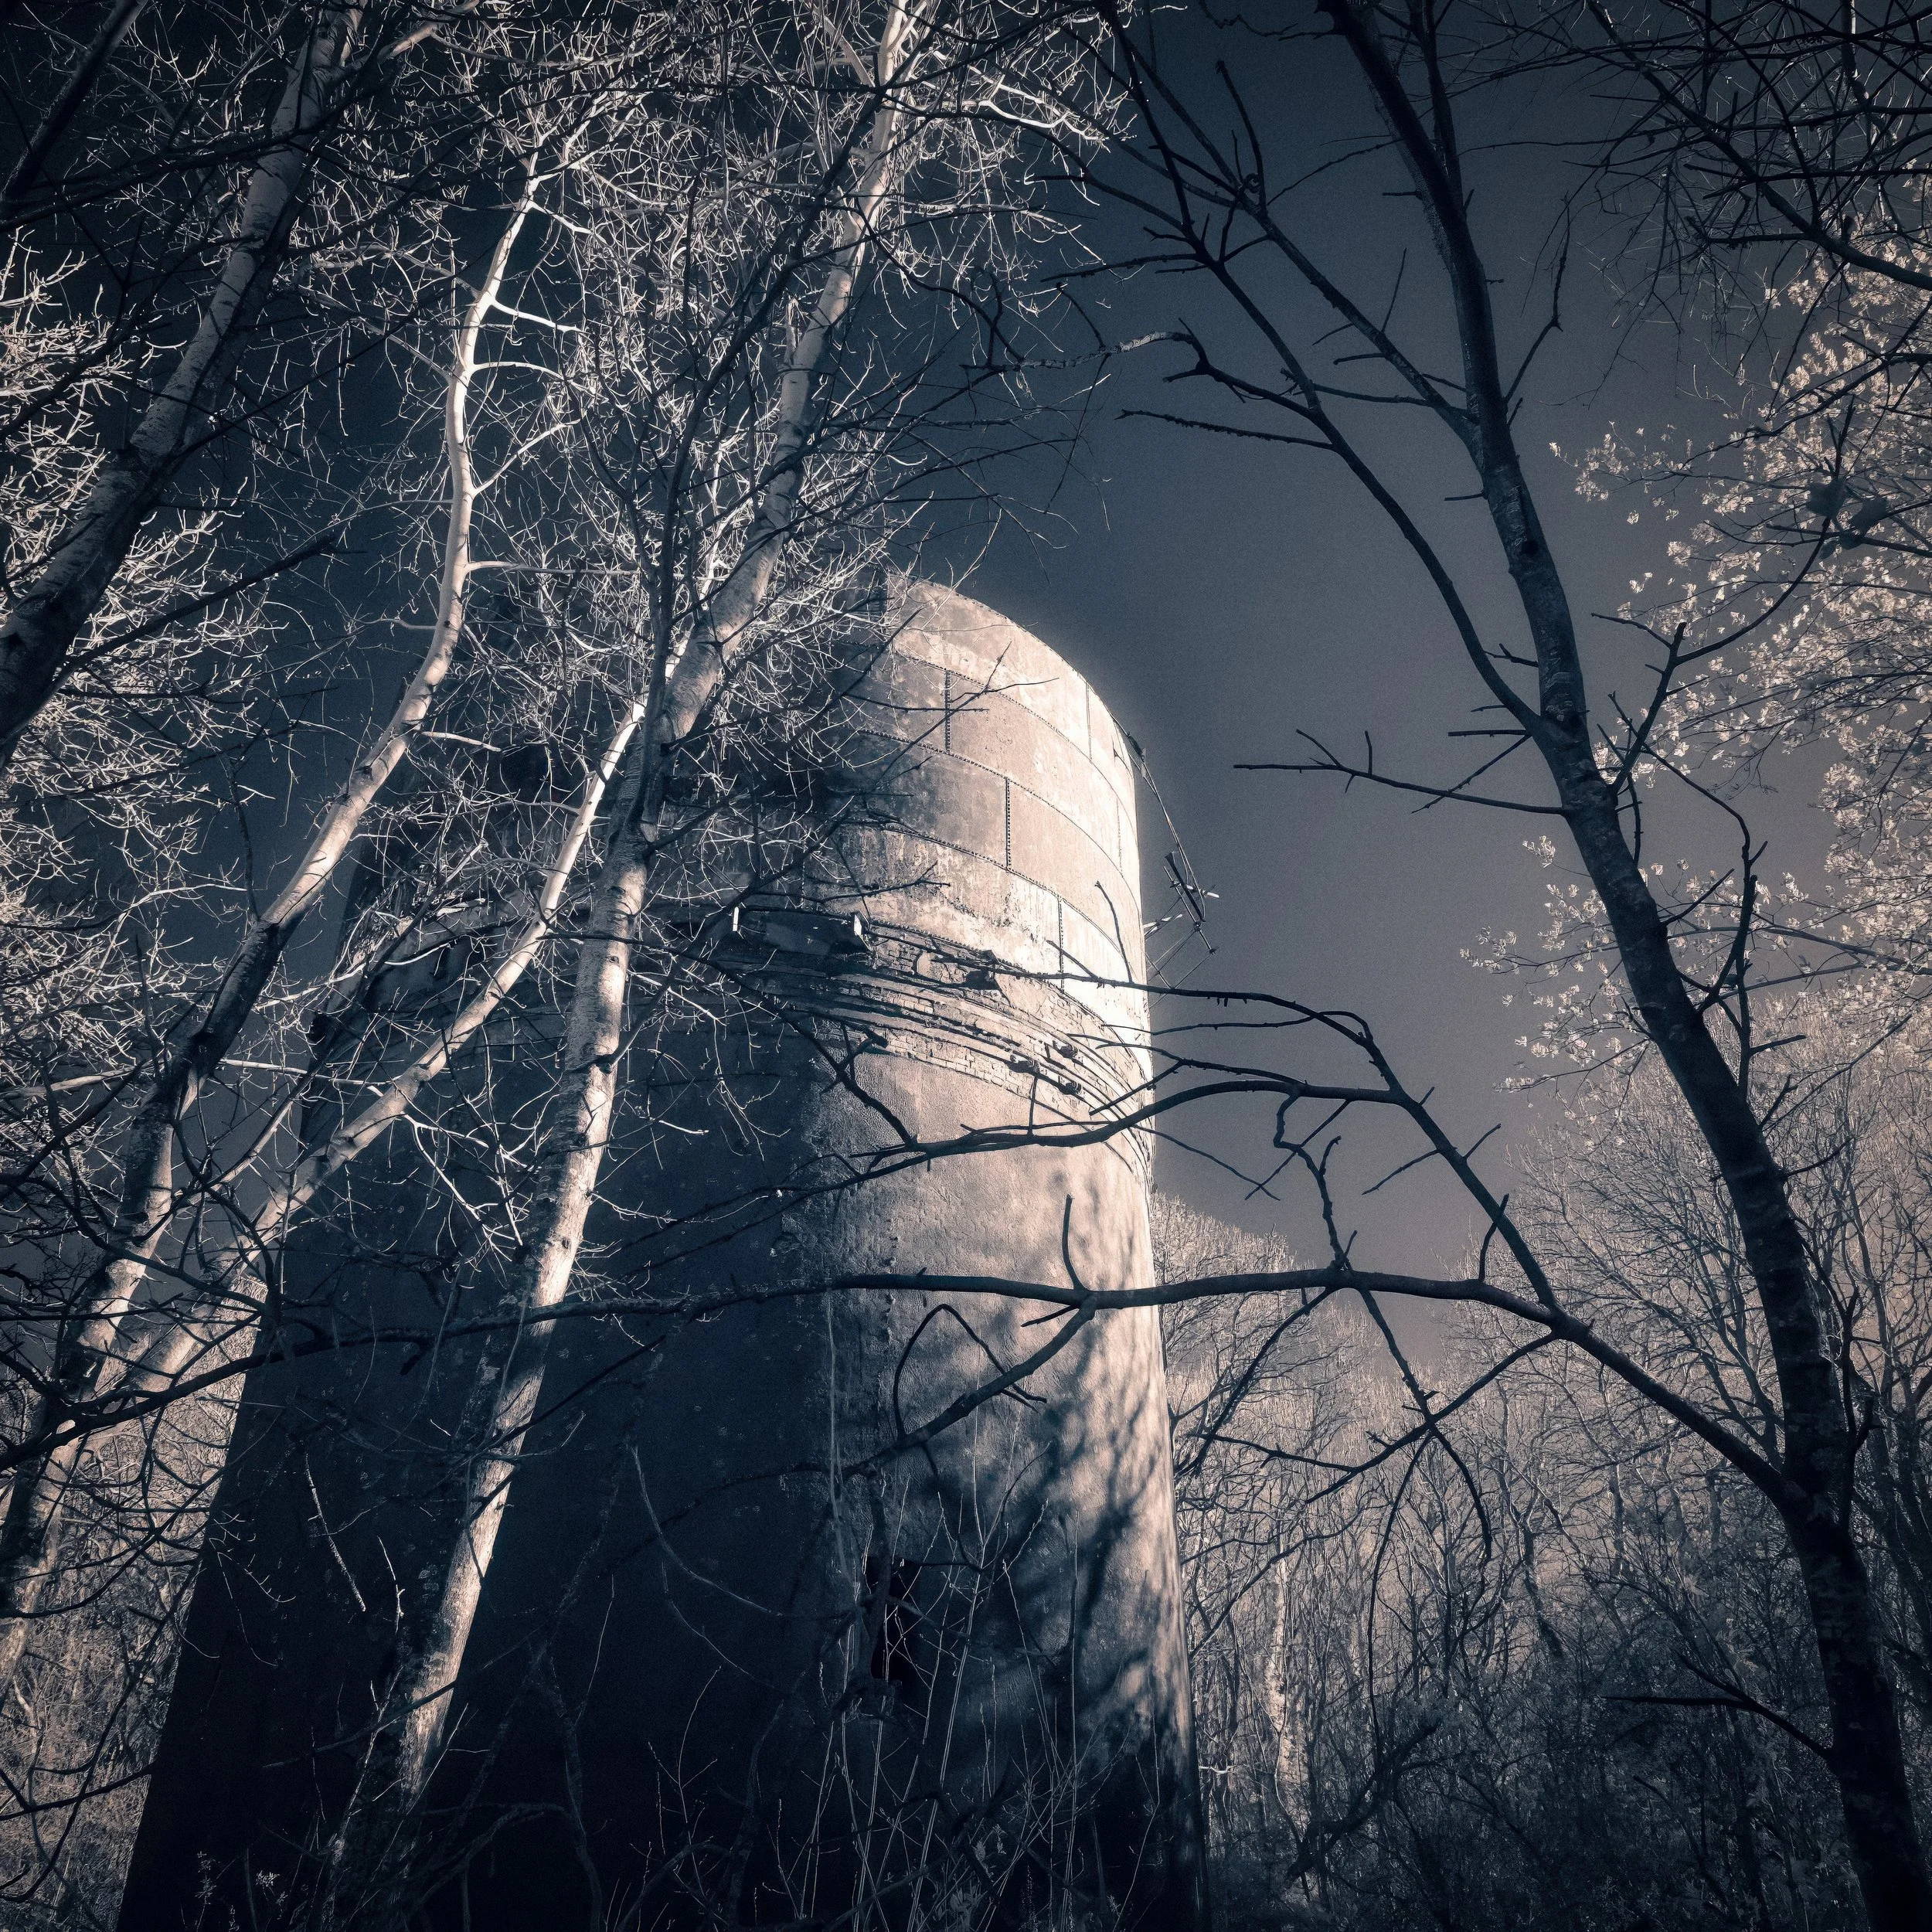
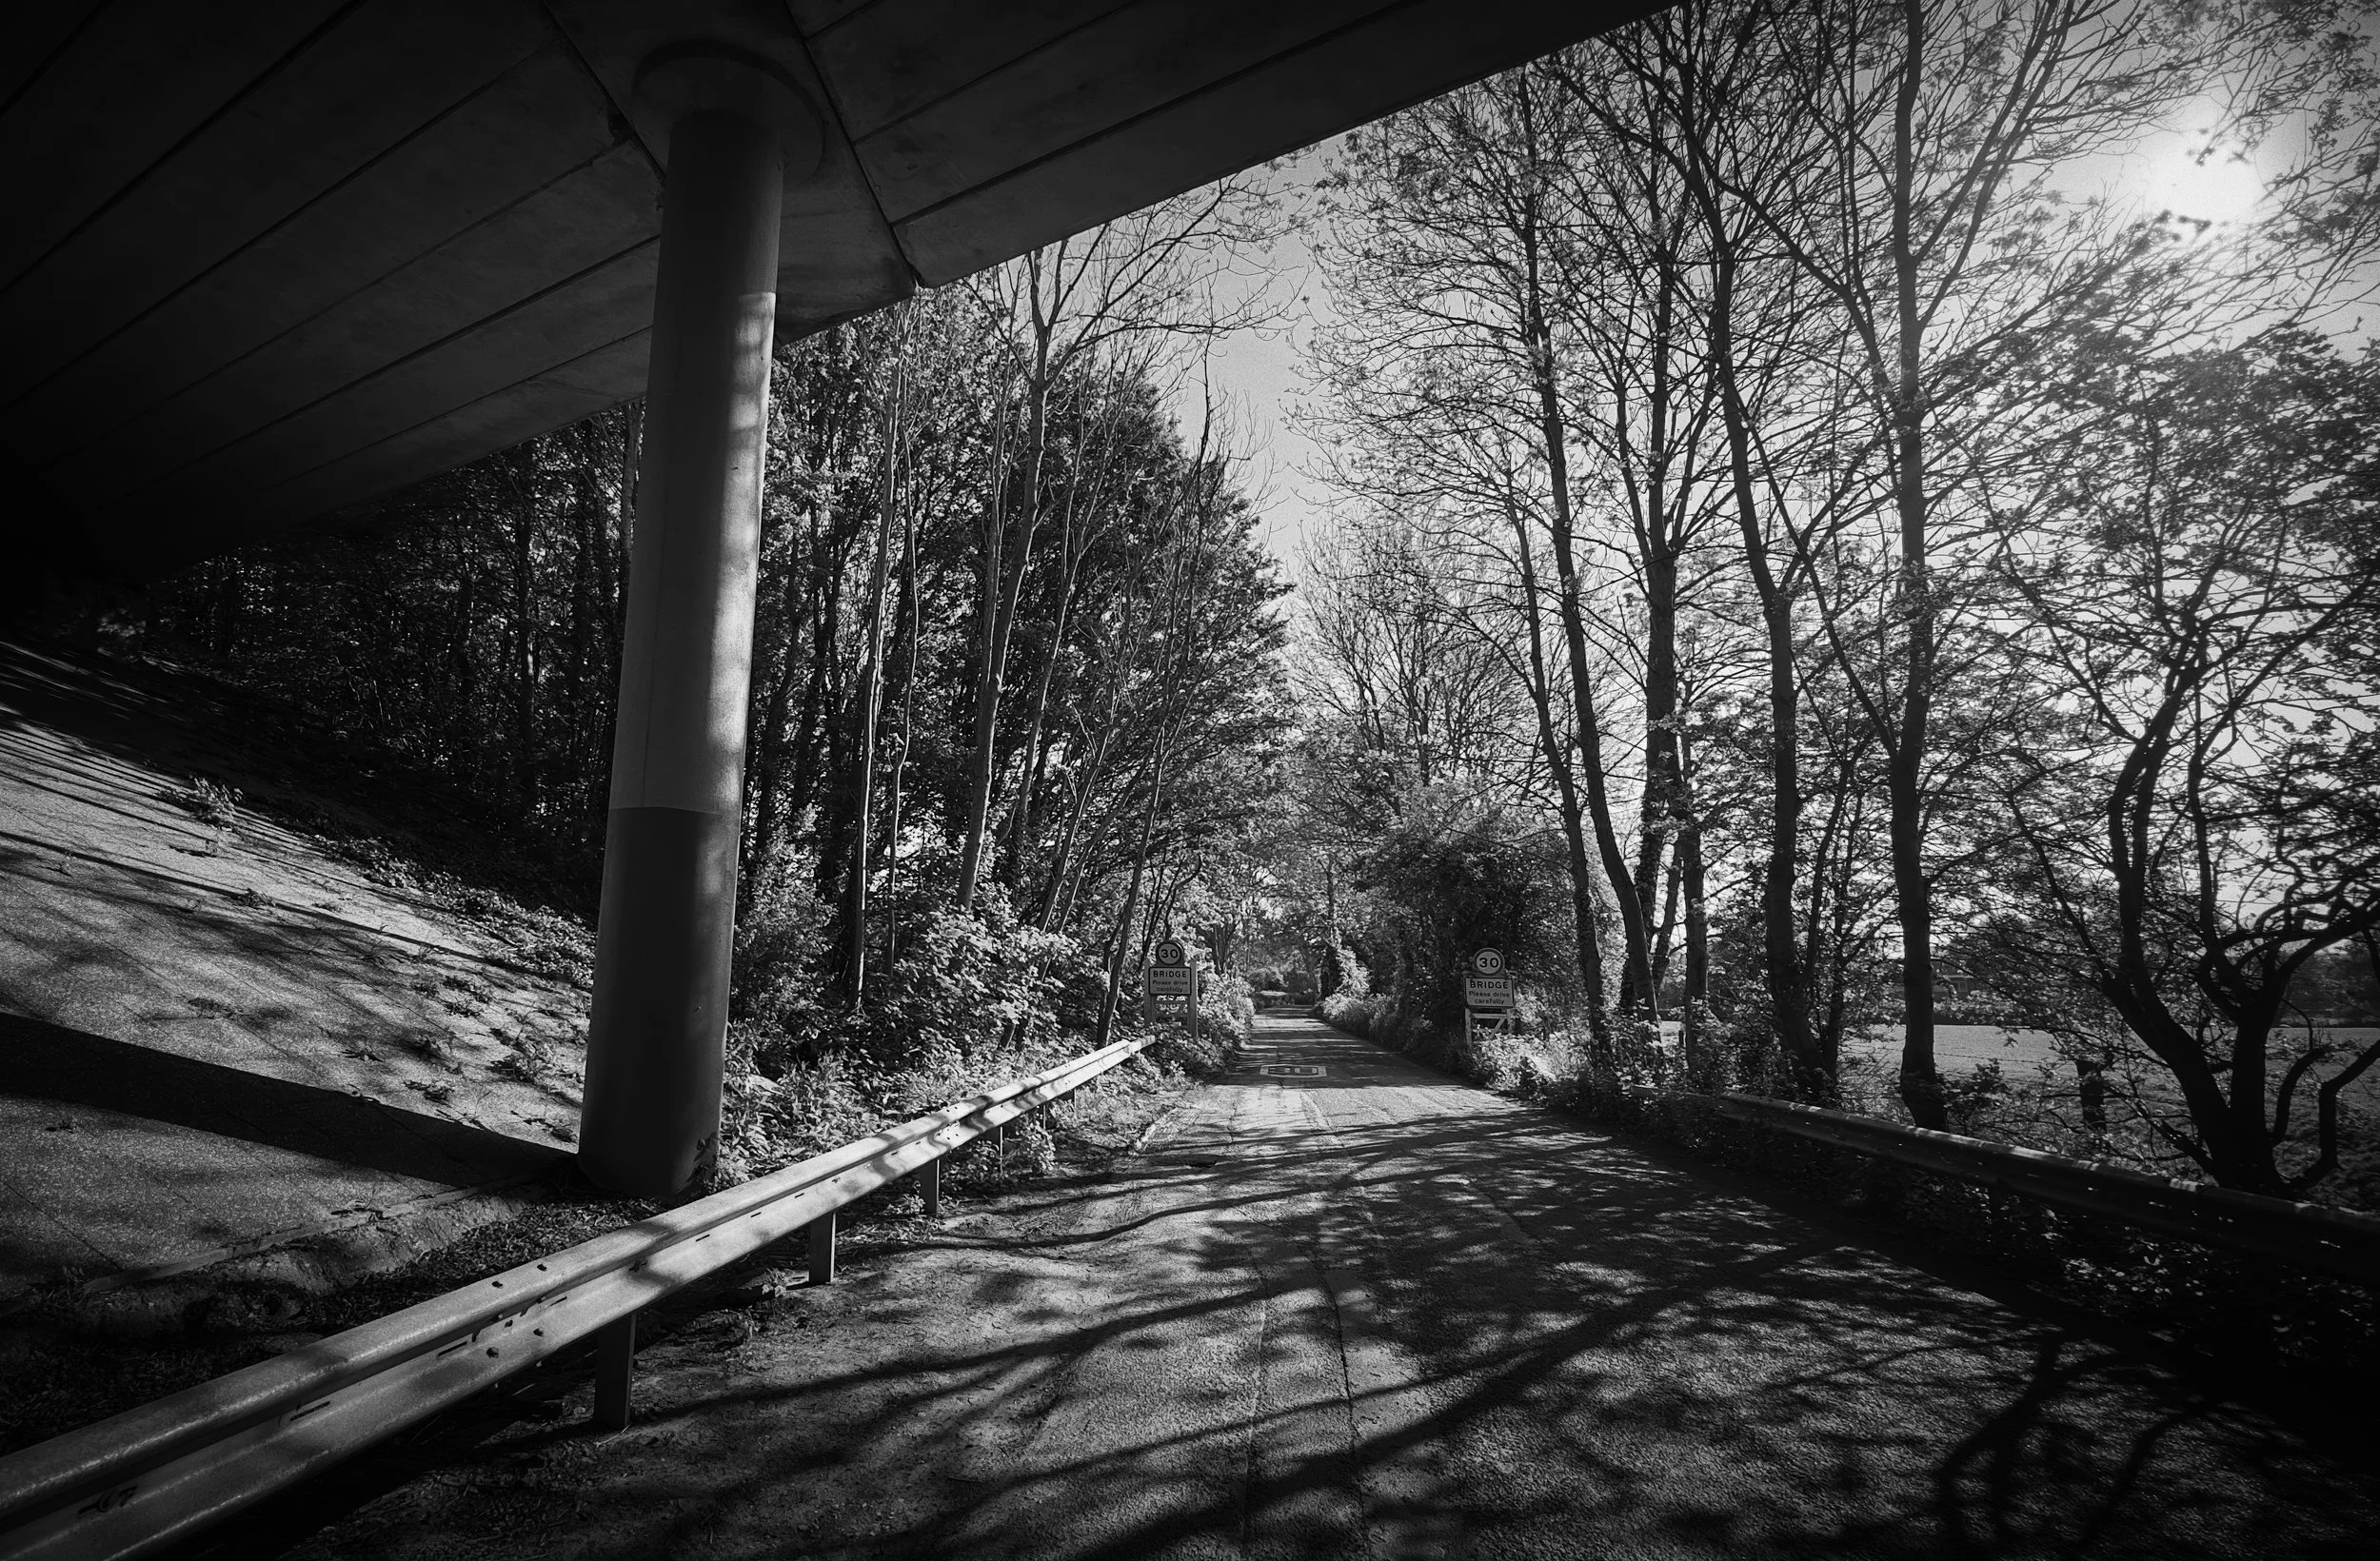
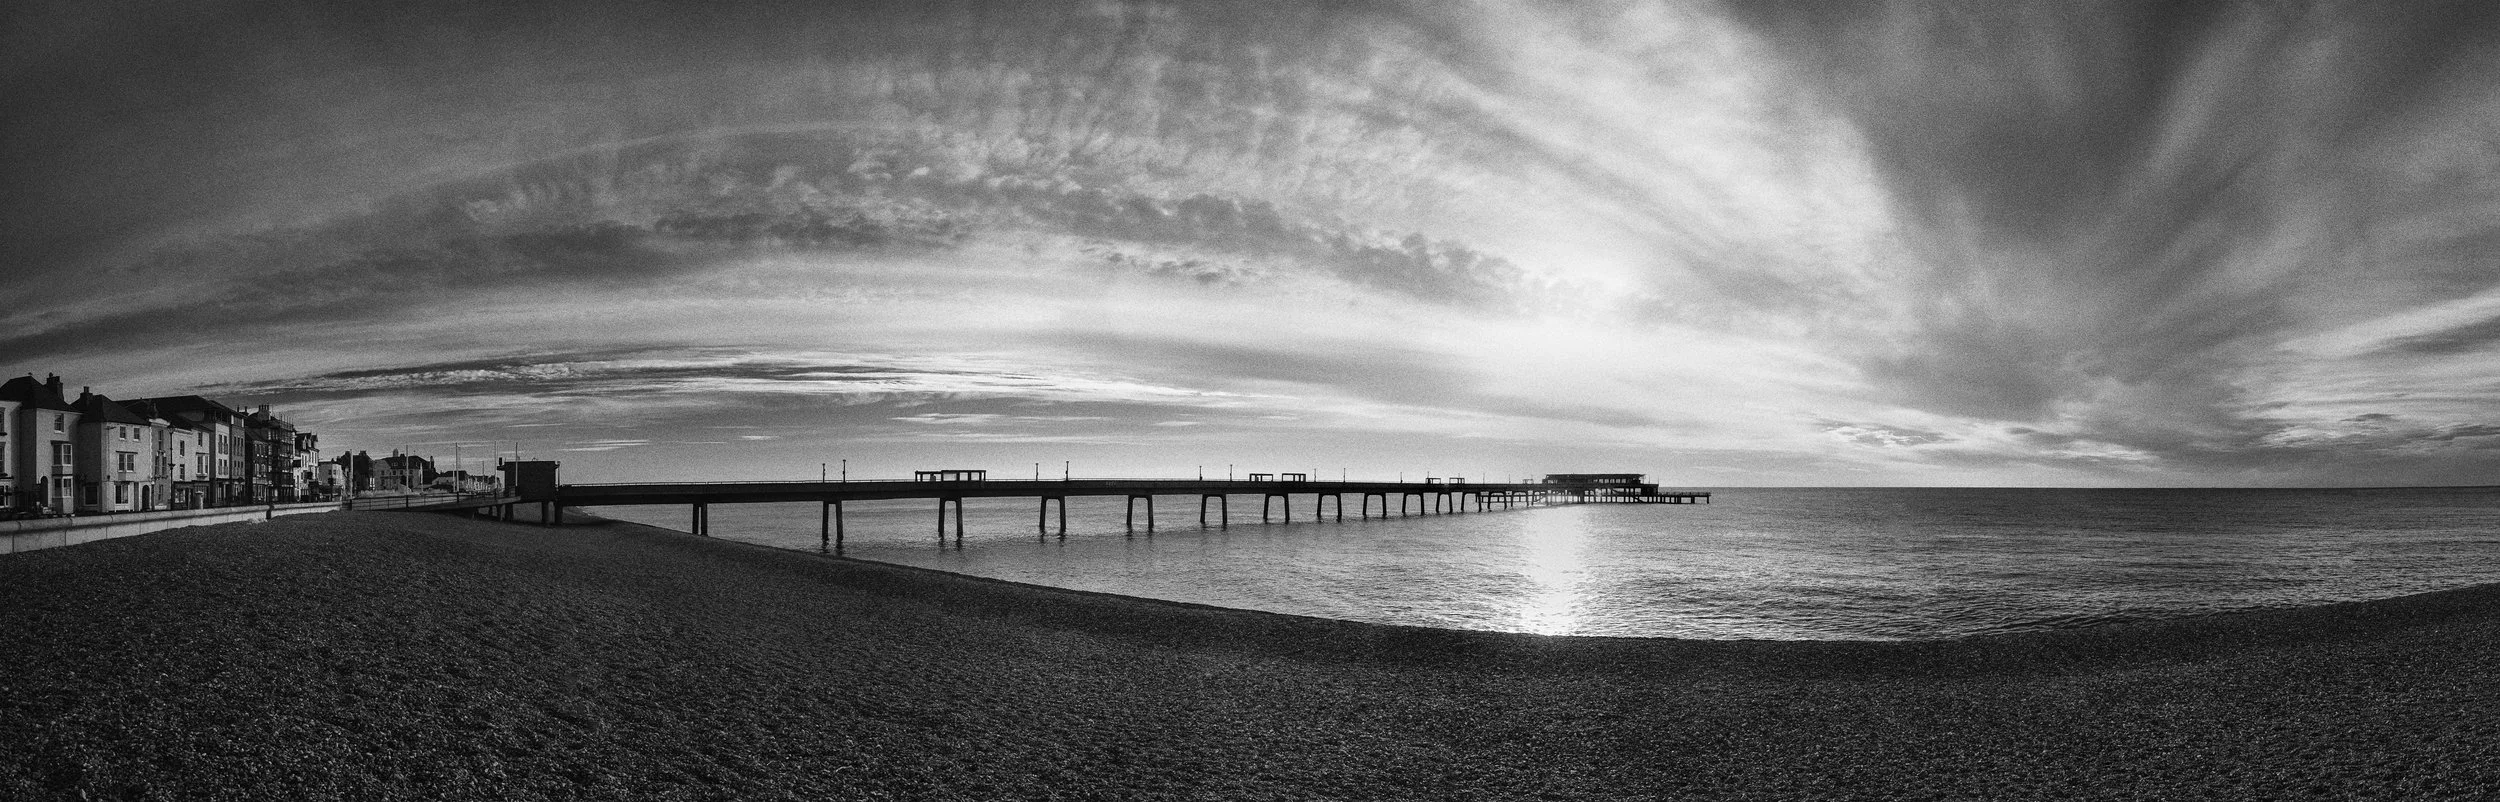
Urban and architectural silhouettes. Buildings, bridges, cranes, fire escapes, rooflines, the lattice of a transmission tower: the geometry of built environments against the sky. These subjects are not always dramatic in the way that sunset people-silhouettes are, but they have a formal elegance that suits the silhouette form. The right angle from which a bridge's arches frame each other, the way a row of industrial cranes creates an irregular skyline, the pattern of fire escape landings on the side of a building — this is silhouette as pure geometry. It works particularly well in black and white, where the absence of colour reinforces the formal, abstract quality of the image.
Night silhouettes. Using artificial light sources as backgrounds opens up a different range of possibilities. A figure walking past a lit shop window, their silhouette cast against the warm yellow rectangle. A couple standing against the neon of a city street. A single figure at the end of a pool of lamplight. The lower light levels mean slower shutter speeds, which means you will need either a tripod, a surface to rest the phone or camera on, or a very steady hand. The colour temperature variations between different artificial sources — the cool blue of LED street lighting, the warm orange of sodium lamps, the vivid mixed colours of neon signs — are not a problem to solve but a creative variable to use. Different light sources produce different background colours behind your silhouette, and choosing your position relative to them is part of the composition.


The cut-paper reference. There is a deliberate compositional choice available in silhouette portraiture that references the aesthetic of 18th-century cut-paper silhouette portraits: the profile view, with the subject in strict side-on position, against a clean neutral or gradient background, with total separation between the dark figure and the bright field. This is particularly effective for portrait subjects and gives the image a quality that is simultaneously archaic and very clean. Profile silhouettes work because the facial profile is among the most legible and distinctive of human outlines — even a simplified profile conveys identity, character, and age in a way that a front-on silhouette does not. Position your subject in profile, find a clean light source behind them, get the separation clean, and the image essentially makes itself.
Silhouette and reflection. This warrants its own mention as a creative approach because it is more than a compositional trick. The doubled shape in still water, the abstract pattern of a reflected tree broken across the surface, the near-symmetry of a figure and its reflection on wet sand: reflection silhouettes work because they introduce a second version of the dark shape that is familiar but slightly different — stretched, fragmented, distorted by surface movement. The figure is recognisable; the reflection is recognisable as the figure but is also something else. Shooting low, close to the reflective surface, intensifies the effect. A very slight breeze on a puddle that breaks the reflection into fragments is often more interesting than perfect stillness.
Processing Silhouettes
Most silhouette images benefit from post-processing, even if they were correctly exposed in the first place. The adjustments are not complicated, but they make a consistent difference.
The key processing moves are: Contrast up, Blacks down, Shadows down — these three together push the subject towards pure black and increase the tonal separation between the silhouette and the background. Then: Highlights and Whites adjusted to control how the background renders — if the sky is slightly blown, pulling the Highlights slider down can recover colour and detail; if it is correctly exposed, leaving it alone or slightly brightening it increases the contrast with the subject. Clarity or Texture applied to the background — not to the subject — can bring out detail in clouds or sky gradation that adds interest to the background.
When to push to pure black and when to leave shadow detail. A pure black silhouette works when the outline shape is the entire point — when the image is graphic, formal, or deliberately referencing the cut-paper aesthetic. It also works for subjects where internal detail would be distracting: people at distance, animals in motion, architectural elements. Shadow detail retained in the silhouette is appropriate when the subject is close enough that internal detail adds something — the texture of a person's hair against the light, the slight depth suggested by shadow in a face. The decision is not technical but compositional: what do you want the image to do?
Colour grading the background. In Lightroom or Lightroom Mobile, the HSL (Hue, Saturation, Luminance) panel gives you selective control over individual colour ranges in the background sky. Pulling the Luminance slider for the orange or red range down darkens those tones and makes sunset colours more saturated; pulling the Saturation slider for blue upwards deepens the upper sky. These adjustments affect only the background, since the subject is black and contains no recoverable colour information. In Snapseed, the Selective tool allows you to tap on specific areas of the background and adjust exposure, contrast, and saturation for that area independently, which is very useful for local sky adjustments.
Converting to black and white. When the background is flat, tonally uniform, or uninteresting in colour — an overcast white sky, a pale blue haze — black and white conversion can strengthen the image considerably. The conversion removes the muted, unappealing colour of the background and allows the tonal contrast between dark and light to do all the work. The approach is straightforward: convert to black and white, then boost Contrast and pull down Blacks. The luminance sliders in the black-and-white conversion panel allow you to control how individual original colours render as grey — boosting the blue luminance lightens the sky; reducing it darkens the sky and makes the silhouette separation more dramatic. Experiment with this; the effects are larger than you might expect.
Sharpening the outline. A small amount of Clarity or Texture applied to the silhouette edge can make the outline crisper and more defined, which reinforces the graphic quality of the image. Apply with restraint: too much creates haloing artefacts at the boundary between subject and background, which are obvious and unpleasant. A light touch — enough to make the edge feel precise rather than soft — is sufficient.
Apps for mobile processing. Lightroom Mobile handles everything described above with a full-featured HSL panel, selective adjustments, and the full range of tonal controls. Snapseed is slightly more accessible for quick adjustments, and its Selective tool for local adjustments is particularly useful for working on specific areas of the background. The standard editing tools in iOS Photos and Google Photos cover the basics (contrast, blacks, shadows, highlights) and are often sufficient for straightforward silhouette work without needing to export to a dedicated app.
Resources
This fascinating video from Clifford Pickett of the iPhone Photography School provides a handy guide to getting silhouette shots in street scenes, while on location in Guanajuato City in Mexico: “Have you ever tried silhouette photography with your iPhone? Silhouettes, where your subject appears dark against a bright background, make for really eye-catching photos. There’s just one problem… The iPhone camera automatically captures as much colour and detail as possible… Which is the exact opposite of what you need for silhouettes. But there is a simple solution! Watch this video, and discover a little-known trick that will outsmart the iPhone and give you stunning silhouette photos every time!”
Alan Schaller explains how he approaches silhouette photography in his usual inimitable style. Dad jokes abound, but the man does take some incredible photographs: “Silhouetting subjects is a useful tool for many different photography styles. Here I show you a few examples of how I like to use them around the streets of London. Enjoy!”
Give it a Try!
Exercise one: the golden-hour silhouette. In the hour before sunset on a clear or partly cloudy day, find a location with a clear view of the western horizon. Identify a subject with a strong, recognisable outline — a tree, a person, a bicycle, a structure — and position yourself so the subject is between you and the sun, with the subject against the sky rather than blending into the darker horizon. Tap the sky to expose for the background, lock the exposure with a long press, and shoot a sequence over the final 20–30 minutes before sunset. Watch how the colour and quality of the background changes as the sun drops: the light shifts from white-yellow to orange to deep red, and the colour temperature changes visibly. The same subject and the same composition will produce significantly different images ten minutes apart. Compare the results and note which exposure, which timing, and which exact framing gave you the strongest combination of subject outline and background.
Exercise two: the indoor window silhouette. Stand someone in front of a bright window — ideally a large window with strong daylight outside. Without using portrait mode, tap the bright window area (not the person) to expose for the light outside. Watch what happens to the person: they go dark. Ask them to turn to profile — a full side-on position — and try several poses. Experiment with having them stand still and having them move: raise one hand, turn slightly, lean. Notice that profiles read much more clearly than front-facing positions. If the person faces you full-on, their silhouette is readable as a person but tells you very little; in profile, it is immediately legible as a specific individual. Try also with the window further in the background versus close: moving the person closer to the window may introduce some rim light, creating a partial rather than a pure silhouette.
Exercise three: urban geometry. Find a bridge, a fire escape, a row of rooftops, a crane, or any piece of built environment with strong geometric lines. Work around it in the late afternoon when the sun is lower and there is more texture in the sky. Find angles where the lines of the structure create compositional shapes against the sky — the repeating arches of a bridge, the rectangular grid of a fire escape, the diagonal of a crane's boom against the open blue. Shoot the same subject in colour and in black and white, and compare. Try both the expected angle (front-on, straight) and unexpected angles (from below, tilted to make the geometry diagonal in the frame). Notice how much the image changes with camera position, and how the relationship between structure and sky shifts as you move. If you have time, return to the same subject at different times of day: the same geometry against a white noon sky and against a blue late-afternoon sky are different photographs.